
HOW TO: Install heated seats (04-06 RA, 02-06 lancer)
 Sep 9, 2010, 12:37 AM
#1
Evolving Member
Thread Starter
iTrader: (4)

Join Date: May 2010
Location: Regina, SK
Posts: 433
Likes: 0
Received 0 Likes
on
0 Posts
HOW TO: Install heated seats (04-06 RA, 02-06 lancer)
***** It has been brought to my attention that the LS model (maybe the ES) have seat covers glued to the foam. This will be an EXTRA PITA so be careful when removing the seat cover. You may want to use an adhesive (velcro for easy later access) to secure the seat cover back down so it remains tight to the cushion************
This is a tutorial on how to install seat heaters in to your 04-06 lancer ralliart or 02-06 lancer. These are great if your area is cold for a long time (4-5 months of freezing winter from where I'm from), or if you want to relieve a sore back that alot of us get from cruising around, or both!
Recently I've purchased a set of carbon fiber seat heaters from ebay (seller is autowarm, can also be found at heatedseatkits.com) and figured I'd share how to install them for those who are interested in adding heated seats to their lancer!
List of tools you will need:
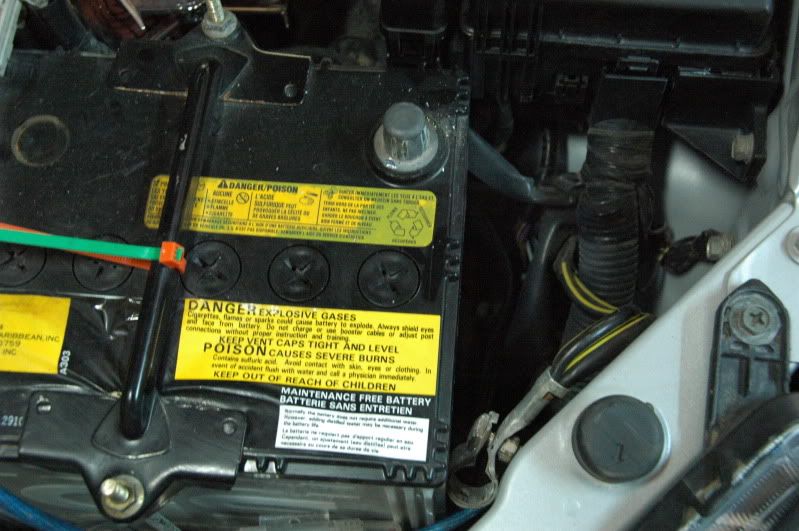
1) First things first, this is going to be an electrical job so don't be a shmuck and disconnect that negative battery terminal and make it look like so
2) To begin removing the seat from the car you need to remove the center console in order to access the seat mounting bolt, do this by flipping the lid on your center console and remove the two philips screws. Pull it out of the vehicle.
3) Adjust the seat so the seat bottom is all the way up, the seat is tilted all the way forwards. Remove the head rest and put the steering wheel up as far as it will go
4) Adjust the seat on the track to remove the 4 mounting bolts, I do not know what the tq spec is on these bolts so pay attention to how easy or difficult they may come off
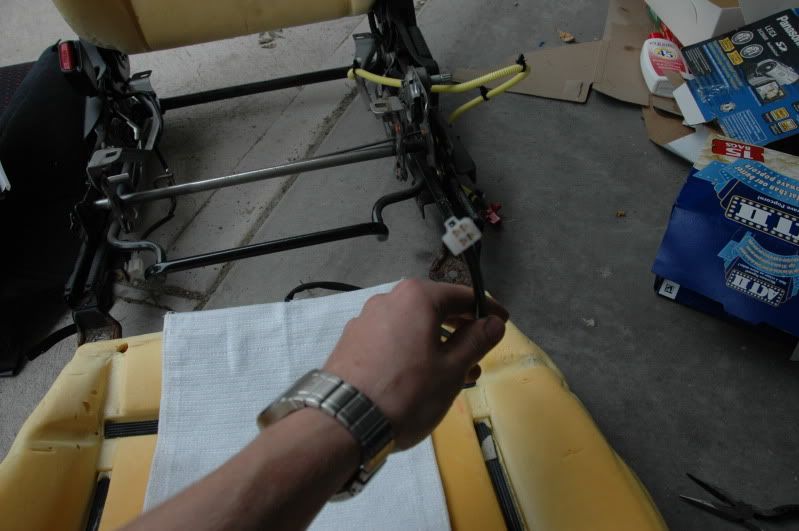
5) The seat will still move on the track, slide it back and tip it backwards to unclip the seatbelt wiring and the air bag wiring (flip the green cap, push the red end)
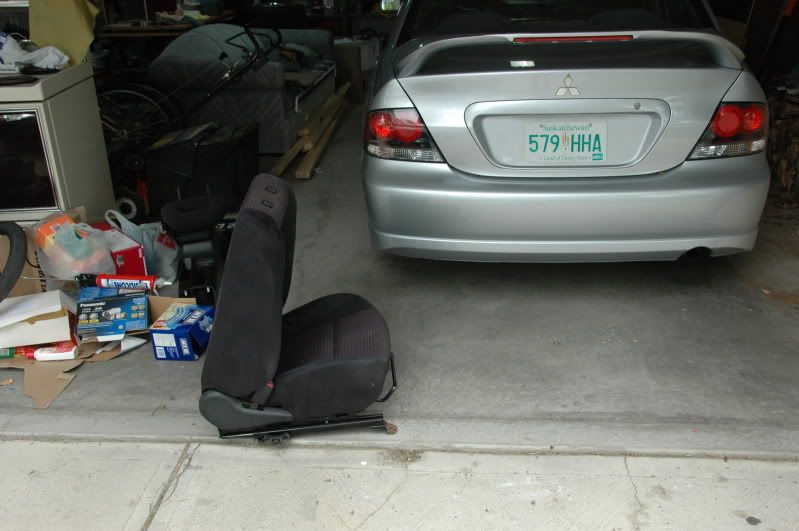
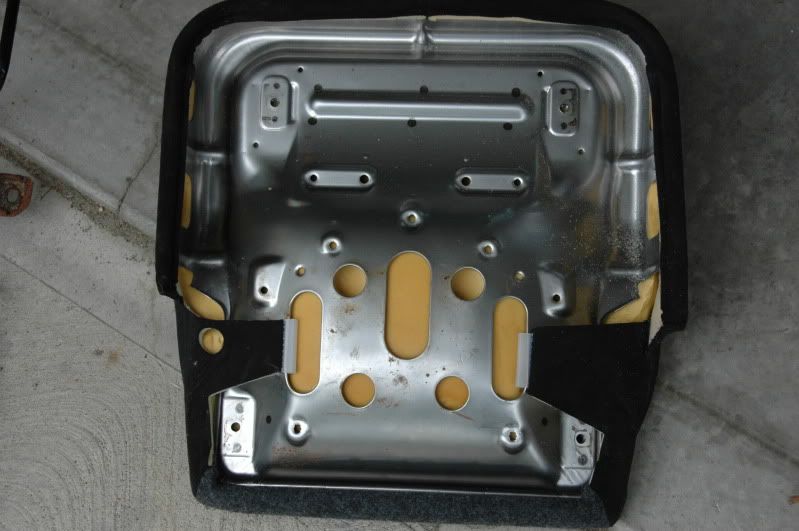
6) pull the seat out from the car being careful not to ding any interior or scratch your door jam. If you have a work bench, place the seat there. In my case I had enough room to use some of the floor and some of my drive way...
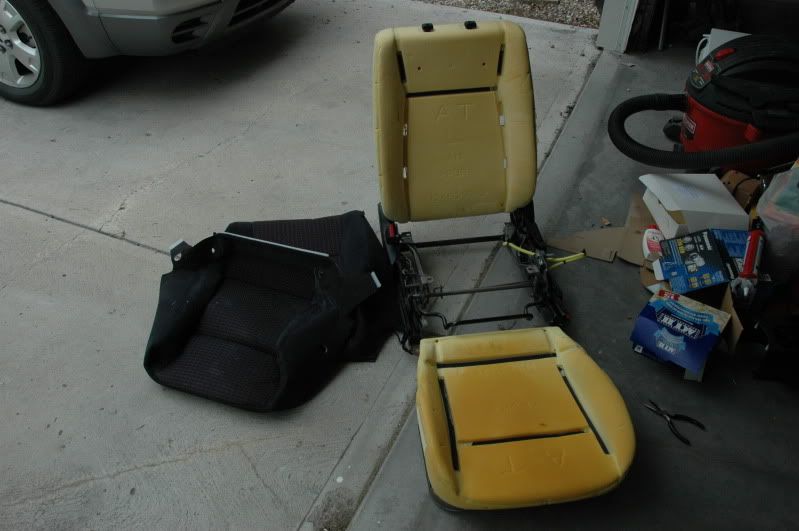
7) with the seat lying forwards unbolt the 4 gold bolds from the bottom of the seat
8) carefully use a flat head or needle nose plyers ( or if you have a clip puller) remove the 2-3 clips holding the air bag wire to the metal seat frame, this is where I receive cut #1..
9) Using needle nose plyers or a flat head, remove the U-clip holding the knob on to the side of the seat, pull the knob off. you should now be able to remove the seat bottom
10) go around to the back of the seat, trace the zippers to the bottom of the seat. the pullers should be folded inside, pull them out from their hiding spot and unzip them, as well as unclipping the big plastic clip at the bottom, found it easier to slide them sideways apart before prying them apart
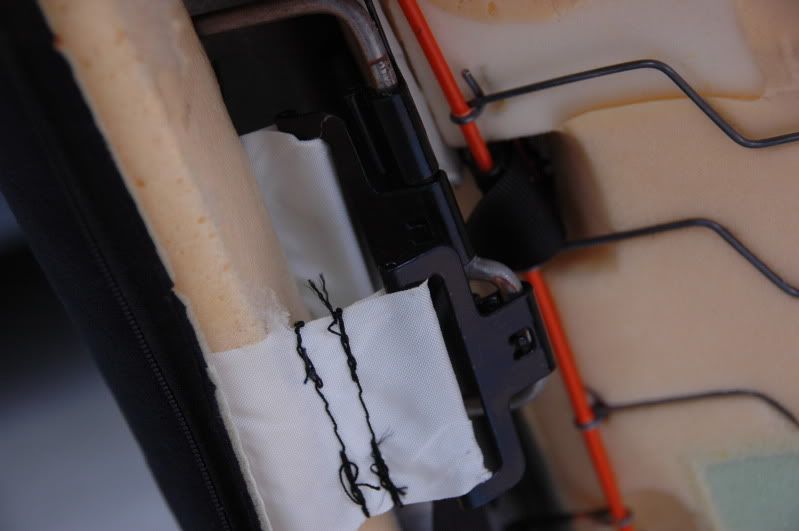
11) peeling the fabric around a bit you'll see these 3 big black clips on the upper left side attached to the air bag fabric, sort of push these around all the way and pop them off. make note of which one was where (it's an air bag dude). There are also 4 clips poking through the foam attached to the orange seat frame wire, unclip those as well.
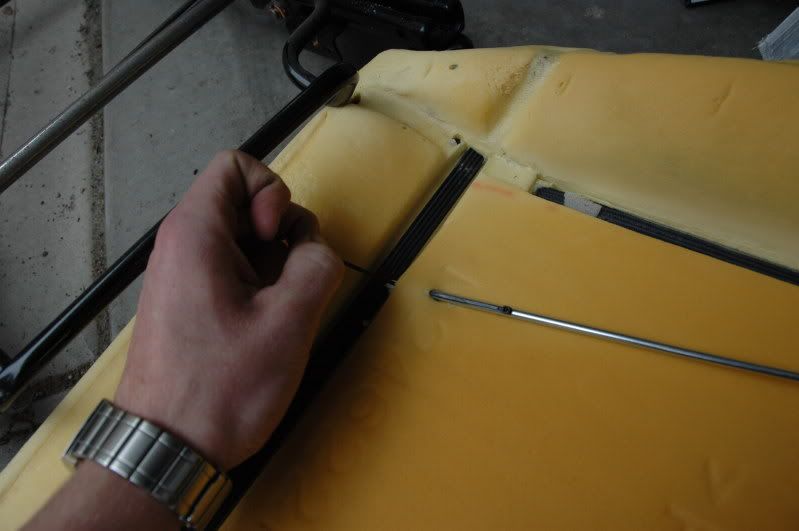
12) Carefully pull off the rest of the fabric on the seat back, and be extremely careful when taking the fabric off around where the head rests mount in order to not rip it. the fabric is velcroed on to the foam, peel off put it aside.
13) back to the seat bottom, there are two clips coming from the side to the middle, push them towards the opposite sides to unclip and release them. Work the edge of the fabric off, the plastic underneath is kind of a zip-lock idea. be patient when taking this off, you don't want to warp/stretch/break this plastic edging.
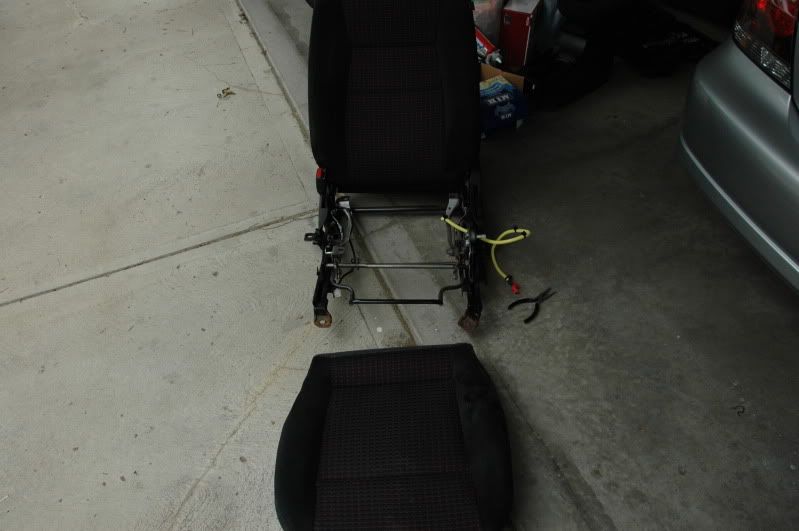
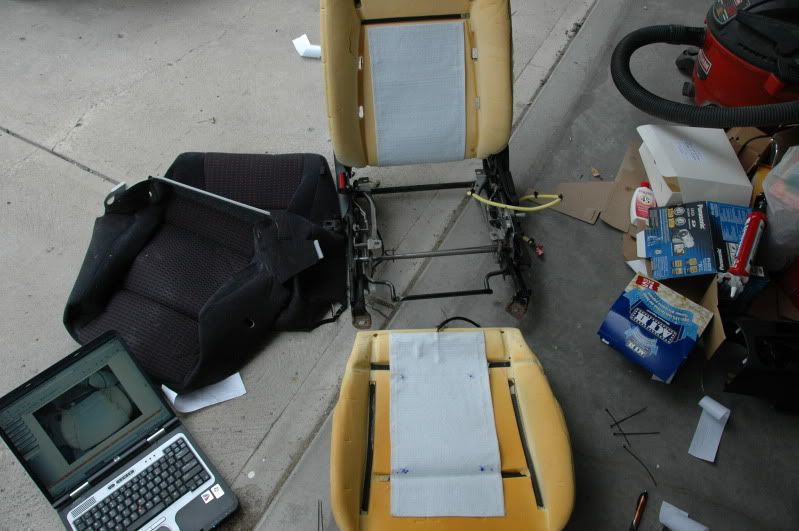
Here's what you should now have! The harder part is now over. Have a snack, have a smoke, whatever, take a break.
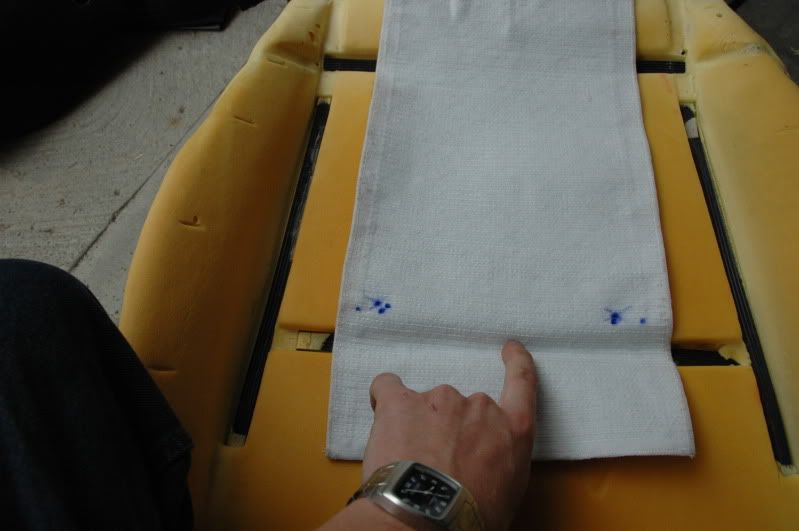
14) mock up where you want the seat heaters to go, fuzzy side up. Once your're happy with where they sit, clean up the foam, lay on some adhesion promoter, and stick them on. The 4 wire harness goes on the seat bottom, 2 wire harness goes on the seat back.
Luckily for us our seats do not have hog ties, therefore you don't have to use the zip ties provided to keep the fabric and seat heaters on. If you don't trust the 3M tape on the bottom side of these and wish to zip tie then here's a quick tip
Here's what you should now have
15) Now, reverse the process and put all the fabric back on the foam portions and put your seat back together. Be Extremely Careful: This is where I had cuts number 2 and 3. Be sure to make some slits in the fabric in order to let the wires hang freely and discretely from the bottom back of the seat.
The Switch(es)
16) using a marker or a pen, figure out exactly where you want to locate your switch or switches. mark where the middle of where the ~2cm hole is going to be. In my case I decided to put the switches on the center console already removed from the vehicled (easy to reach in the car, easy to locate, and I knew that nothing electrical is going to get drilled in to, it's a safe bet)
17) using the drill and the 1/2" drill bit, drill your holes in the desired location. Once the hole is drilled, use the 1/2" drill bit to work the edges of the hole out to approximately 2 cm. You'll know the hole is big enough to start filing when the harness clip for the switch can pass through the drilled hole.
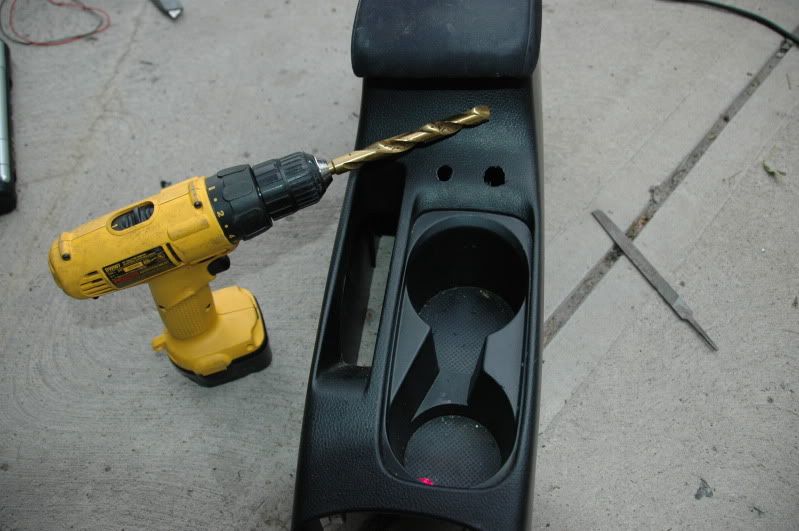
18) file and test fit your hole until the switch fits like butter.
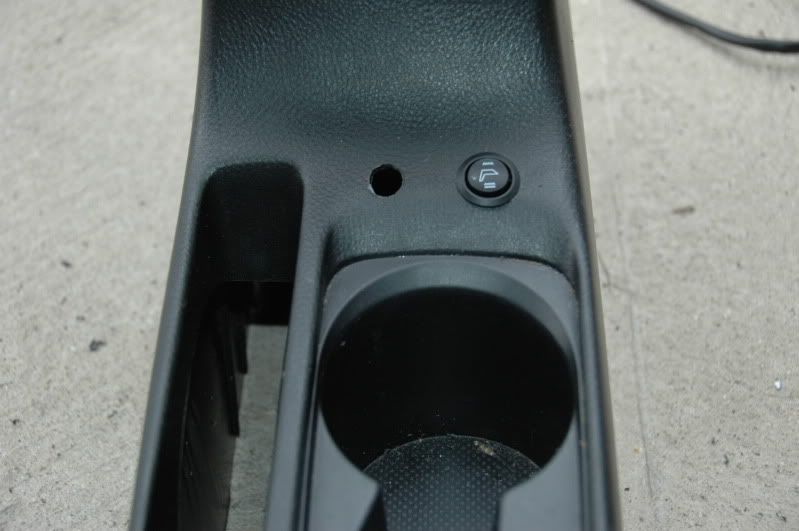
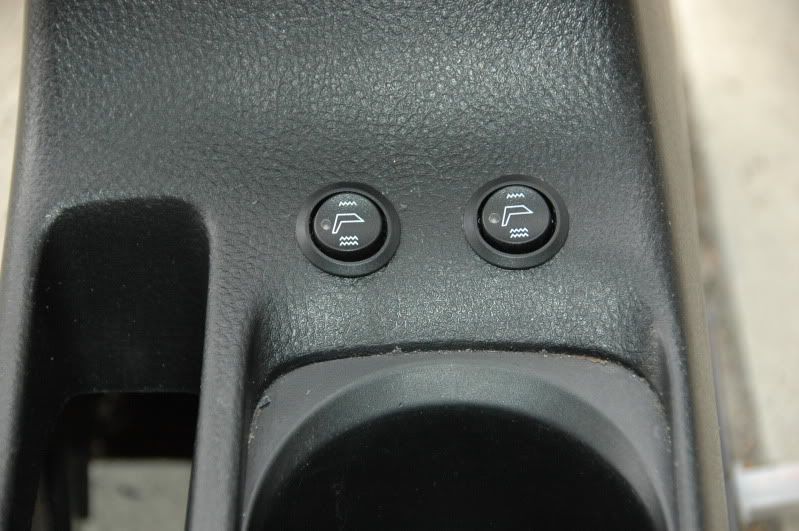
Here's how my switches look once they're installed in the center console:
Wiring, See post #3
The instructions provided tell you that the power wire can either be attached right to the battery, in to the ignition accessory, in to the fuse box, or in to a 12v outlet (or cigarette lighter). As well as these devices should be grounded to earth on the car chasis, Do Not Ground These To An Existing Ground Wire, cars have high amperage and low voltage, and you DO NOT want to over amp a wire (circuit) and cause it to fry and bbq your lancer.
The 12v power wire provided however does not reach up to the battery, and I had a hell of a time trying to find the correct fuseable circuit in the fuse box (missing fuses and such?), so I wired only one seat in to the cigarette lighter (which is 15 amps, the seat heaters are 10 amps, DO NOT SPLICE IN 2 SEAT HEATERS AT THIS SOURCE, it is a fire risk. Thank you.) you will have to find another constant 12v power source to tap in to, I'd used my 10amp ignition for my head unit, but make sure it is the same 10 amp amperage, I cannot stress that enough!
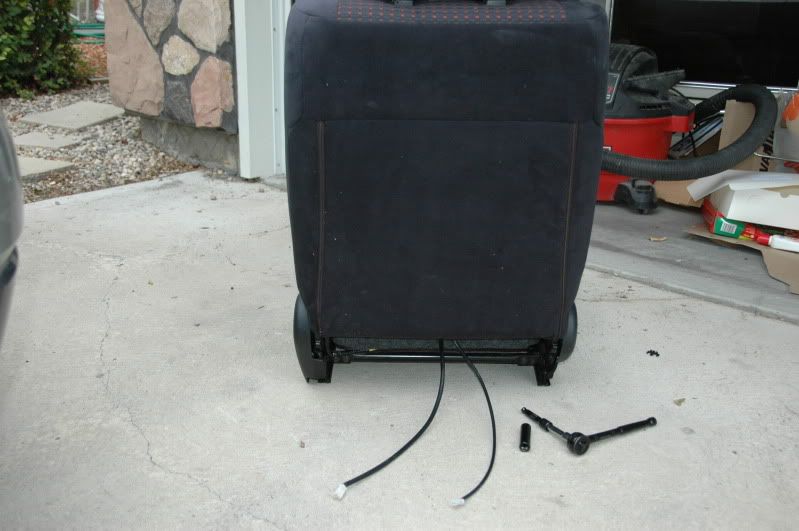
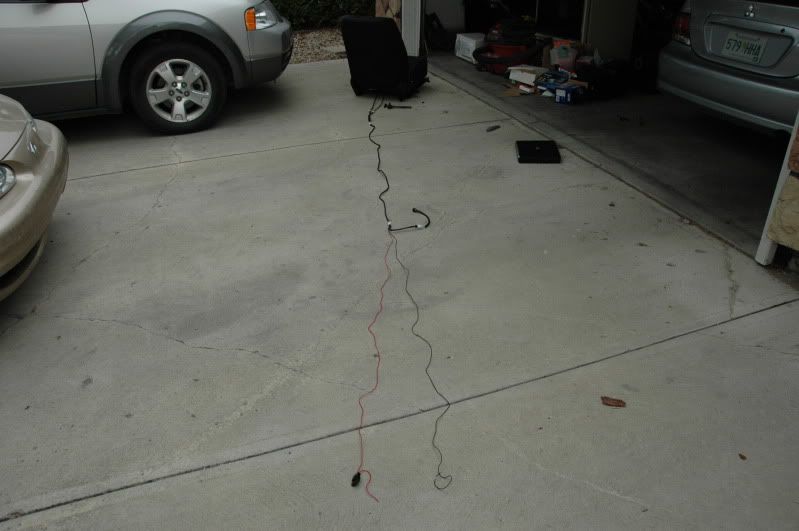
19) Carefully place the seat back in to the car and bolt it back down, be careful fiddling with the adjustment to get in within the door, thats where I got cut #4. Mock up where you want your 12v. ground, and seat heater harness to go
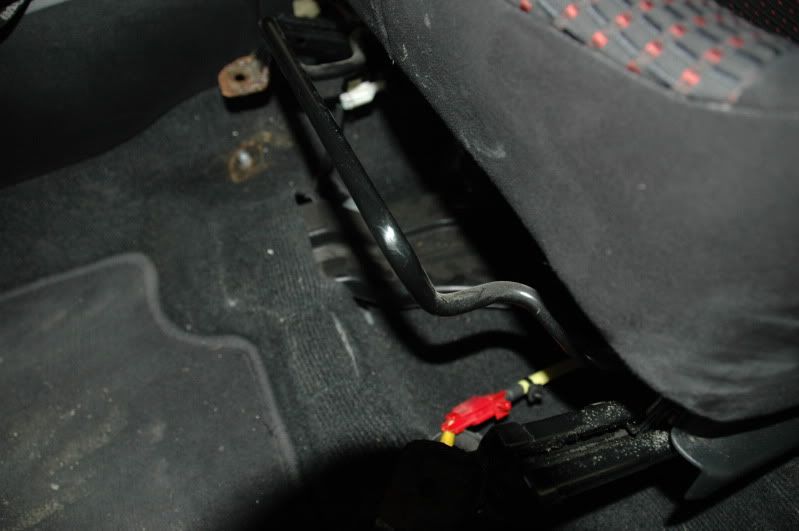
19.5) Hide all the wires underneath trim panels or underneath the carpet, make sure that none of the wires come any where near the seat rail.
20 a) Originally I chose to ground out the seat heaters to the bottom shoulder support in the back seat, the wires were super easy to run. Pull up on the bottom of your back seat and it should pop right off. There are two bolts holding in what looks like two long steel U's, unbolt these. I used a circular wire connector and crimped it to the end of my ground wire.
Use your sand paper to wear off the paint around the bolt holes to bare steel. Place the ground over the hole, lay the bracket over top, and bolt right back in. If you choose to ground yours out here you will find it is a very solid ground.
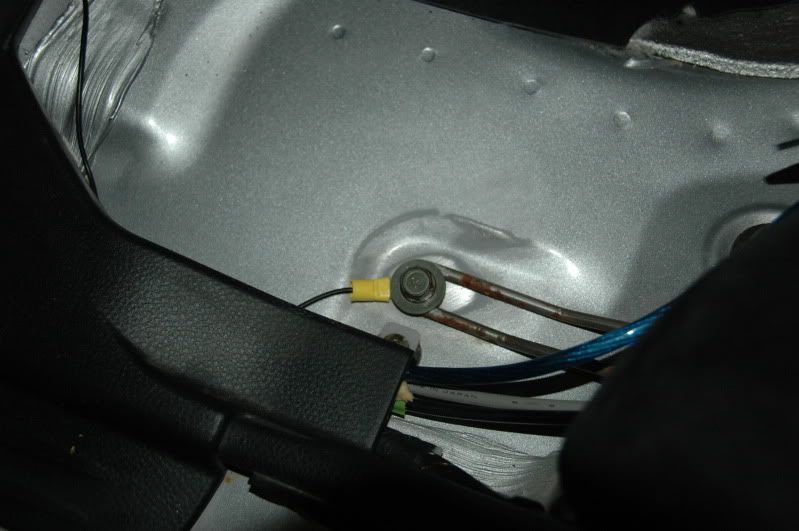
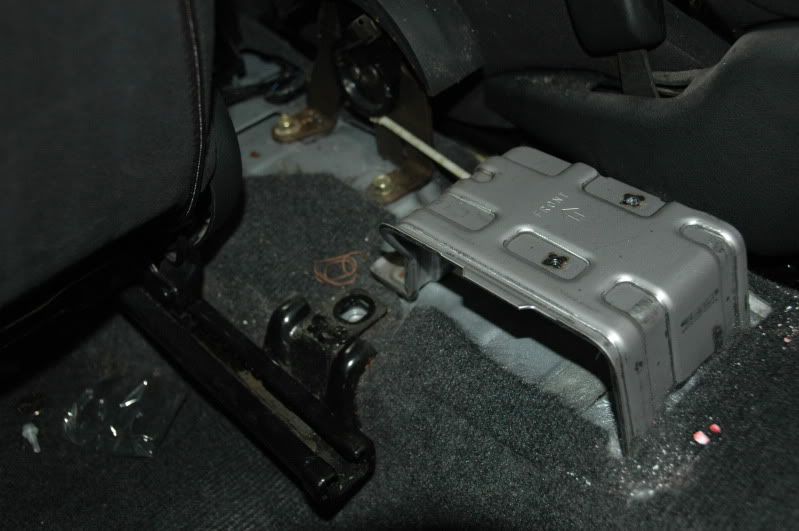
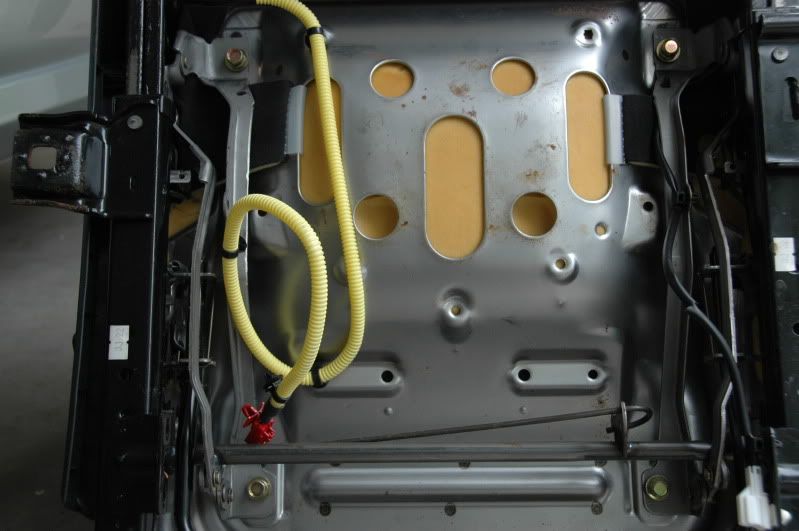
20 b) I'd changed the grounding location to the metal bracket under the center console in pic#2, it only made sense to put it their after pondering my install months down the road. There's no sanding involved, the wiring can shortened to a much more convenient amount and it can be cleanly hidden right underneath the center console.
21) Put your back seat back in, take a step back and look around. What looks different? Well nothing really besides a new fandangled switch sitting somewheres in your car (and that's what's awesome about these kits, they leave the seats looking OEM with a switch that looks like its supposed to be there) Re-connect your negative terminal on your battery. Fire your car up and let it idle for 10 minutes in order for the ecu to learn itself. While your car is running test to make sure your new heated seats work, setting one (green light) is low heat, setting two (red light) is high heat. The low setting is actually surpisingly warm, very comfortable and just the right amount to loosen ones back or take away the chills, after the heater warms up it can grow to be quite hot (but comfy). These may take 5-10 min to heat up their first go around. the high setting is actually a bit much for right now, but when it hits -50C at some point this winter I won't be complaining one bit

Enjoy and share the warmth - nerdbotSKRA
This is a tutorial on how to install seat heaters in to your 04-06 lancer ralliart or 02-06 lancer. These are great if your area is cold for a long time (4-5 months of freezing winter from where I'm from), or if you want to relieve a sore back that alot of us get from cruising around, or both!
Recently I've purchased a set of carbon fiber seat heaters from ebay (seller is autowarm, can also be found at heatedseatkits.com) and figured I'd share how to install them for those who are interested in adding heated seats to their lancer!
List of tools you will need:
- flat head screw driver (function varies)
- philips screw driver
- clip puller if you have one
- 10-14 mm sockets to do a variety of things (can't remember which do what at this point, 12-14 preferably being deep)
- ratchet with 6-8" extension
- wire cutters/strippers
- drill
- 1/2" drill bit
- needle nose plyers
- file
- seat heaters with wiring harness and elements
- adhesion promoter
- patience. the seat metal is extremely sharp, I cut myself a total of 4 times on one seat alone.
- Sand paper
- electrical connectors, quick splices, whatever you want to power and ground these
- 2-3 hours of your time per seat
1) First things first, this is going to be an electrical job so don't be a shmuck and disconnect that negative battery terminal and make it look like so
2) To begin removing the seat from the car you need to remove the center console in order to access the seat mounting bolt, do this by flipping the lid on your center console and remove the two philips screws. Pull it out of the vehicle.
3) Adjust the seat so the seat bottom is all the way up, the seat is tilted all the way forwards. Remove the head rest and put the steering wheel up as far as it will go
4) Adjust the seat on the track to remove the 4 mounting bolts, I do not know what the tq spec is on these bolts so pay attention to how easy or difficult they may come off
5) The seat will still move on the track, slide it back and tip it backwards to unclip the seatbelt wiring and the air bag wiring (flip the green cap, push the red end)
6) pull the seat out from the car being careful not to ding any interior or scratch your door jam. If you have a work bench, place the seat there. In my case I had enough room to use some of the floor and some of my drive way...
7) with the seat lying forwards unbolt the 4 gold bolds from the bottom of the seat
8) carefully use a flat head or needle nose plyers ( or if you have a clip puller) remove the 2-3 clips holding the air bag wire to the metal seat frame, this is where I receive cut #1..
9) Using needle nose plyers or a flat head, remove the U-clip holding the knob on to the side of the seat, pull the knob off. you should now be able to remove the seat bottom
10) go around to the back of the seat, trace the zippers to the bottom of the seat. the pullers should be folded inside, pull them out from their hiding spot and unzip them, as well as unclipping the big plastic clip at the bottom, found it easier to slide them sideways apart before prying them apart
11) peeling the fabric around a bit you'll see these 3 big black clips on the upper left side attached to the air bag fabric, sort of push these around all the way and pop them off. make note of which one was where (it's an air bag dude). There are also 4 clips poking through the foam attached to the orange seat frame wire, unclip those as well.
12) Carefully pull off the rest of the fabric on the seat back, and be extremely careful when taking the fabric off around where the head rests mount in order to not rip it. the fabric is velcroed on to the foam, peel off put it aside.
13) back to the seat bottom, there are two clips coming from the side to the middle, push them towards the opposite sides to unclip and release them. Work the edge of the fabric off, the plastic underneath is kind of a zip-lock idea. be patient when taking this off, you don't want to warp/stretch/break this plastic edging.
Here's what you should now have! The harder part is now over. Have a snack, have a smoke, whatever, take a break.
14) mock up where you want the seat heaters to go, fuzzy side up. Once your're happy with where they sit, clean up the foam, lay on some adhesion promoter, and stick them on. The 4 wire harness goes on the seat bottom, 2 wire harness goes on the seat back.
Luckily for us our seats do not have hog ties, therefore you don't have to use the zip ties provided to keep the fabric and seat heaters on. If you don't trust the 3M tape on the bottom side of these and wish to zip tie then here's a quick tip
- Do not poke holes near the top near the wires at the ends of the elements
- Do not poke holes in any area where there is 3M tape
- holes should be in section of carbon weave, fabric only, do not break the element inside
- If you must cut holes, according to the instructions they are to be in triangles, as well as patched up with the heat resistant tape provided
- element CAN be cut to fit, but that sections width by width will not be heated
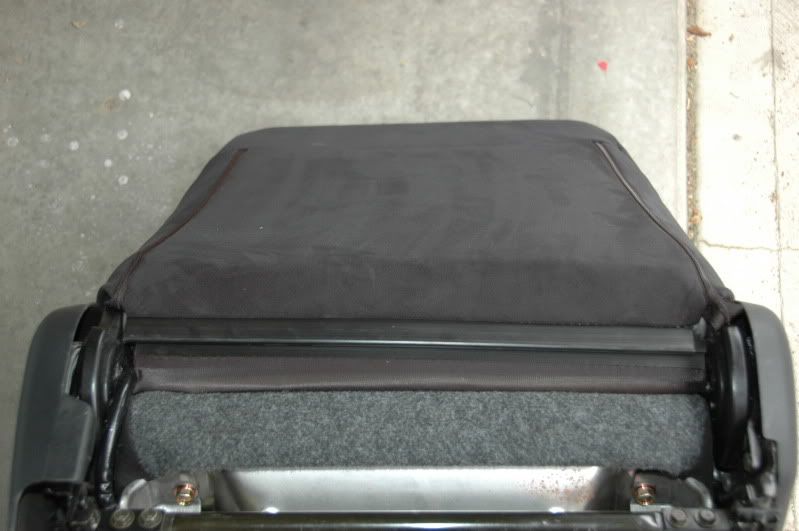
Here's what you should now have
15) Now, reverse the process and put all the fabric back on the foam portions and put your seat back together. Be Extremely Careful: This is where I had cuts number 2 and 3. Be sure to make some slits in the fabric in order to let the wires hang freely and discretely from the bottom back of the seat.
The Switch(es)
16) using a marker or a pen, figure out exactly where you want to locate your switch or switches. mark where the middle of where the ~2cm hole is going to be. In my case I decided to put the switches on the center console already removed from the vehicled (easy to reach in the car, easy to locate, and I knew that nothing electrical is going to get drilled in to, it's a safe bet)
17) using the drill and the 1/2" drill bit, drill your holes in the desired location. Once the hole is drilled, use the 1/2" drill bit to work the edges of the hole out to approximately 2 cm. You'll know the hole is big enough to start filing when the harness clip for the switch can pass through the drilled hole.
18) file and test fit your hole until the switch fits like butter.
Here's how my switches look once they're installed in the center console:
Wiring, See post #3
The instructions provided tell you that the power wire can either be attached right to the battery, in to the ignition accessory, in to the fuse box, or in to a 12v outlet (or cigarette lighter). As well as these devices should be grounded to earth on the car chasis, Do Not Ground These To An Existing Ground Wire, cars have high amperage and low voltage, and you DO NOT want to over amp a wire (circuit) and cause it to fry and bbq your lancer.
The 12v power wire provided however does not reach up to the battery, and I had a hell of a time trying to find the correct fuseable circuit in the fuse box (missing fuses and such?), so I wired only one seat in to the cigarette lighter (which is 15 amps, the seat heaters are 10 amps, DO NOT SPLICE IN 2 SEAT HEATERS AT THIS SOURCE, it is a fire risk. Thank you.) you will have to find another constant 12v power source to tap in to, I'd used my 10amp ignition for my head unit, but make sure it is the same 10 amp amperage, I cannot stress that enough!
19) Carefully place the seat back in to the car and bolt it back down, be careful fiddling with the adjustment to get in within the door, thats where I got cut #4. Mock up where you want your 12v. ground, and seat heater harness to go
19.5) Hide all the wires underneath trim panels or underneath the carpet, make sure that none of the wires come any where near the seat rail.
20 a) Originally I chose to ground out the seat heaters to the bottom shoulder support in the back seat, the wires were super easy to run. Pull up on the bottom of your back seat and it should pop right off. There are two bolts holding in what looks like two long steel U's, unbolt these. I used a circular wire connector and crimped it to the end of my ground wire.
Use your sand paper to wear off the paint around the bolt holes to bare steel. Place the ground over the hole, lay the bracket over top, and bolt right back in. If you choose to ground yours out here you will find it is a very solid ground.
20 b) I'd changed the grounding location to the metal bracket under the center console in pic#2, it only made sense to put it their after pondering my install months down the road. There's no sanding involved, the wiring can shortened to a much more convenient amount and it can be cleanly hidden right underneath the center console.
21) Put your back seat back in, take a step back and look around. What looks different? Well nothing really besides a new fandangled switch sitting somewheres in your car (and that's what's awesome about these kits, they leave the seats looking OEM with a switch that looks like its supposed to be there) Re-connect your negative terminal on your battery. Fire your car up and let it idle for 10 minutes in order for the ecu to learn itself. While your car is running test to make sure your new heated seats work, setting one (green light) is low heat, setting two (red light) is high heat. The low setting is actually surpisingly warm, very comfortable and just the right amount to loosen ones back or take away the chills, after the heater warms up it can grow to be quite hot (but comfy). These may take 5-10 min to heat up their first go around. the high setting is actually a bit much for right now, but when it hits -50C at some point this winter I won't be complaining one bit
Enjoy and share the warmth
- nerdbotSKRA
Last edited by nerdbotSKRA; Jan 28, 2012 at 12:49 PM.
 Sep 9, 2010, 07:48 AM
#2
Newbie
iTrader: (1)

Join Date: Sep 2009
Location: Queens,NY
Posts: 68
Likes: 0
Received 0 Likes
on
0 Posts
very nice tutorial. I think i might try this in the near future. the switch looks very very clean and almost stock, and may even increase resale value of your car. good job bro
Jan 29, 2011, 12:33 PM
#3
Evolving Member
Thread Starter
iTrader: (4)
Join Date: May 2010
Location: Regina, SK
Posts: 433
Likes: 0
Received 0 Likes
on
0 Posts
I thought I would bump this up for anyone interested, considering winter has settled in for awhile.
UPDATE:
I'd changed the location of where to ground these kits out (far more recommended for a cleaner easier wiring job), reflecting over how I'd put these in back when, I'd looked back at the photos and decided that the metal bracket in which the center console sits (2 screws) is a much more ideal place to ground these things to (obivously, duh, haha) there's no sanding involved, shorter wire lengths, can fully hide the wire under the console with nothing even peeking out, I'm a hawk for clean wiring haha. See pic#2..
Also, there is an extra length of wire given between the relay and the power/ground (pic#19) and it is kind of annoying to hide the bulk under the carpet. There was an easy solution, after comparing the wiring harness clips I'd removed this longest segment of wire after figuring it is given as an extension to install these in back seats as well. Clip the relay harness directly to the switch and shorten the wiring harness to a more then convenient length, all I'd had to do was tuck this under a gap below the floor vents below the seats, which holds in it place and hides it perfectly.
After having these installed and using them everyday since early october until now, I have experienced no problems with shorting/malfunctions/failures of any kind, the guys at my dealer are kind of shocked their $200 not including installing fees kit (the same thing I have lol) got shown up by an $80 kit installed by myself. Later down the road a failure of some kind is to be expected, considering the elements are a moving part that have pressure applied to them everyday (even OEM fail eventually due to wear) but I don't think I'll be worrying about the provided 2 year, 30 000 mile warranty. This kit is warm before my car is, and they provide enough heat to give warmth and comfort on days where the temperature was anywhere between -10C to -50C.
Last edited by nerdbotSKRA; Jan 29, 2011 at 12:46 PM.
Jan 30, 2011, 01:08 AM
#5
Evolving Member
Thread Starter
iTrader: (4)
Join Date: May 2010
Location: Regina, SK
Posts: 433
Likes: 0
Received 0 Likes
on
0 Posts
I'd recommend it for the 'fax. Having heated cloth for winter is a definite comfort advantage here haha. I'm adding it to my list of requirements when I go car shopping again, whenever that may be ") or just install these kits again. All my friends and family (besides the loaded ones with temperature controlled leather interiors which are a burden for our region IMO) are impressed by the kits' performance
or just install these kits again. All my friends and family (besides the loaded ones with temperature controlled leather interiors which are a burden for our region IMO) are impressed by the kits' performance
or just install these kits again. All my friends and family (besides the loaded ones with temperature controlled leather interiors which are a burden for our region IMO) are impressed by the kits' performance


Trending Topics
Jan 30, 2011, 10:04 PM
#8
Evolving Member
Thread Starter
iTrader: (4)
Join Date: May 2010
Location: Regina, SK
Posts: 433
Likes: 0
Received 0 Likes
on
0 Posts
it is entirely possible, you can check out the products at heatedseatkits.com, I'm not sure how the evolution seats are configured but I can't see any reason why installing the elements wouldn't work. the kits are pretty much universal unless some makes have car seats that aren't designed to ever be taken apart..
Jan 26, 2012, 06:29 PM
#9

well I got my kits and will be installing mine this weekend - thanks for the write up - I was a little scared the seats in these cars had glued on fabric - but I'd tear it apart tomorrow... I'll take photos and post as I can
Jan 26, 2012, 09:08 PM
#11
so one thing I didn't see - at least mine are - glued to the foam - the seat covers that is - which is going to add a major PITA to the entire project- I'll post photos of the final product - but I am a little worried about the nice tight look of stock - I'll get it figured - nerd you have finished photos of the seats - how did you address the glued fabric? or are were your not glued?
Jan 26, 2012, 10:19 PM
#12
So I guess the LS has glued seats - so word of warning - not that it cannot be done - I am currently doing it - I'll post but just a word of advise - easy to deal with however buy a can of spray glue - elmers or something and after install reglue
Jan 27, 2012, 06:59 AM
#13
Excellent write-up.
I installed this kit a few years ago in my old Impreza. Reliable. If you do need hog clips the local farmers co-op sells those clips (they are copper rings opened slightly) and the special pliers to close them for under $10. The only word of warning is do glue or tie the bottom seat pad down or it will eventually shift backwards and ball-up a bit near the back of the seat.
I installed this kit a few years ago in my old Impreza. Reliable. If you do need hog clips the local farmers co-op sells those clips (they are copper rings opened slightly) and the special pliers to close them for under $10. The only word of warning is do glue or tie the bottom seat pad down or it will eventually shift backwards and ball-up a bit near the back of the seat.
Jan 28, 2012, 12:41 PM
#14
Evolving Member
Thread Starter
iTrader: (4)
Join Date: May 2010
Location: Regina, SK
Posts: 433
Likes: 0
Received 0 Likes
on
0 Posts
Thanks for making that note ^
The RA does not have glued seat covers, I think in there I have something along the lines of "the fabric is velcroed on to the foam, peel off put it aside". I didn't think that the LS/ES would either. That's strange haha.
I did not secure the fabric to the seat afterward, over the course of the year the fabric has shifted slightly but it's nothing that I'd be concerned about personally.
The kit is still holding strong
I'll add that note at the top of the topic.
Last edited by nerdbotSKRA; Jan 28, 2012 at 12:44 PM.

Thread
Thread Starter
Forum
Replies
Last Post
barneyb
Evo How Tos / Installations
16
May 13, 2018 08:24 PM