
Replaced RA FMIC for Evo X FMIC - Here's my experience
 Apr 29, 2010, 06:38 PM
#1
Evolving Member
Thread Starter
iTrader: (15)
Join Date: Mar 2010
Location: Sachse, TX
Posts: 151
Likes: 0
Received 0 Likes
on
0 Posts
Replaced RA FMIC for Evo X FMIC - Here's my experience
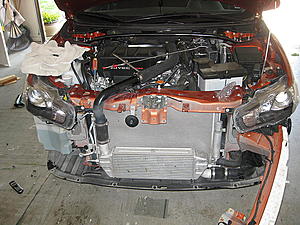
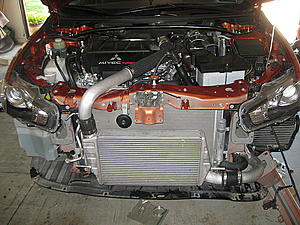
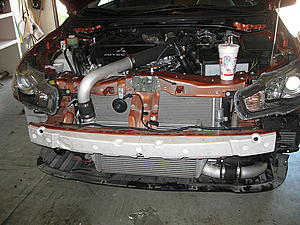
I didn't really know a whole lot about my RA until today. I gutted the mule and replaced the RA FMIC with the Evo X FMIC and pipes. It took me roughly 5 fn hours, mind you this was my first attempt. At any rate, I learned some stuff I wanted to pass along. This in no way meant to be a tutorial but rather an experience sharing event.
Front grill & bumper - 1 hr
Dismantling stock FMIC and UICP - 15 min
Installing UICP - 5 min
Dismantling stock LICP - 1 hr
Installing new LICP - 1.5 hr
Installing Evo X FMIC - 15 min
Intalling front grill & bumper - 45 min (much easier to put back on!)
Lessons learned to follow:
K, so I jacked her up - easier on the back if you don't have to bend over for five hours. Learned this from working on my 72 Camaro. Get some ziplock baggies so you don't lose the bolts or screws.
Stock FMIC
Evo X FMIC
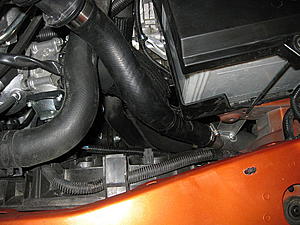
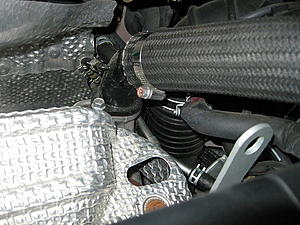
The stock pipe going to the BOV is much shorter than the Evo X so you have to cut the Evo X BOV pipe to about 15.5" to fit.
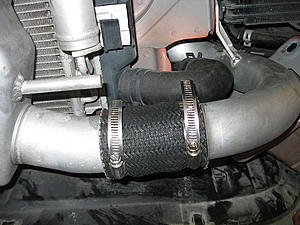
UICP fits nicely to the FMIC
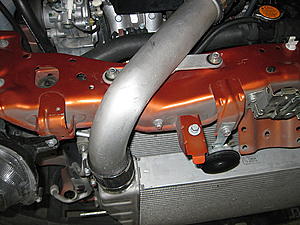
UICP fits nicely to the outlet.
Front grill & bumper - 1 hr
Dismantling stock FMIC and UICP - 15 min
Installing UICP - 5 min
Dismantling stock LICP - 1 hr
Installing new LICP - 1.5 hr
Installing Evo X FMIC - 15 min
Intalling front grill & bumper - 45 min (much easier to put back on!)
Lessons learned to follow:
K, so I jacked her up - easier on the back if you don't have to bend over for five hours. Learned this from working on my 72 Camaro. Get some ziplock baggies so you don't lose the bolts or screws.
Stock FMIC

Evo X FMIC

The stock pipe going to the BOV is much shorter than the Evo X so you have to cut the Evo X BOV pipe to about 15.5" to fit.

UICP fits nicely to the FMIC

UICP fits nicely to the outlet.

 Apr 29, 2010, 06:47 PM
#4
Evolving Member
Thread Starter
iTrader: (15)
Join Date: Mar 2010
Location: Sachse, TX
Posts: 151
Likes: 0
Received 0 Likes
on
0 Posts
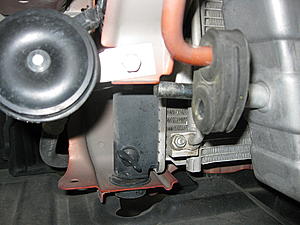
LICP fits almost good. The only place to bolt it to the car is at the curve as show in the pic below. If you tried hard enough you could force the upper bracket to fit the spot below the battery tray. BTW you need to remove the battery and plastic tray to get to the LICP.
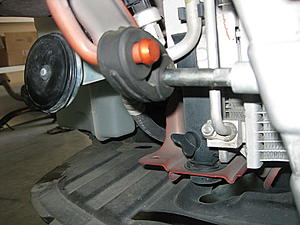
Don't make this mistake when you put the bumper guard back up. The driver side mount fits perfect no prob. But don't mount the bumper guard until you attached the passenger mount or you will have this issue as I did.
That's better
Almost there. TG my wonderful wife brought me dinner! See the Sonic cup.
Ahhhh, that's better!
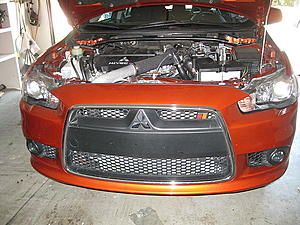
As Porky Pig says, That's all folks!
+1's if you like

Don't make this mistake when you put the bumper guard back up. The driver side mount fits perfect no prob. But don't mount the bumper guard until you attached the passenger mount or you will have this issue as I did.

That's better

Almost there. TG my wonderful wife brought me dinner! See the Sonic cup.

Ahhhh, that's better!

As Porky Pig says, That's all folks!
+1's if you like

Trending Topics
Apr 30, 2010, 12:12 AM
#12
Evolved Member
iTrader: (7)
Join Date: Apr 2010
Location: Rhode Island
Posts: 735
Likes: 0
Received 0 Likes
on
0 Posts
Splatz, YOU ARE THE MAN. Thank so much for this post. I have been posting and posting trying to find out if evo x uicp would work in the RA, and youve done it. Awesome, I am pumped. I will be pm ing you with some questions about specifics. Thanks again
Apr 30, 2010, 04:47 AM
#14
Newbie

Join Date: Dec 2008
Location: Australia
Posts: 18
Likes: 0
Received 0 Likes
on
0 Posts
Yeah, great write up!
I've changed mine as well, only changed the upper piping & bottom pipe is still stock (unfortunately wasnt included.)
Though I didn't remove the intrusion bar to fit it, having an extra pair of hands helped maneuver it in.
I've changed mine as well, only changed the upper piping & bottom pipe is still stock (unfortunately wasnt included.)
Though I didn't remove the intrusion bar to fit it, having an extra pair of hands helped maneuver it in.