
Quick questions re: AMS TBE install
 Jun 14, 2009, 05:12 PM
#1
Newbie
Thread Starter
Join Date: Sep 2002
Location: PA
Posts: 60
Likes: 0
Received 0 Likes
on
0 Posts
Quick questions re: AMS TBE install
Hi guys,
Just finished installing the AMS tbe on my IX and have a couple of quick questions;
1) The muffler is too close to the bumper outlet on the drivers side of the car and is slightly burning it... I've tried to get the darn thing centered properly by trying to move it along the rubber hangers but it falls back into place. I bought a couple of rubber grommets and rubber clamps that I was going to use on the metal hanger to force it into a different position on the rubber hanger. It seems like this would work, but it bothers me that it is fitting like that as I would have thought it'd be centered without rigging. I realize that part of this is due to the slightly off center positioning of the tbe itself (to keep it a straight through design). Help??
2) For some reason, all of the bolts don't seem to be tightening down that well (which may be causing the problem above to a certain extent). If I hold the bolt in place and tighten the nut, it'll tighten up and then just continue to go round and round (while the bolt stays in place.. e.g., the whole thing is not turning). Why won't they tighten down all the way? I was under the impression that I needed 40lb of torque on these bolts and it isn't happening. Help?
Thanks!
 Jun 14, 2009, 05:49 PM
#2
Newbie
Thread Starter
Join Date: Sep 2002
Location: PA
Posts: 60
Likes: 0
Received 0 Likes
on
0 Posts
I should mention that I have the resonated test pipe. I did see that thread where people were fixing their fitment issues by rotating the test pipe. I'm not sure that is my problem as I saw their pics and their mufflers were WAY off center.
I did see that "top" was written on my test pipe, but it was written between two different ways of mounting the TP... so I had to take a guess. The way it is installed if you look under the car it looks like this ---> "0" if that makes sense. The other way it could have been installed (and still had the "top" near the top..) would have turned it right up against the heat shield which didn't make sense to me.....
Also, can't understand why those nuts continue to turn but not tighten.... they just keep going and going and going..
Thanks
 Jun 14, 2009, 08:48 PM
#4
Newbie
Thread Starter
Join Date: Sep 2002
Location: PA
Posts: 60
Likes: 0
Received 0 Likes
on
0 Posts
I will try to get some pictures up
In regards to the bolt, I don't think I explained myself clearly - I used vicegrips to hold the bolt so it would not move and I turn the nut with a socket and it'll tighten to a certain extent and then it will just turn and turn and turn.... almost like something is stripped. However, if something was stripped then I wouldn't be able to loosen and remove the bolt. The bolts just never stops turning.
By the way, I used anti-seize on all of the bolts.. maybe that's my problem.. but everyone I spoke to said to use it....
The odd thing is that it happens only to the bolts that came with the exhaust. The stock spring bolts were able to be torqued to 37lbs (with antiseize on them).
Jun 15, 2009, 08:04 AM
#6
Newbie
Thread Starter
Join Date: Sep 2002
Location: PA
Posts: 60
Likes: 0
Received 0 Likes
on
0 Posts
Amazing that I was able to strip the nut with the puny ratchet. I didn't think I was tightening all that hard (and definitely no where near the torque people have recommended - 40lbs). After doing some reading, it seems that the anti-seize increases the likelihood of stripping the nut to a certain extent...
I'm going to buy new bolts and put them on this weekend.
Any idea on the size and material of the bolts that came with the TBE? I guess they are 14mm. Length? Don't want to put the wrong bolt type on there and have them bond chemically or something....
I'm going to buy new bolts and put them on this weekend.
Any idea on the size and material of the bolts that came with the TBE? I guess they are 14mm. Length? Don't want to put the wrong bolt type on there and have them bond chemically or something....
Jun 15, 2009, 09:03 AM
#7

Amazing that I was able to strip the nut with the puny ratchet. I didn't think I was tightening all that hard (and definitely no where near the torque people have recommended - 40lbs). After doing some reading, it seems that the anti-seize increases the likelihood of stripping the nut to a certain extent...
I'm going to buy new bolts and put them on this weekend.
Any idea on the size and material of the bolts that came with the TBE? I guess they are 14mm. Length? Don't want to put the wrong bolt type on there and have them bond chemically or something....
I'm going to buy new bolts and put them on this weekend.
Any idea on the size and material of the bolts that came with the TBE? I guess they are 14mm. Length? Don't want to put the wrong bolt type on there and have them bond chemically or something....
Trending Topics
Jun 15, 2009, 04:52 PM
#8
Newbie
Thread Starter
Join Date: Sep 2002
Location: PA
Posts: 60
Likes: 0
Received 0 Likes
on
0 Posts
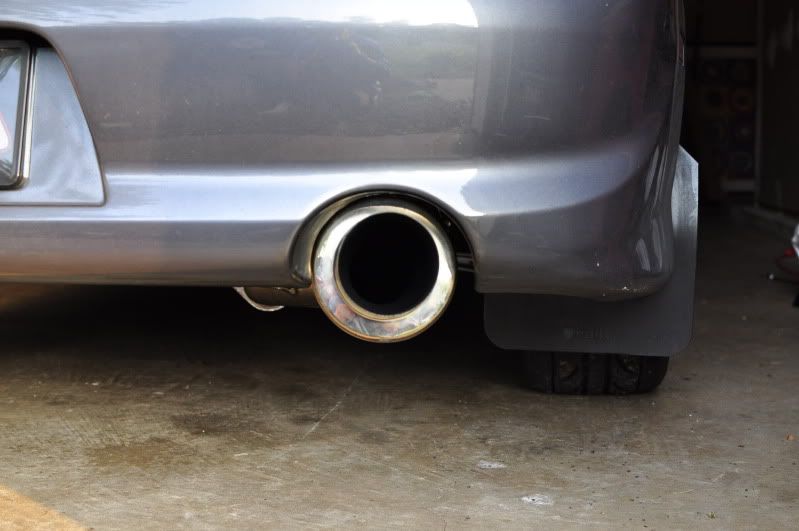
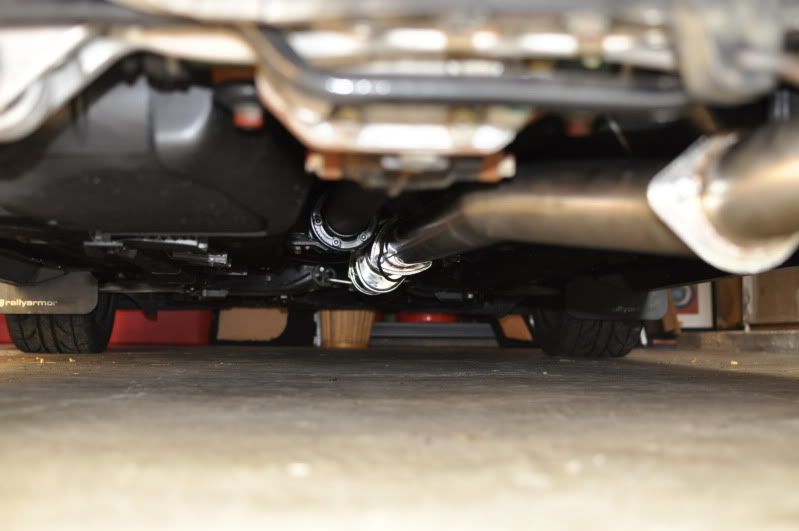
Snapped some pics of the bumper to show how the exhaust is off centered. Also, took a quick pic underneath to show the positioning of the resonated TP. I don't think I could have gone wrong with any other pieces....?
I guess I want to rule out an incorrect install (positioning) of the TP. Any other way and it is very very close to the heat shield.
If TP position is not my problem, then it must be the bolts. Maybe I used too much antiseize? Is that possible? The incorrect placement of the exhaust could be due to an inconsistency in bolt tightness since the nut appears to be stripped? It's flush though and I don't hear any leaks....
Pics below. Let me know if you need better ones to see
Last edited by Need4Spd; Jun 15, 2009 at 04:54 PM. Reason: Pics not showing up
Jun 15, 2009, 05:59 PM
#10
Newbie
Thread Starter
Join Date: Sep 2002
Location: PA
Posts: 60
Likes: 0
Received 0 Likes
on
0 Posts
Like what, off centered like that? That's normal? I find that difficult to believe. I've driven the car maybe 70 miles and it's damaging the bumper? After even 1k miles I'd hate to see what my bumper looks like unless I fix this..
Jun 16, 2009, 07:22 AM
#11
You have the flow direction correct on the resonated pipe but it is rotated in the wrong direction. That resonator should be sitting fairly flat with the words "top of car" facing the underbody of the car. It appears you have it on its side. On the three bolt flange that bolts to the catback the bottom two holes should be perpendicular to the ground. That should clear up the issue you are having.
Eric
Eric
Jun 18, 2009, 05:22 PM
#12
Newbie
Thread Starter
Join Date: Sep 2002
Location: PA
Posts: 60
Likes: 0
Received 0 Likes
on
0 Posts
You have the flow direction correct on the resonated pipe but it is rotated in the wrong direction. That resonator should be sitting fairly flat with the words "top of car" facing the underbody of the car. It appears you have it on its side. On the three bolt flange that bolts to the catback the bottom two holes should be perpendicular to the ground. That should clear up the issue you are having.
Eric
Eric
I'm wondering if "top" was written on the wrong side? Because if I move the test pipe once COUNTERclockwise than the two holes of three bolt flange will be perpendicular to the ground..... should the "muffler" style portion of the resonated test pipe be parallel or on the 45 degree angle (perpendicular to the heatshield) as I described above? Do you happen to have any pics of a "correct" install of the resonated test pipe?
Also, thoughts on the bolt and tightening issues? As I mentioned above, they won't tighten properly. Yes, I am using a separate wrench to "hold" the bolt as I tighten the nut and the nut just keeps turning with minimal effort. I think I may need to replace, at the very least, the nuts. I assume the anti-seize I used probably caused me to overtighten and strip the nuts. Is there anything special about the bolts/nuts that you provided or can I just pick some new ones up at Lowes/Home Depot? How can I avoid this? Maybe less anti-seize? I put a lot of it on...
Sorry about all the questions. Is it easier if I give you a call?
Thanks for your help - would like to fix this on Saturday
Chris
 Jun 19, 2009, 08:55 PM
#15
Evolving Member
iTrader: (8)

Join Date: Jan 2009
Location: New Jersey
Posts: 220
Likes: 0
Received 0 Likes
on
0 Posts
sounds like you may have overtightened the nuts and they may be stripped.
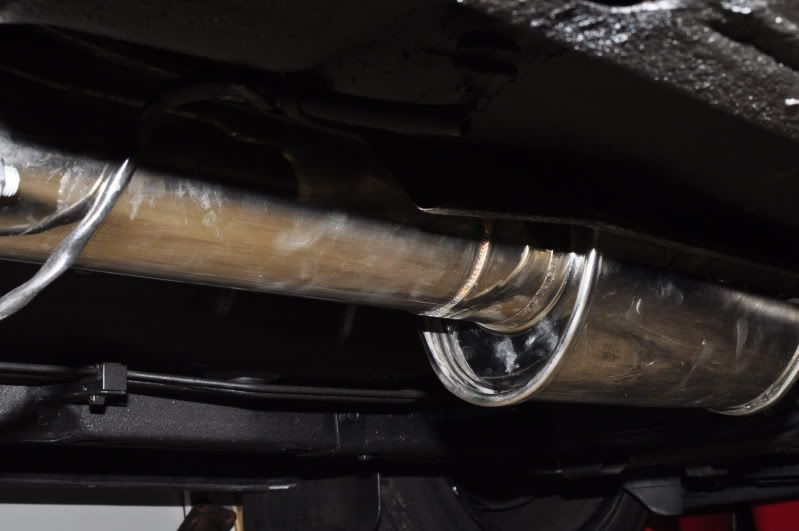
here is a shot of my exhaust and it is not perfectley centered but it is at a slight angle so it fits through the cutout perfectly without rubbing the bumper. when you fix your testpie yours should be the same.


here is a shot of my exhaust and it is not perfectley centered but it is at a slight angle so it fits through the cutout perfectly without rubbing the bumper. when you fix your testpie yours should be the same.

Thread
Thread Starter
Forum
Replies
Last Post
fireroasted
Evo Engine / Turbo / Drivetrain
20
Mar 27, 2017 08:17 AM
EGbeater
Evo How Tos / Installations
27
Jan 16, 2016 04:14 PM
vtluu
Evo How To Requests / Questions / Tips
16
Jan 8, 2011 07:57 AM
BushBurninEvo
Evo Engine / Turbo / Drivetrain
17
Jan 15, 2005 01:10 PM