
Defi install
 Aug 25, 2006, 01:50 AM
#1
Evolving Member
Thread Starter
iTrader: (1)

Join Date: Jul 2006
Location: Berea
Posts: 386
Likes: 0
Received 0 Likes
on
0 Posts
Defi install
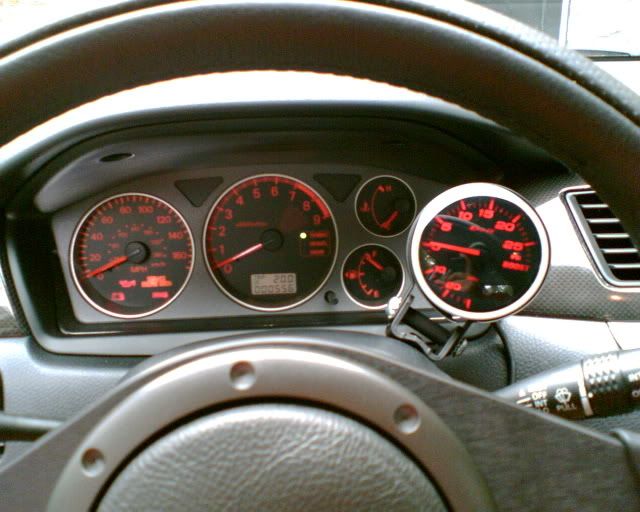
Installed my Defi BF boost gauge and control unit II today! looks amazing and pretty simple install really, thanks to Carlos (fromwrxtoevo)!! couple of quick phone pics!
defi
defi
 Aug 25, 2006, 01:58 AM
#2
Tim,
Looks great. You can't go wrong with the Defi electronic. A couple of questions:
Did you resuse the existing boost line from previous boost gauge?
Are you using previous boost gauge in conjuction with the Defi?
More and more I found this Defi boost gauge/controller one of the best diagnosis tools/mods in the market. It matches the interior illumination, is accurate as hell and it looks killer.
Carlos
Aug 25, 2006, 02:11 AM
#4
Evolving Member
Thread Starter
iTrader: (1)
Join Date: Jul 2006
Location: Berea
Posts: 386
Likes: 0
Received 0 Likes
on
0 Posts
Carlos,
I ripped out everything to do with the other boost gauge lol. the boost sensor for the defi came with a vacuum line. the only thing re-used was the T fitting for that line.
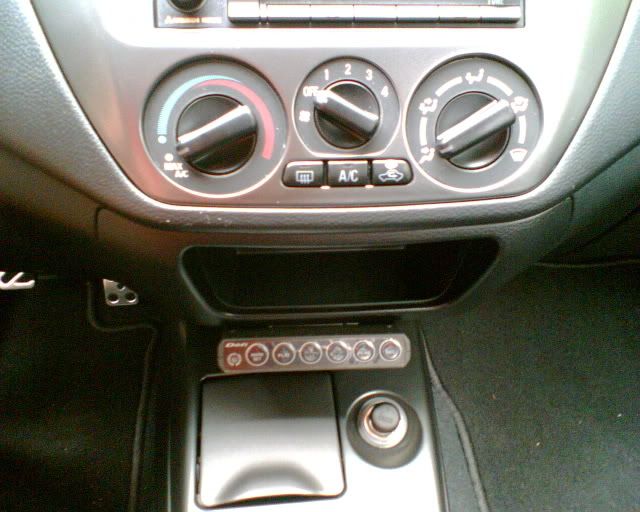
The gauge matches very well with the dash lights and the control unit actually matches the HVAC controls pretty well too!
I love the features of it. all very useful and ive only had it in a few hours!
and where did you get the dash cover for your Evo's? I love the location we share for the gauge but i dont like how the mounting bracket looks. Plus, if you remember my DSM, the dash was beginning to warp. The cover will solve both of those problems for me!
thanks for the compliments! I need to get some good pictures of all of the car!
Tim
I ripped out everything to do with the other boost gauge lol. the boost sensor for the defi came with a vacuum line. the only thing re-used was the T fitting for that line.
The gauge matches very well with the dash lights and the control unit actually matches the HVAC controls pretty well too!
I love the features of it. all very useful and ive only had it in a few hours!
and where did you get the dash cover for your Evo's? I love the location we share for the gauge but i dont like how the mounting bracket looks. Plus, if you remember my DSM, the dash was beginning to warp. The cover will solve both of those problems for me!
thanks for the compliments! I need to get some good pictures of all of the car!
Tim
Aug 25, 2006, 02:16 AM
#5
Evolving Member
Thread Starter
iTrader: (1)
Join Date: Jul 2006
Location: Berea
Posts: 386
Likes: 0
Received 0 Likes
on
0 Posts
thanks Golovko! when i get the rest of them they will be mounted here gauge pod but ill have to find another spot for the control unit. i would love to put them up in the radio location but i dont think the N1's screen will work out being on the bottom with the relocation kit
Aug 25, 2006, 03:06 AM
#6
Yes Tim.. I remember the shi t y job the Mitsubishi dealer did putting your dash back together, it was a shame that they are called professionals...
Anyway, if you want, I can post pics on this topic about my dashes on the Evos and how I did the custom install to make them look part of the dash. I ended making a tiny cut through the dash cover so that I could install the mounting bracket.
My installation is 100% stealthy, no visible wires, no mounting braket, no hardware, simply clean install.
Carlos
Aug 25, 2006, 04:23 PM
#7
Evolved Member
iTrader: (6)
Join Date: Sep 2005
Location: NYC
Posts: 2,269
Likes: 0
Received 0 Likes
on
0 Posts
i installed the same gauge + unit couple of days ago too, using an autometer pod...
the quality is simply amazing and the kit is so complete that if i was going to install the same kit again i could do it in less than an hour...
Of course as a DIY installation it took me a whole morning and a lot of reading of 4-5 different installation guides etc., but the final outcome is pretty well...
My next gauges will be EGT, oil temp., wide band in the factory radio position using the helix and relocation kit... But other stuff comes first...
Trending Topics
Aug 25, 2006, 05:57 PM
#8
Evolving Member
Thread Starter
iTrader: (1)
Join Date: Jul 2006
Location: Berea
Posts: 386
Likes: 0
Received 0 Likes
on
0 Posts
i had my old gauge in the same location using the same bracket...not a real fan of it having to look down kinda to see it...install looks clean though! yeah second time through it would probably take me 20 minutes start to clean up! 