
Do Luck Carbon Fiber Front Lip Install : EVO 8
 Apr 16, 2005, 08:36 PM
#1
Account Disabled
Thread Starter
iTrader: (20)
Join Date: Oct 2003
Posts: 37
Likes: 0
Received 0 Likes
on
0 Posts
Hello EvoM

The carbon fiber doluck lip is a good way to differentiate your Evo from the rest of the pack and takes no time at all. Installing the doluck lip is so easy in fact, we considered not even doing a write up for it, but we don't want to leave any stone unturned I ordered this carbon fiber lip in October 2004, it showed up April 2005. This lip was well worth the wait, after installing I though to myself, I would wait years for this thing
1.) We will begin by removing the entire splash guard from the bottom of the car. Raising the car on jack stands, ramps, or a lift will make this a lot easier. There are so many poppet style fasteners holding the splash guard on, we lost count at 20! Remove the middle panel first (it also has three (3) screws) and then work your way around until the splash guard is completely off.
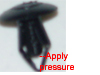
Tech Tip: You will want to apply pressure to the top side of the fastner and they will pop out. Do not be fooled by the phillips screw thread, these DO NOT unscrew. Make sure to save these fastners, these will be used to secure the new lip.
2.) After you have removed all those custom fastners, you will want to remove the screws that are securing the lip. There is approx. 10 phillips screws holding the lip on.
Tech Tip: Save these screws, these sercure your new lip.
3.) After you remove the stock lip, grab the do luck lip and get it ready to mount on the car. I suggest starting on the drivers side and move it into place. Once you have in place move along to the passenger side and align. It is a tight fit and at one point and swore up and down it would not fit. But it fits GREAT, just very tight. Take your time and take a few deep breaths and it goes on nice.
Tech Tip: Start on the drivers side and move your way across the car
4.) After you lip is snug, start at the drivers side and put the screws in following along the car. Once you have all the screws in place, secure the under body plastic with the fasteners.


The carbon fiber doluck lip is a good way to differentiate your Evo from the rest of the pack and takes no time at all. Installing the doluck lip is so easy in fact, we considered not even doing a write up for it, but we don't want to leave any stone unturned
I ordered this carbon fiber lip in October 2004, it showed up April 2005. This lip was well worth the wait, after installing I though to myself, I would wait years for this thing 1.)
We will begin by removing the entire splash guard from the bottom of the car. Raising the car on jack stands, ramps, or a lift will make this a lot easier. There are so many poppet style fasteners holding the splash guard on, we lost count at 20! Remove the middle panel first (it also has three (3) screws) and then work your way around until the splash guard is completely off. Tech Tip: You will want to apply pressure to the top side of the fastner and they will pop out. Do not be fooled by the phillips screw thread, these DO NOT unscrew. Make sure to save these fastners, these will be used to secure the new lip.
2.) After you have removed all those custom fastners, you will want to remove the screws that are securing the lip. There is approx. 10 phillips screws holding the lip on.
Tech Tip: Save these screws, these sercure your new lip.
3.) After you remove the stock lip, grab the do luck lip and get it ready to mount on the car. I suggest starting on the drivers side and move it into place. Once you have in place move along to the passenger side and align. It is a tight fit and at one point and swore up and down it would not fit. But it fits GREAT, just very tight. Take your time and take a few deep breaths and it goes on nice.
Tech Tip: Start on the drivers side and move your way across the car
4.) After you lip is snug, start at the drivers side and put the screws in following along the car. Once you have all the screws in place, secure the under body plastic with the fasteners.


 Apr 21, 2006, 01:54 AM
#5
Newbie

Join Date: Apr 2006
Location: seattle!
Posts: 25
Likes: 0
Received 0 Likes
on
0 Posts
OMG THAT GOES on my list. i loved do luck since middle school. when i first noticed the JDM VIP/Upperclass race bred styling. kinda both.damn those rich kids and the good stuff they make.
Apr 21, 2006, 06:20 AM
#6
Evolved Member
iTrader: (10)
Join Date: Jul 2002
Location: Homeless
Posts: 520
Likes: 0
Received 0 Likes
on
0 Posts
Originally Posted by Samdiver74
So does the install retain all the underbody splash guards/ aero dams or not?
Trending Topics
Jan 18, 2007, 11:29 PM
#8
I just installed the APR CF front lip.
FYI = PITA
Not hard but frustrating..
Under tray is a real pita to get those pop fasteners off.
Even harder getting them back on after lips attached.
Did it in my garage at midnight on ramps, with me underneath on a roller.
Would have been 100 times easier if you had access to an overhead lift.
It's alot easier to get the fasteners back in if you can do it while it's in the air from underneath.
APR lip went on snug and looks great.
But the under tray is pretty aggrivating.
The fasteners just dont want to go back in without a little coaxing, and some pushing and pulling and alot of cursing - LOL..
The tabs on the lip and the holes just dont wanna line up right on some of the tray holes.
Either that or they get pushed up when you try to push the fastener through
and then it wont catch right and is almost impossible to do by yourself
and without an overhead lift.
{need 6 hands to push/pull and attach.}
A bit of a headache but well worth it, imo..
here's some quick pics. in my garage right after install
Install time / 2-3 hours on ramps -- If you're lucky and the fasteners go in easy and no help..
Install time / 1-2 hours on LIFT -- with a little effort, and some extra hands..


Good Luck...
FYI = PITA
Not hard but frustrating..
Under tray is a real pita to get those pop fasteners off.
Even harder getting them back on after lips attached.
Did it in my garage at midnight on ramps, with me underneath on a roller.
Would have been 100 times easier if you had access to an overhead lift.
It's alot easier to get the fasteners back in if you can do it while it's in the air from underneath.
APR lip went on snug and looks great.
But the under tray is pretty aggrivating.
The fasteners just dont want to go back in without a little coaxing, and some pushing and pulling and alot of cursing - LOL..
The tabs on the lip and the holes just dont wanna line up right on some of the tray holes.
Either that or they get pushed up when you try to push the fastener through
and then it wont catch right and is almost impossible to do by yourself
and without an overhead lift.
{need 6 hands to push/pull and attach.}
A bit of a headache but well worth it, imo..
here's some quick pics. in my garage right after install
Install time / 2-3 hours on ramps -- If you're lucky and the fasteners go in easy and no help..
Install time / 1-2 hours on LIFT -- with a little effort, and some extra hands..
Good Luck...
Last edited by SICK9; Jan 19, 2007 at 01:09 AM.


Thread
Thread Starter
Forum
Replies
Last Post
LancerShop.com
Evo 'For Sale' External Engine / Power
13
Oct 4, 2016 05:44 PM
LancerShop.com
Evo 'For Sale' Exterior Styling
16
Aug 25, 2016 06:42 PM