How to Install Buschur Muffler Delete
 Aug 15, 2004, 02:14 PM
#1
Evolving Member
Thread Starter
iTrader: (6)

Join Date: Apr 2004
Posts: 429
Likes: 0
Received 0 Likes
on
0 Posts
How to Install Buschur Muffler Delete
How to Install Buschur Muffler Delete
by G6CivCX
Parts Required:
Tools Required:

If you are not familiar with any of the tools, please read the following articles:
http://g6civcx.napalm.net/tech.htm
Time Required:
Background
The Buschur muffler delete is a good mod if you want something that will save weight and make a few horsepowers. The only thing is that this is a true muffler delete. Hence, the name As such, it can be quite loud. So be careful, as it may not be legal with your track and/or sanctioning body, as well as your local legislative body
But the good thing is that it's extremely light. It weighs only 3.7 lbs. according to Buschur, which I verified. The stock muffler weighs 19.5 lbs. It's also well aft of the cat, which means no dread check-engine light.

Preparation:
1. Before you accept delivery of the muffler delete, inspect its content. The pipe itself should look like the picture. It should also be accompanied by three (3) nuts, one nut/bolt with 2 big round washers. If not, refuse shipment and demand that your vendor refund your money for your trouble
2. Park the vehicle in a safe place. Engage the parking brake. Let the vehicle cool to the touch, or burn yourself. Your choice.
3. I recommend soaking the bolts of the exhaust overnight with PB Blaster. It will make your life a whole lot easier. Check the link to the articles above if you're not familiar with PB Blaster. Soak all 3 flange bolts and the yellow bolt on the rear hanger.


Soak both sides of the bolts liberally. Remember to wear your eye protection and get plenty of ventilation.
4. Study the diagram of the muffler assembly.
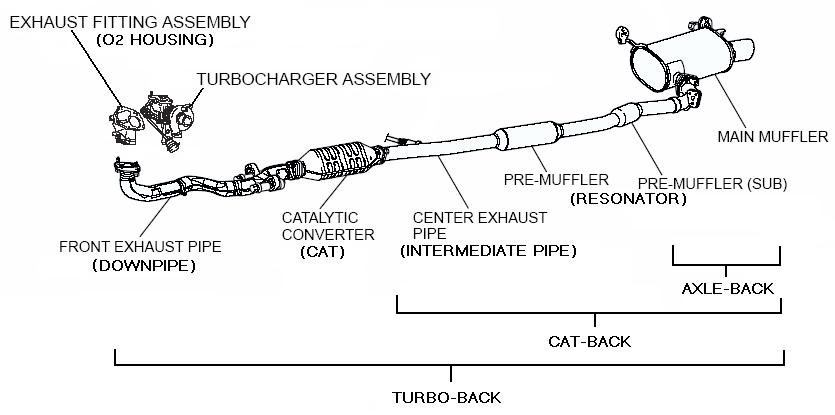
You will see that the the muffler is bolted onto the resonator pipe by 3 bolts, sandwiching a gasket in between the flanges. The muffler hangs onto by the car by 2 hangers. The front hanger is a slip on. The rear hanger is a bolted onto the muffler assembly.

We're going to cheat a little bit and skip ahead. As you can see here, the 3 bolts holding the flange with the gasket. The rear hanger bolts onto the muffler from the passenger side through the hanger, and onto the muffler. The front hanger slides onto the hanger.

5. Get an assistant if you can. While 20 lbs. isn't a whole lot, but the way the muffler is designed, it can be awkward to position. Plus it's always good to have someone watch over you while you work in case something happens.
6. While it's not necessary to put the vehicle on jackstands to do this job, I did it to give me more clearance so I can take better pictures. You may do it if you like.
Procedure:
1. Start by unbolting the three (3) bolts at the muffler flange. They're 14mm. You'll be thanking me if you soaked it with PB Blaster like I recommend, or you'll be cursing yourself for not doing it. Your choice
The nut is welded onto the muffler flange. You must turn the head of the bolt on the resonator side with a 14mm socket or wrench. Use a breaker by if you need it.
My best advice to you is to be patient and use plenty of PB Blaster and a breaker. While the bolts are pretty hefty, you may round out the head. Then you'll have to cut them off. That's not fun, and hard to do without damaging the flange.
So take my word for it and use PB Blaster, a breaker bar, a buddy, and bring plenty of patience
2. Now that you have unbolted the 3 bolts, catch the gasket and don't let it fall down. Also, the tip of the muffler will scrape the bumper if you don't support it.

3. Start unbolting the bolt that holds the muffler onto the rear hanger. It's 12mm. Same deal. Be patient, use a breaker bar, etc. Be careful because once you unbolt it, the muffler will pivot even more. So be ready to catch it.
4. Now we start on the front hanger. This one will be a little difficult. Use plenty of lubricating oil. Just grab the muffler and start twisting it off the hanger. After a few minutes, it will come out. Be careful and don't drop the muffler on yourself.


5. Now that the muffler is off, get it out of the way. It's heavy, isn't it?

6. This step is optional. I chose to remove the front hanger completely because the Buschur does not use it. It took some prying with a screwdriver to get it out. I found that it was best to come at it from the rear passenger tyre. Take a flathead, and pry it out while simultaneously pulling it off the bracket. It's cleaner without the hanger there
7. Now is a good time to start cleaning off the hardware. You will not be using the hanger bolt. You will, however, be reusing the flange bolts and the gasket. Inspect them both for damage. Replace if necessary.
8. It's a good idea to coat the thread of the bolts with antiseize compound. That will stop it from seizing up in case you want to remove them in the future.
9. Start by putting the rear hanger onto the tab. I prefer to insert the bolt from the passenger side, through the washer, through the hanger, through the other washer, through the mounting tab, and onto the bolt. This will make it easier to tighten the bolt because I can ratchet on the passenger side better than on the driver side due to clearance. Start bolting it up by hand, but don't actually tighten it yet. We need to adjust it.


10. Be careful and don't let the tip scratch your bumper. This is when the assistant come in handy
11. Start assembling the flanges together. Don't forget the gasket! I prefer to put the bolt head on the passenger side and the nut on the driver side. The nut is 17mm. The bolt head is still 14mm. Now it's hard to break this bolt, it's very easy to strip the head. So same deal like when you took it off. Start by hand to make sure you don't cross-thread. Then tighten with the ratchet/wrench combination you like. I prefer to use a 17mm socket and a 14mm wrench. Your choice. Go around at least 3 times to make sure it's tight. Torque to 25-30 ft-lb if you like.

12. Go back and adjust the hanger. Tighten it. Both the bolt head and nut are 13mm. Same deal. Tighten it and torque to 20 ft-lb if you like.
13. Inspect your work. Start the vehicle and check for leak. Enjoy
Synopsis
The muffler delete is loud! Don't do it if you plan on street driving your car, or if your track requires a muffler. You won't pass tech inspection.
I have driven it by a few police cars, and no problem so far *knocks on wood* I like the sound and the weight saving. Just remember not to gun it.
I've found that I actually speed less frequently now because I'm more aware of my speed. Let's see how long this lasts
Can you spot the difference?


by G6CivCX
Parts Required:
- Buschur muffler delete kit
Tools Required:
- breaker bar
- lubricating oil
- PB Blaster
- flathead screwdriver (optional)
- antiseize compound
- 12mm socket or wrench
- 13mm socket or wrench (2 needed)
- 14mm socket or wrench
- 17mm socket or wrench
- ratchet, if you're using sockets
- gloves
- safety goggles (not pictured)
If you are not familiar with any of the tools, please read the following articles:
http://g6civcx.napalm.net/tech.htm
Time Required:
- 1-2 hours
Background
The Buschur muffler delete is a good mod if you want something that will save weight and make a few horsepowers. The only thing is that this is a true muffler delete. Hence, the name
As such, it can be quite loud. So be careful, as it may not be legal with your track and/or sanctioning body, as well as your local legislative body But the good thing is that it's extremely light. It weighs only 3.7 lbs. according to Buschur, which I verified. The stock muffler weighs 19.5 lbs. It's also well aft of the cat, which means no dread check-engine light.
Preparation:
1. Before you accept delivery of the muffler delete, inspect its content. The pipe itself should look like the picture. It should also be accompanied by three (3) nuts, one nut/bolt with 2 big round washers. If not, refuse shipment and demand that your vendor refund your money for your trouble
2. Park the vehicle in a safe place. Engage the parking brake. Let the vehicle cool to the touch, or burn yourself. Your choice.
3. I recommend soaking the bolts of the exhaust overnight with PB Blaster. It will make your life a whole lot easier. Check the link to the articles above if you're not familiar with PB Blaster. Soak all 3 flange bolts and the yellow bolt on the rear hanger.
Soak both sides of the bolts liberally. Remember to wear your eye protection and get plenty of ventilation.
4. Study the diagram of the muffler assembly.
You will see that the the muffler is bolted onto the resonator pipe by 3 bolts, sandwiching a gasket in between the flanges. The muffler hangs onto by the car by 2 hangers. The front hanger is a slip on. The rear hanger is a bolted onto the muffler assembly.
We're going to cheat a little bit and skip ahead. As you can see here, the 3 bolts holding the flange with the gasket. The rear hanger bolts onto the muffler from the passenger side through the hanger, and onto the muffler. The front hanger slides onto the hanger.
5. Get an assistant if you can. While 20 lbs. isn't a whole lot, but the way the muffler is designed, it can be awkward to position. Plus it's always good to have someone watch over you while you work in case something happens.
6. While it's not necessary to put the vehicle on jackstands to do this job, I did it to give me more clearance so I can take better pictures. You may do it if you like.
Procedure:
1. Start by unbolting the three (3) bolts at the muffler flange. They're 14mm. You'll be thanking me if you soaked it with PB Blaster like I recommend, or you'll be cursing yourself for not doing it. Your choice
The nut is welded onto the muffler flange. You must turn the head of the bolt on the resonator side with a 14mm socket or wrench. Use a breaker by if you need it.
My best advice to you is to be patient and use plenty of PB Blaster and a breaker. While the bolts are pretty hefty, you may round out the head. Then you'll have to cut them off. That's not fun, and hard to do without damaging the flange.
So take my word for it and use PB Blaster, a breaker bar, a buddy, and bring plenty of patience
2. Now that you have unbolted the 3 bolts, catch the gasket and don't let it fall down. Also, the tip of the muffler will scrape the bumper if you don't support it.
3. Start unbolting the bolt that holds the muffler onto the rear hanger. It's 12mm. Same deal. Be patient, use a breaker bar, etc. Be careful because once you unbolt it, the muffler will pivot even more. So be ready to catch it.
4. Now we start on the front hanger. This one will be a little difficult. Use plenty of lubricating oil. Just grab the muffler and start twisting it off the hanger. After a few minutes, it will come out. Be careful and don't drop the muffler on yourself.
5. Now that the muffler is off, get it out of the way. It's heavy, isn't it?
6. This step is optional. I chose to remove the front hanger completely because the Buschur does not use it. It took some prying with a screwdriver to get it out. I found that it was best to come at it from the rear passenger tyre. Take a flathead, and pry it out while simultaneously pulling it off the bracket. It's cleaner without the hanger there
7. Now is a good time to start cleaning off the hardware. You will not be using the hanger bolt. You will, however, be reusing the flange bolts and the gasket. Inspect them both for damage. Replace if necessary.
8. It's a good idea to coat the thread of the bolts with antiseize compound. That will stop it from seizing up in case you want to remove them in the future.
9. Start by putting the rear hanger onto the tab. I prefer to insert the bolt from the passenger side, through the washer, through the hanger, through the other washer, through the mounting tab, and onto the bolt. This will make it easier to tighten the bolt because I can ratchet on the passenger side better than on the driver side due to clearance. Start bolting it up by hand, but don't actually tighten it yet. We need to adjust it.
10. Be careful and don't let the tip scratch your bumper. This is when the assistant come in handy
11. Start assembling the flanges together. Don't forget the gasket! I prefer to put the bolt head on the passenger side and the nut on the driver side. The nut is 17mm. The bolt head is still 14mm. Now it's hard to break this bolt, it's very easy to strip the head. So same deal like when you took it off. Start by hand to make sure you don't cross-thread. Then tighten with the ratchet/wrench combination you like. I prefer to use a 17mm socket and a 14mm wrench. Your choice. Go around at least 3 times to make sure it's tight. Torque to 25-30 ft-lb if you like.
12. Go back and adjust the hanger. Tighten it. Both the bolt head and nut are 13mm. Same deal. Tighten it and torque to 20 ft-lb if you like.
13. Inspect your work. Start the vehicle and check for leak. Enjoy
Synopsis
The muffler delete is loud! Don't do it if you plan on street driving your car, or if your track requires a muffler. You won't pass tech inspection.
I have driven it by a few police cars, and no problem so far
*knocks on wood* I like the sound and the weight saving. Just remember not to gun it.I've found that I actually speed less frequently now because I'm more aware of my speed. Let's see how long this lasts
Can you spot the difference?
Last edited by g6civcx; Aug 15, 2004 at 02:26 PM.
 Aug 16, 2004, 08:29 PM
#3
Evolving Member
Thread Starter
iTrader: (6)
Join Date: Apr 2004
Posts: 429
Likes: 0
Received 0 Likes
on
0 Posts
Originally Posted by kdogg
Nice write-up. I can't believe all the red overspray you have underneath your car!
The overspray was my fault. I got my bumper repainted for a very hefty discount. As such, I told them to not worry about it. I was getting a deal so I wasn't complaining, and I didn't want to create extra work for them
 Aug 23, 2004, 05:58 PM
#5
Evolving Member
Thread Starter
iTrader: (6)
Join Date: Apr 2004
Posts: 429
Likes: 0
Received 0 Likes
on
0 Posts
I don't know how much power it's putting out. I haven't had a chance to put it back on the dyno to compare with it before.
By the time I get it back on the dyno the other mods will confound the readings so I will definitely not know how much power it's putting out
By the time I get it back on the dyno the other mods will confound the readings so I will definitely not know how much power it's putting out

Thread
Thread Starter
Forum
Replies
Last Post
kozmic27
Evo X How Tos / Installations
32
Oct 28, 2019 04:39 PM
RallySport Direct
Evo X How Tos / Installations
40
Aug 17, 2015 07:46 PM
rydogg008
Evo X How Tos / Installations
11
Jan 31, 2015 06:19 PM
g6civcx
Evo How To Requests / Questions / Tips
17
Jul 19, 2013 02:44 PM