
Competition Sound in my Evo
 Jan 12, 2009, 07:13 AM
#1
Newbie
Thread Starter

Join Date: Jul 2008
Location: Singapore
Posts: 86
Likes: 0
Received 0 Likes
on
0 Posts
Competition Sound in my Evo
Yes I know, I know….ICE in an EVO???? Haha…unfortunately I suffer from enjoying both the pleasures of a high performance car and driving to a great sounding system. And if u r gonna put in a sound system, what better car to do it than one with enough oomph to not be bogged down by it .
.
I did spend a lot of time planning the system. I needed
1) boot space (which was already small!) as I have a young kid with another on the way, 2) a competition worthy sound and
3)a flexible install that allows the heavy stuff to be removed when I go to track.
I tried my best to minimize the amount of equipment used, and lightened the car elsewhere to make up for their added weight. All in all I think it came out perfect!
Let me first clarify my use of the term ‘competition sound’. Over here in Singapore, the SQ competitions are purely judged on the systems’ sound (imaging, staging etc) and nothing on the install itself. This works out great as I don’t need a flashy and heavy boot install to impress. Anyway on to the pictures:
Wiring:
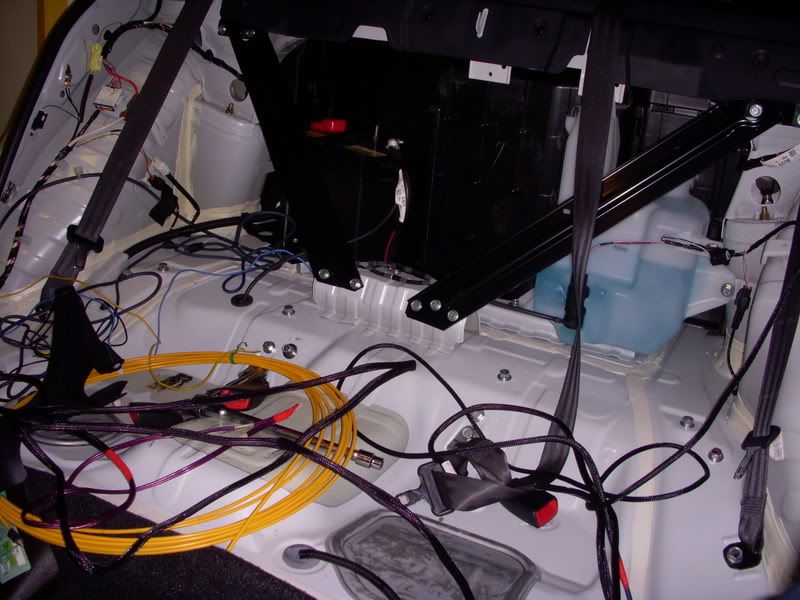
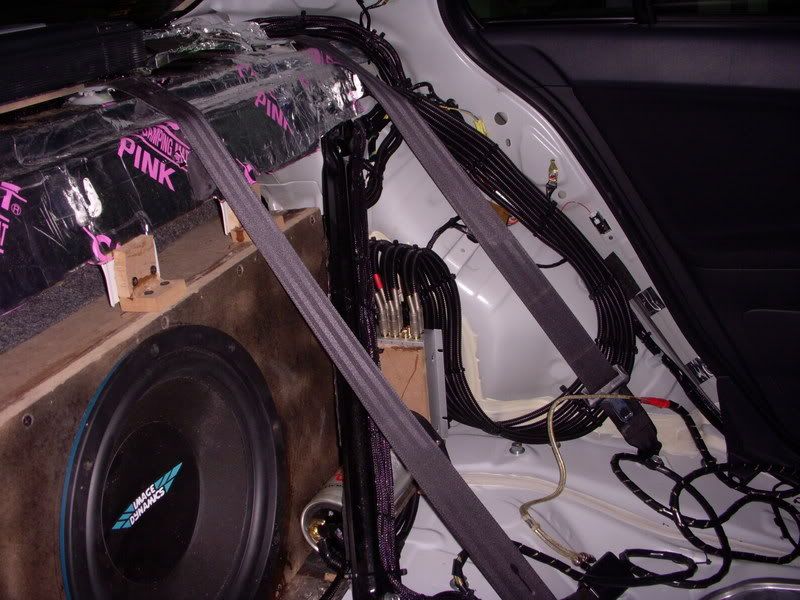
I normally DIY all my installs but as I wanted a fair amount of fiberglass work this time, so decided to leave that to the experts. I did install some of the system myself and most of the system design and components chosen were mine. I started off doing all the wiring, running powered cables on one side, speaker wire down the other and signal down the middle, all wrapped in their own protective sheath. Having the battery in the boot actually helps as no hefty power cables are required to run from the front to the back!
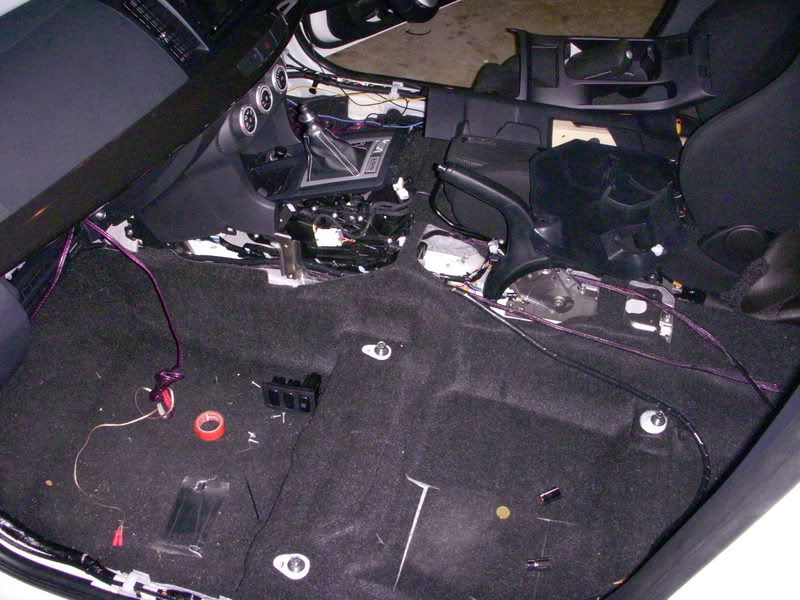

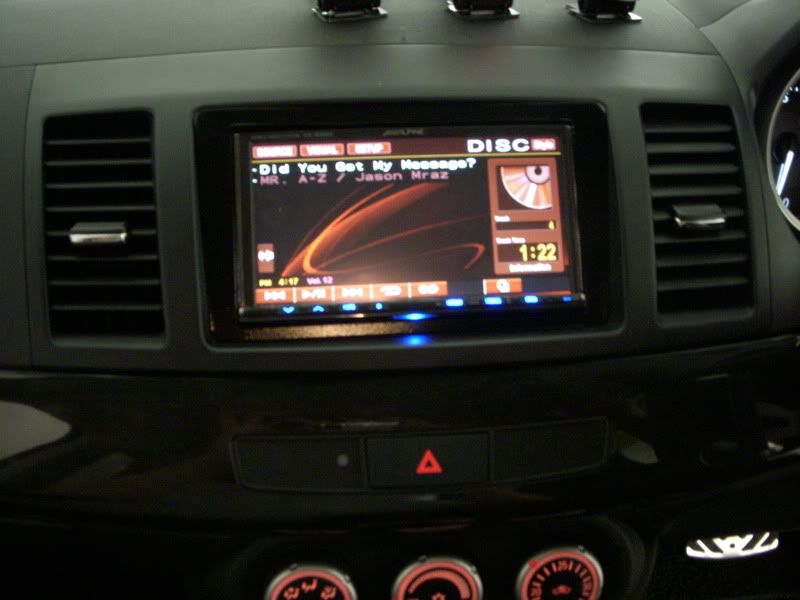
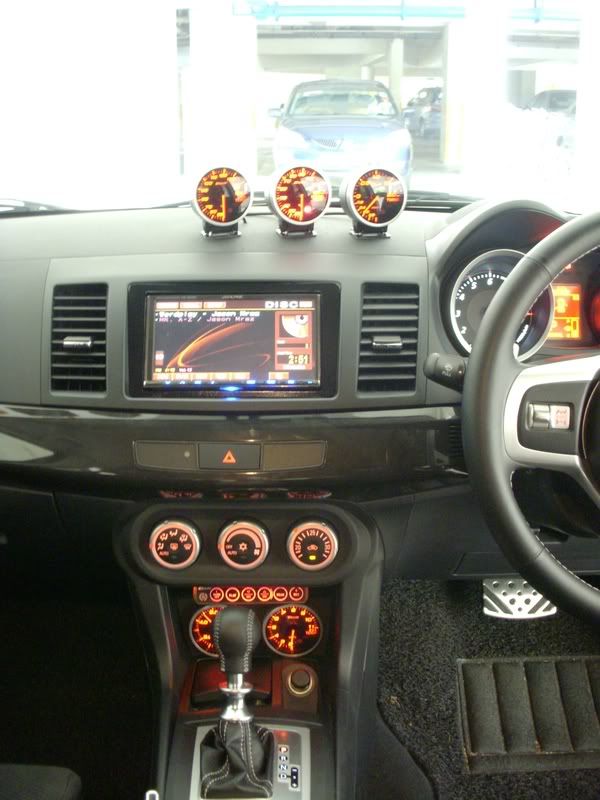
Head unit:
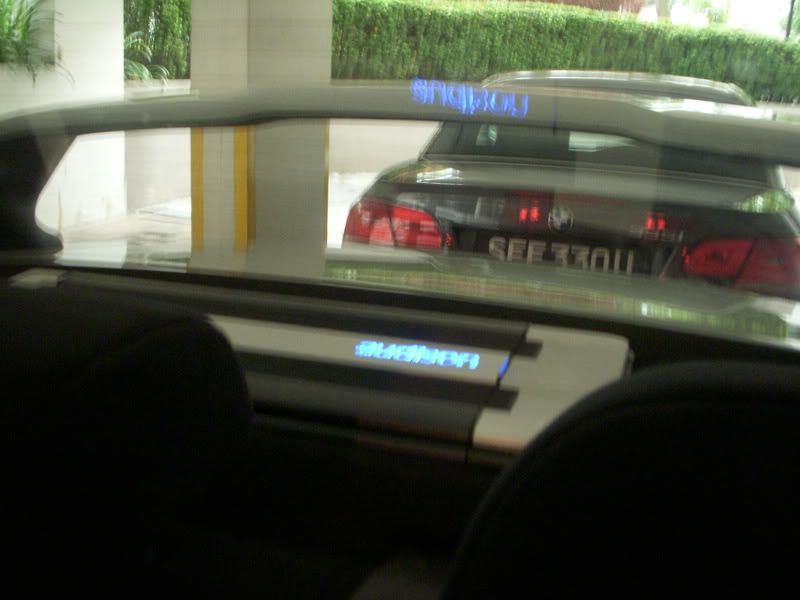
Next to go in was the HU, the latest double din from Alpine, the IVA502. Did not like how the unit stuck out on the stock HU brackets so I flushed mounted it and added a plastic trim around it. Still needs a bit of work before its perfect.
Front Components.
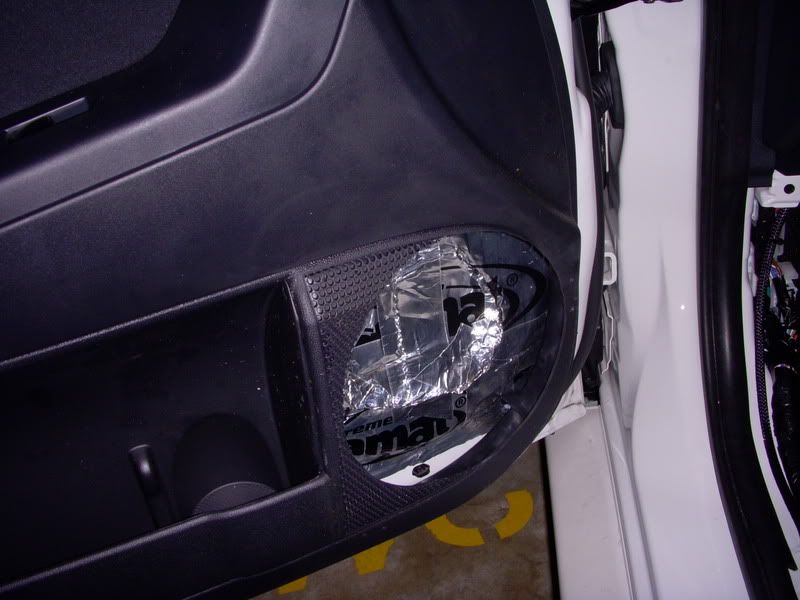
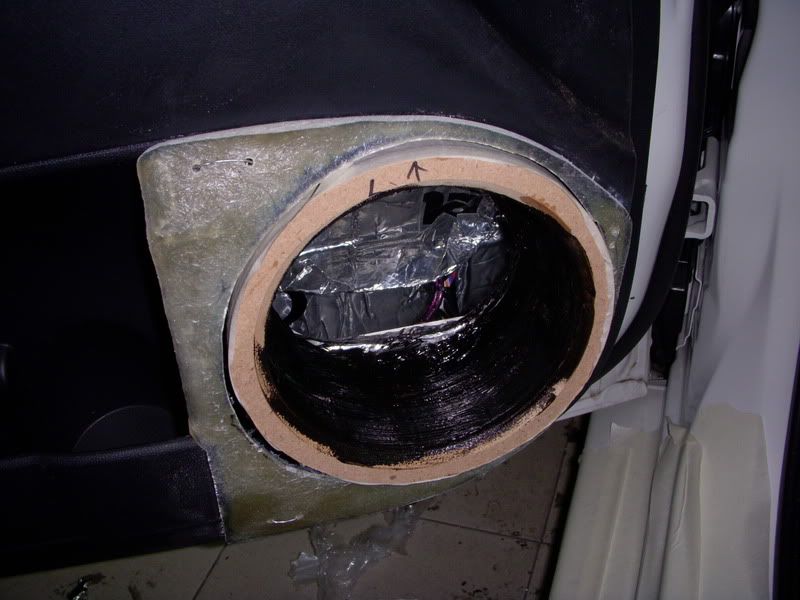
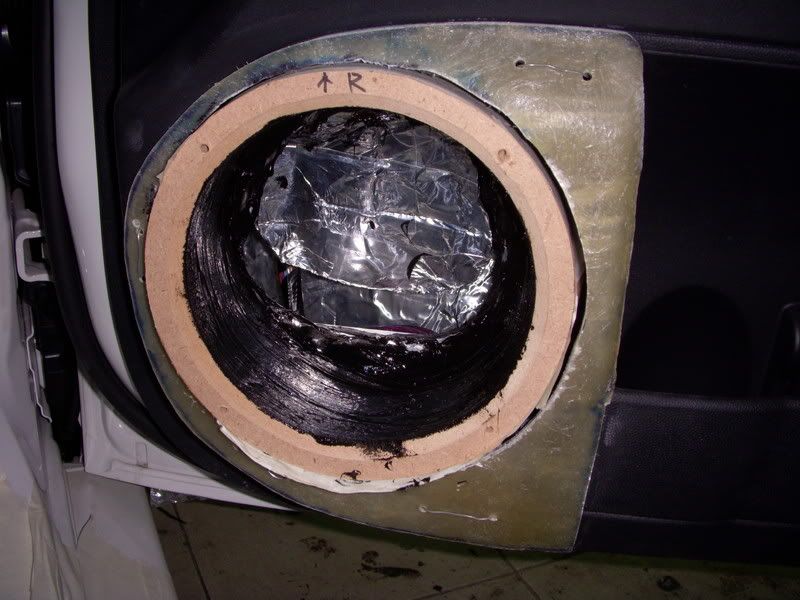
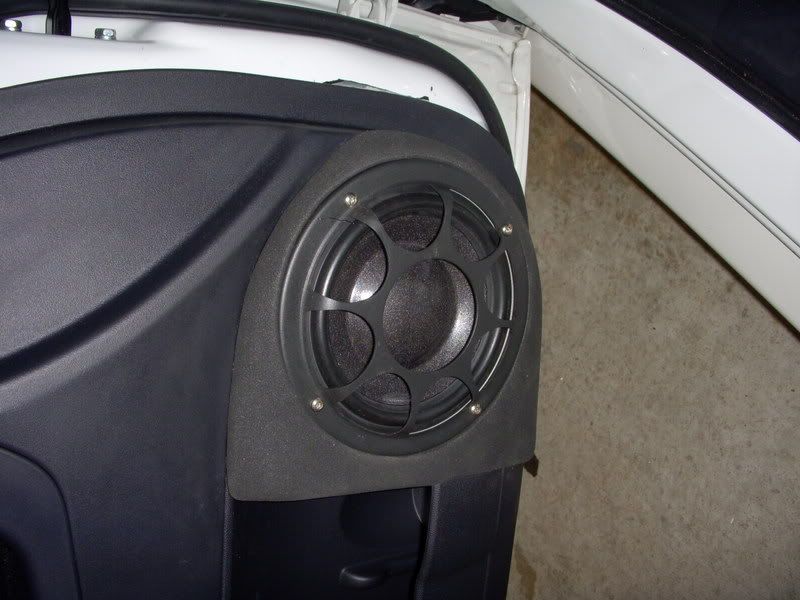
For the front speakers, I chose Morel’s top of the line Supremo Picolo tweeters and Supremo SW6 Midbass. The SW6 went into modified door locations to allow the direct transmission of sound by exposing the cone. The doors were also lined with dynamat extreme.
The tweeters were mounted on milled aluminium pods that were anodized black. Pods are quite popular here as they can rotate on their ball & socket joint allowing for tweeter angle adjustment
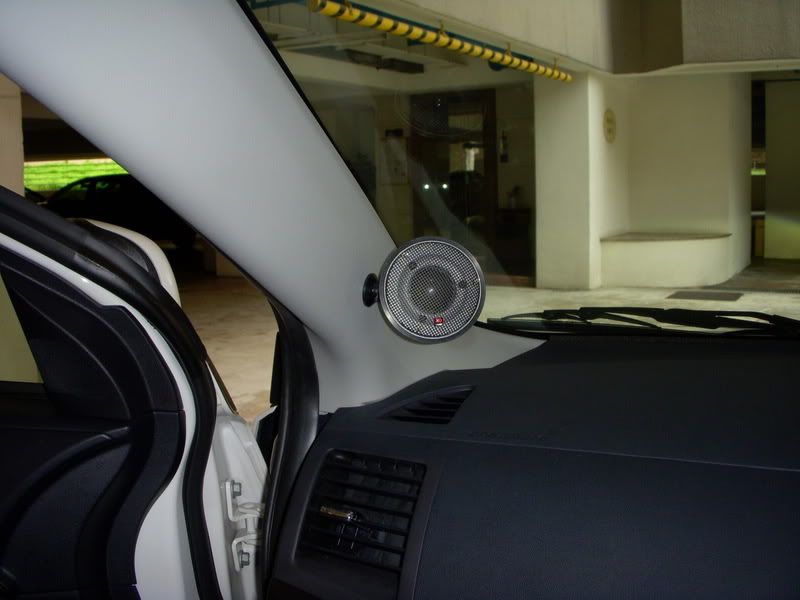
The front speakers are run actively and there are no rear speakers => weight savings!!
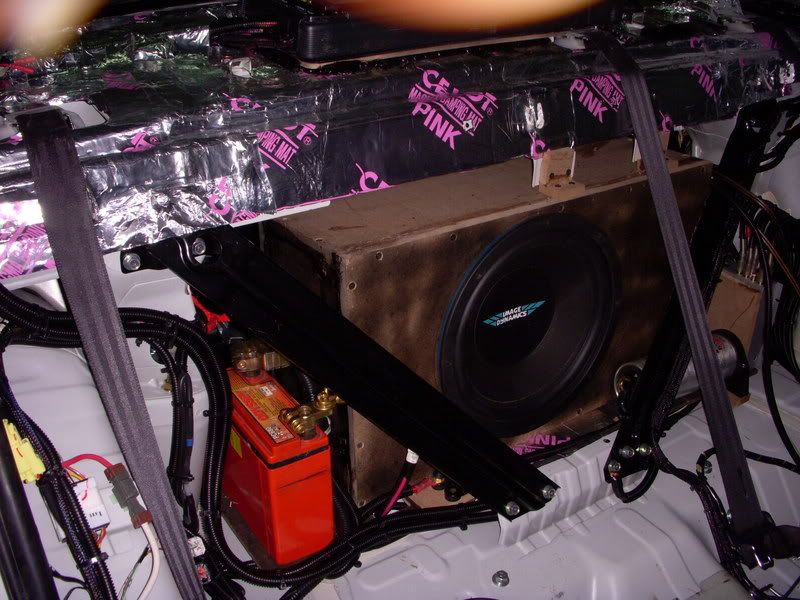
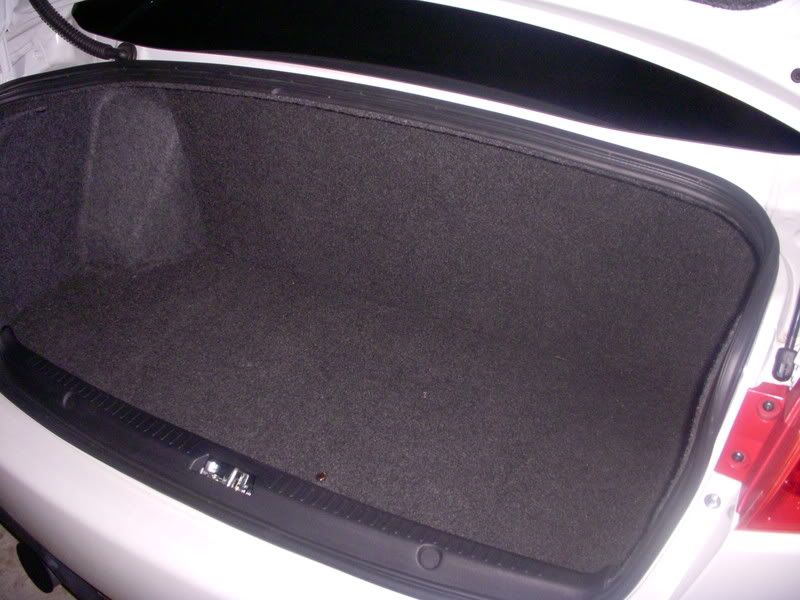
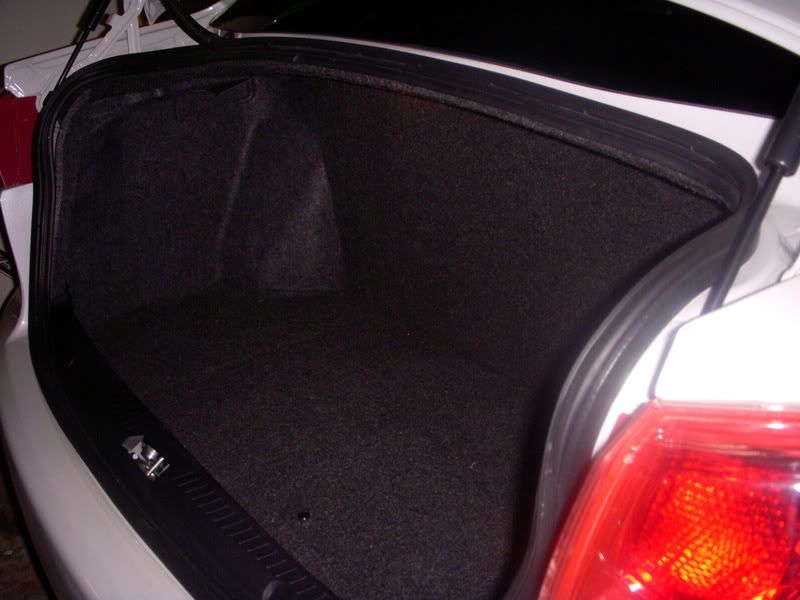
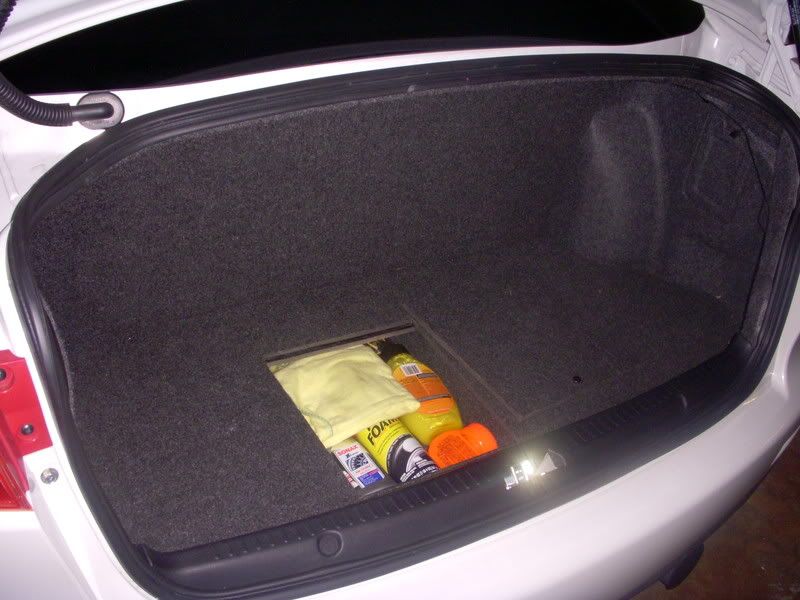
Boot install:
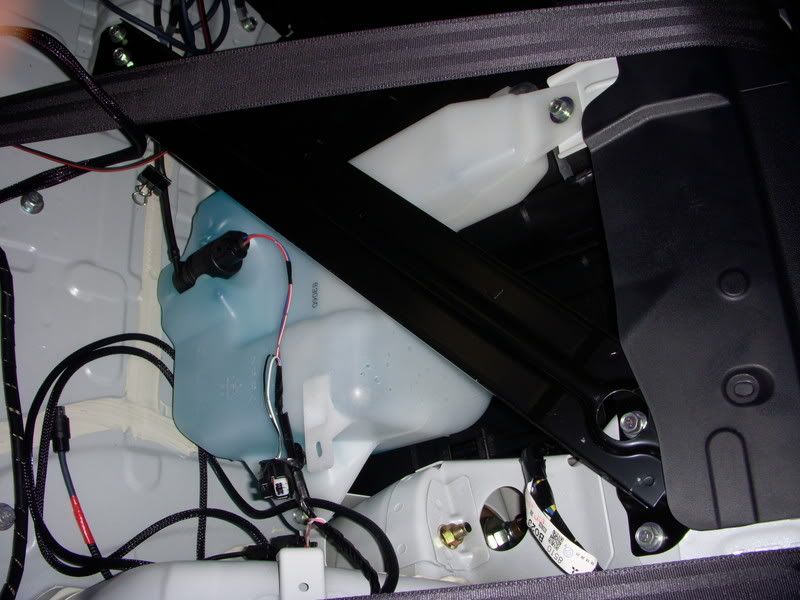
Needing as much boot space as possible, I decided to downsize the battery to an Odyssey PC680 and remove the stock washer bottle. On the SST this bottle just serves the window washer (no intercooler waterspray) and I hardly ever use it. Will install a small bladder in the engine later enough for 3 or 4 squirts!
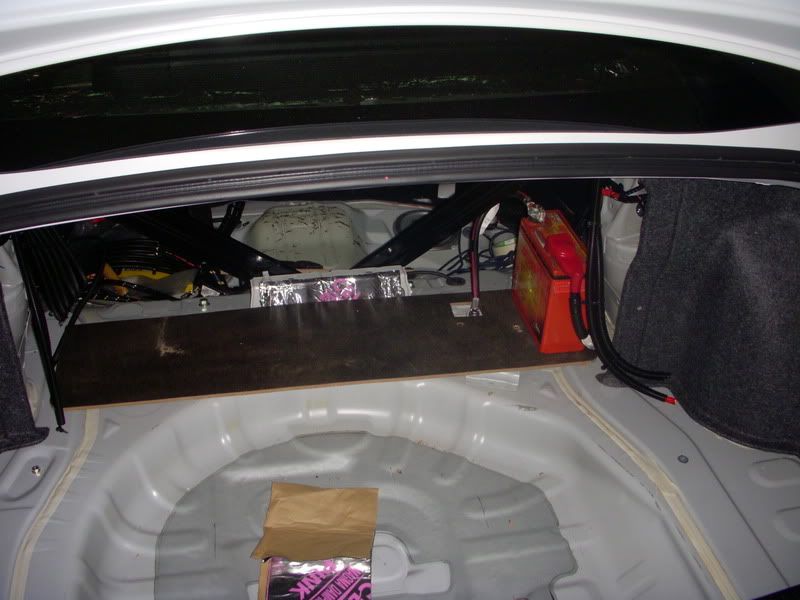
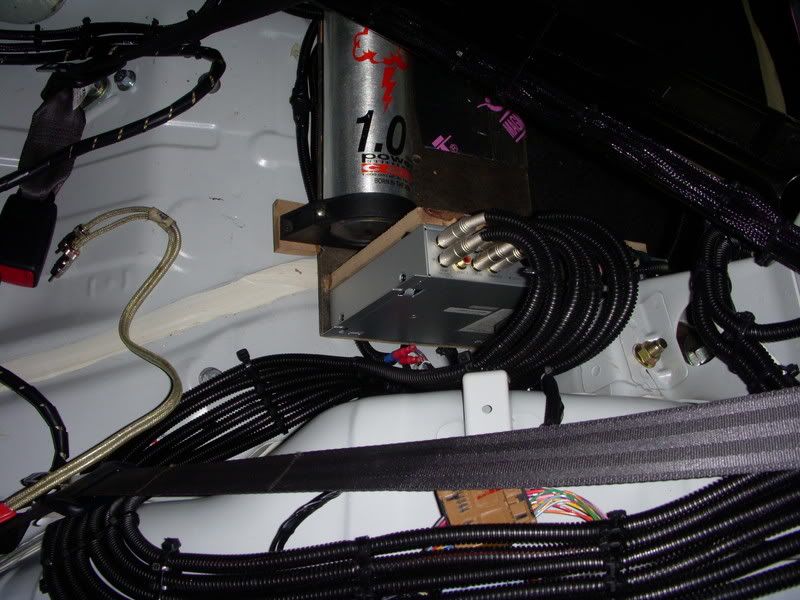
Alpine’s digital signal processor H701 is also installed in the boot. This unit comes with a digital adjustable 3 way crossover, time alignment for each speaker signal and a 31band equalizer.
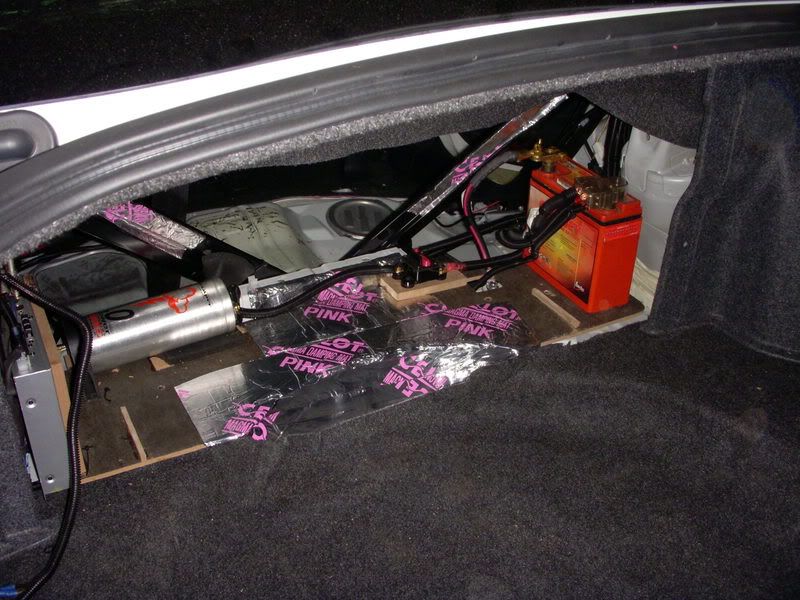
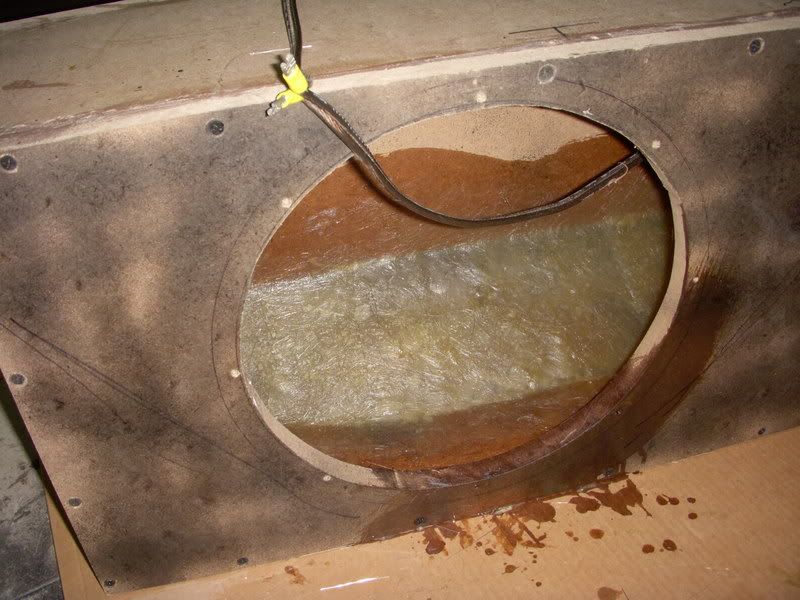
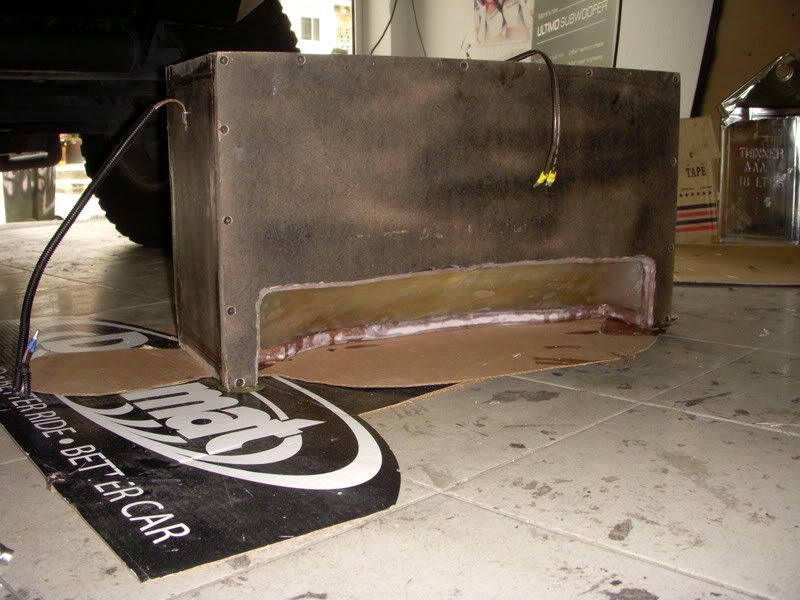
Subbox:
The boot also houses the removable sub box for an Image Dynamics IDQ12D2V2 12” sub. This sub produces great clear bass and does not need a big box. The box was custom made. The fibred ‘dent’ on the back allows me to still carry the spare tire if I ever need to. The box bolts in to the original washer bottle mounts. The sub fires into the cabin thru the thin cloth behind the rear armrest. We found this works very well as without speaker holes in the parcel shelf….the boot is pretty much ‘sealed’ from the interior.
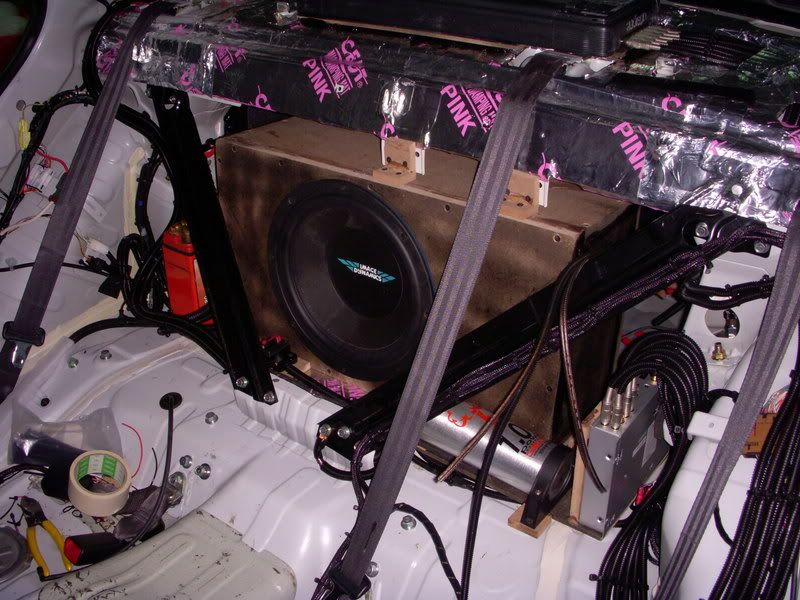
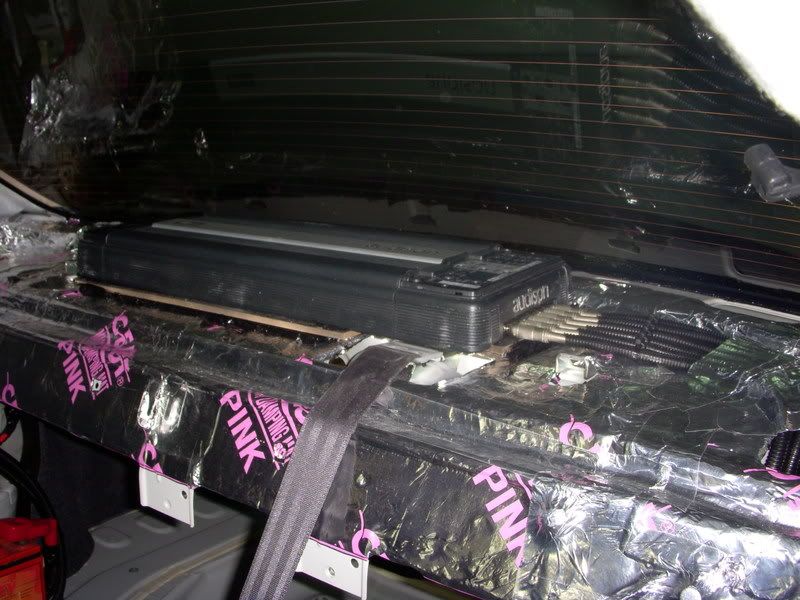
Amplifier:
The highlight of the install! I decided to run just one 5 channel amp to reduce the install space, reduce the amount of wiring required and save weight. The Audison LRX5.1k is one of the best 5 channel amps around with 2X60W RMS Class A for the tweeters, 2X170W RMS Class AB for the mids, and 1X750W RMS Class D Monoblock for the Sub and 4ohms.
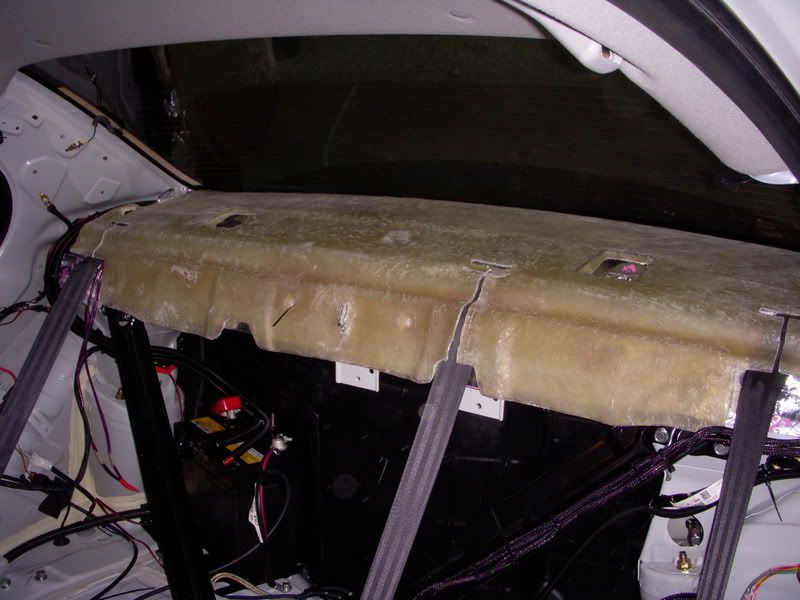
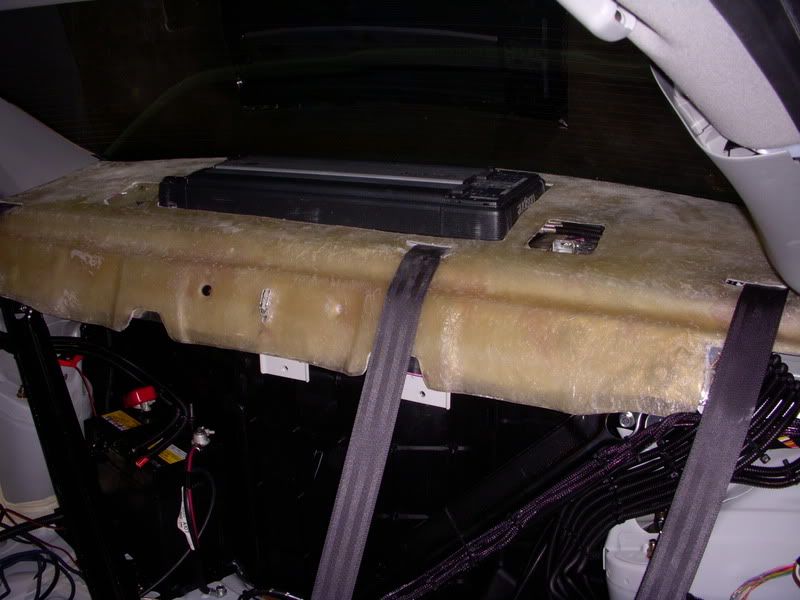
As the Evo does not have any holes in the parcel shelf for rear speakers….this was a perfect place to mount it! A custom fiberglass shelf was constructed to flush mount the amp and I still have the same rear vision area as original.

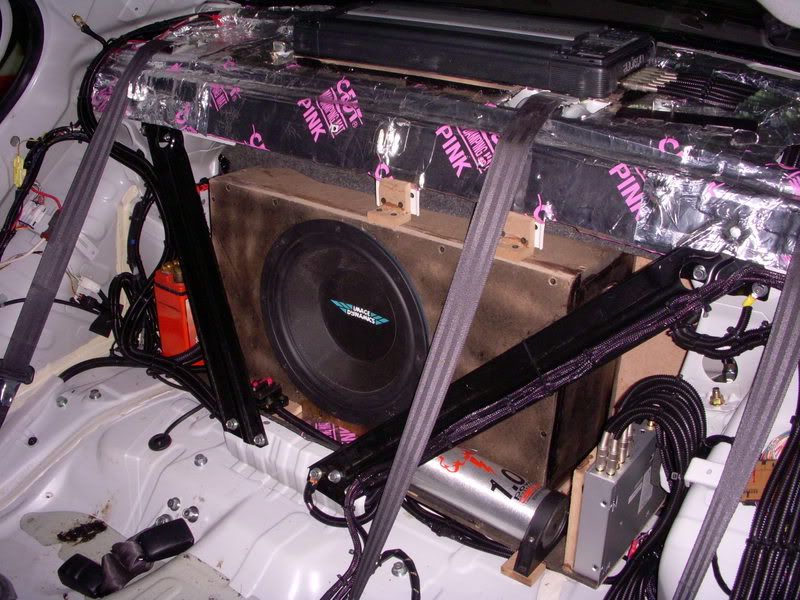
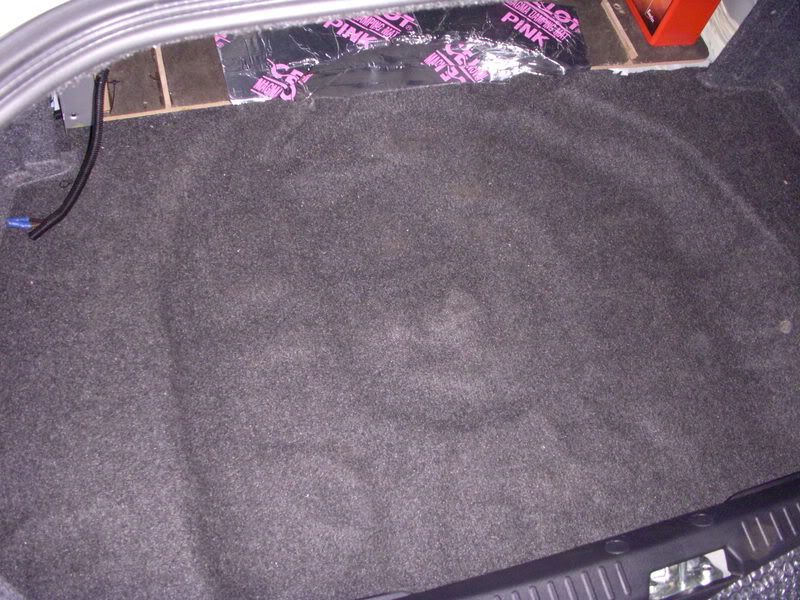
The boot was finished in carpeted panels to hide everything. A false floor with a little ‘cubby’ hole on the floor to keep things in was added to neaten things up. I can remove this to free up a little more room when needed.
.I did spend a lot of time planning the system. I needed
1) boot space (which was already small!) as I have a young kid with another on the way, 2) a competition worthy sound and
3)a flexible install that allows the heavy stuff to be removed when I go to track.
I tried my best to minimize the amount of equipment used, and lightened the car elsewhere to make up for their added weight. All in all I think it came out perfect!
Let me first clarify my use of the term ‘competition sound’. Over here in Singapore, the SQ competitions are purely judged on the systems’ sound (imaging, staging etc) and nothing on the install itself. This works out great as I don’t need a flashy and heavy boot install to impress. Anyway on to the pictures:
Wiring:
I normally DIY all my installs but as I wanted a fair amount of fiberglass work this time, so decided to leave that to the experts. I did install some of the system myself and most of the system design and components chosen were mine. I started off doing all the wiring, running powered cables on one side, speaker wire down the other and signal down the middle, all wrapped in their own protective sheath. Having the battery in the boot actually helps as no hefty power cables are required to run from the front to the back!
Head unit:
Next to go in was the HU, the latest double din from Alpine, the IVA502. Did not like how the unit stuck out on the stock HU brackets so I flushed mounted it and added a plastic trim around it. Still needs a bit of work before its perfect.
Front Components.
For the front speakers, I chose Morel’s top of the line Supremo Picolo tweeters and Supremo SW6 Midbass. The SW6 went into modified door locations to allow the direct transmission of sound by exposing the cone. The doors were also lined with dynamat extreme.
The tweeters were mounted on milled aluminium pods that were anodized black. Pods are quite popular here as they can rotate on their ball & socket joint allowing for tweeter angle adjustment
The front speakers are run actively and there are no rear speakers => weight savings!!
Boot install:
Needing as much boot space as possible, I decided to downsize the battery to an Odyssey PC680 and remove the stock washer bottle. On the SST this bottle just serves the window washer (no intercooler waterspray) and I hardly ever use it. Will install a small bladder in the engine later enough for 3 or 4 squirts!
Alpine’s digital signal processor H701 is also installed in the boot. This unit comes with a digital adjustable 3 way crossover, time alignment for each speaker signal and a 31band equalizer.
Subbox:
The boot also houses the removable sub box for an Image Dynamics IDQ12D2V2 12” sub. This sub produces great clear bass and does not need a big box. The box was custom made. The fibred ‘dent’ on the back allows me to still carry the spare tire if I ever need to. The box bolts in to the original washer bottle mounts. The sub fires into the cabin thru the thin cloth behind the rear armrest. We found this works very well as without speaker holes in the parcel shelf….the boot is pretty much ‘sealed’ from the interior.
Amplifier:
The highlight of the install! I decided to run just one 5 channel amp to reduce the install space, reduce the amount of wiring required and save weight. The Audison LRX5.1k is one of the best 5 channel amps around with 2X60W RMS Class A for the tweeters, 2X170W RMS Class AB for the mids, and 1X750W RMS Class D Monoblock for the Sub and 4ohms.
As the Evo does not have any holes in the parcel shelf for rear speakers….this was a perfect place to mount it! A custom fiberglass shelf was constructed to flush mount the amp and I still have the same rear vision area as original.
The boot was finished in carpeted panels to hide everything. A false floor with a little ‘cubby’ hole on the floor to keep things in was added to neaten things up. I can remove this to free up a little more room when needed.
Last edited by CooLeh7; Jan 12, 2009 at 07:40 AM.

 Jan 12, 2009, 10:50 AM
#5
Evolving Member
iTrader: (17)
Join Date: Jan 2004
Location: College Station, TX
Posts: 442
Likes: 0
Received 0 Likes
on
0 Posts
One word "WOW"... It's nice to see that other people actually do care about quality audio. Nice choice on the Morels. I went with the Ovation 6 b/c of the pretty drastic price increase for the Supremos. Great job on everything.
Trending Topics
Jan 12, 2009, 07:19 PM
#8
Newbie
Thread Starter
Join Date: Jul 2008
Location: Singapore
Posts: 86
Likes: 0
Received 0 Likes
on
0 Posts
Actually, my shop had done another X a few months back with a rear facing sub and did not get as much bass in the cabin as mine. We believe it had to do with the fact the boot is pretty much sealed from the cabin except for the area behind the rear seat armrest.
And with the signal processor's time alignment feature with good tuning, The bass imaging now sound like the sub is mounted in the front dash!
And with the signal processor's time alignment feature with good tuning, The bass imaging now sound like the sub is mounted in the front dash!
 Jan 13, 2009, 04:08 AM
#10
Newbie
Thread Starter
Join Date: Jul 2008
Location: Singapore
Posts: 86
Likes: 0
Received 0 Likes
on
0 Posts
BAsically the seat base is held in by two clips at the front of the seat. Just pull the base directly upwards from the front. Need a bit of force. Once the base is out u will see 3 bolts holding the seat back in place. Once u have removed these...u need to pull the seatback upwards first before removing it forward as there is a hook on wire connection located behind the seat. Hope u understood all that!
Jan 13, 2009, 04:11 AM
#11
Newbie
Thread Starter
Join Date: Jul 2008
Location: Singapore
Posts: 86
Likes: 0
Received 0 Likes
on
0 Posts
To me best sounding speakers so far.
 Feb 5, 2009, 07:03 PM
#14
Evolving Member
Join Date: Feb 2009
Location: Arkansas
Posts: 202
Likes: 0
Received 0 Likes
on
0 Posts
It is very easy, just time consuming and don't get in a hurry.
BTW. I like how you enclosed everything and one big point, I agree with you taking the seats and all out, makes it so easier and cleaner install. I notice the little things, cuz I used to be an installer. Anyway nice job. Why not glass the tweeters????
BTW. I like how you enclosed everything and one big point, I agree with you taking the seats and all out, makes it so easier and cleaner install. I notice the little things, cuz I used to be an installer. Anyway nice job. Why not glass the tweeters????
Feb 5, 2009, 07:59 PM
#15
Evolved Member
Join Date: Dec 2008
Location: MD
Posts: 685
Likes: 0
Received 0 Likes
on
0 Posts
Nice setup, I like the unconventional thinking to put the amp on the decklid. That's never crossed my mind before, but I will have to start suggesting that on my customer builds. Nice glass work also!