
Evo Hood Damper Kit (Nitrogen-filled) for Evo X / $60.00 shipped!!!
 Feb 6, 2009, 12:41 PM
#1
Account Disabled
Thread Starter
iTrader: (64)

Join Date: Feb 2006
Location: Mesa, AZ
Posts: 396
Likes: 0
Received 0 Likes
on
0 Posts
Evo Hood Damper Kit (Nitrogen-filled) for Evo X / $60.00 shipped!!!
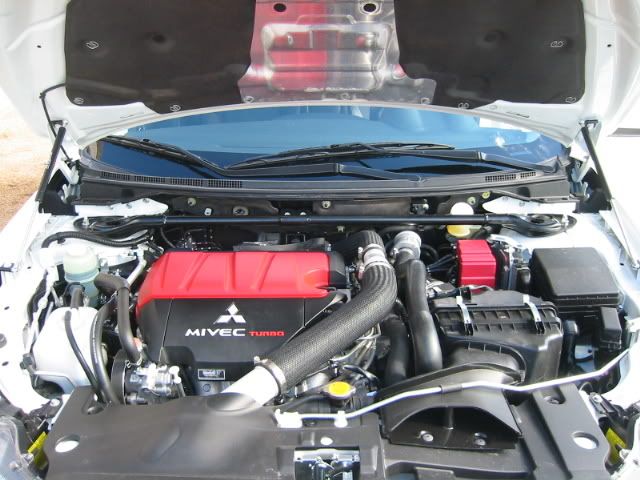
Mynes Performance has received our latest batch of Gas hood damper kits. These have been tested on the Evo X and 2008+ Lancers and they function flawlessly. Our kit has been redesigned to have stronger gas shocks than our competitors and it eliminates the "lazy" hood opening... This kit can be installed in about 10 minutes.
These hood dampers were originally designed for the Evo 7-9, but they also work great with the Evo X since the fender bolts to the hood bolt are the same distance of travel. The only notable change is the orientation of the mounting brackets.
VIDEO Demo Added: http://www.youtube.com/watch?v=b2bvyj0Mam0
It's Carbon Hood safe !!!
!!!
Kit Contents:
- Gas Damper w/ Ball Stud & fastening clips (2)
- "Long" Brackets for fender (2)
- "Short" Brackets for hood (2)
- Lock washers (4)
- Washers (4)
Tools needed:
One rachet with a 10mm socket and a 12mm socket.
If you have any question, please feel free to call the shop directly.
Mynes Performance, Inc.
934 E. Southern Ave, Bldg 1
Mesa, AZ 85204
Tel: 480.969.5609
Paypal address: mynesperformance@yahoo.com
To order: Send $60 to the above Paypal address and i will get it shipped out. Customers outside the Conti-US, pls contact me for shipping quotes. If ordering more than one set, first set is $60, $55 for each additional set.
================================================== ========
Installation Instructions:
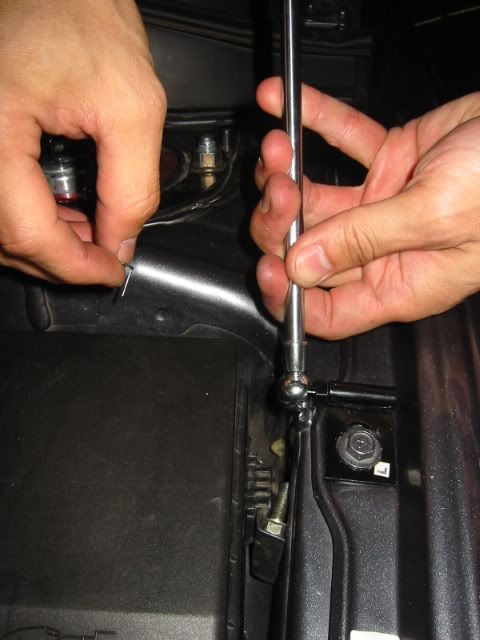
1. Remove screw from middle of fender on Driver side.
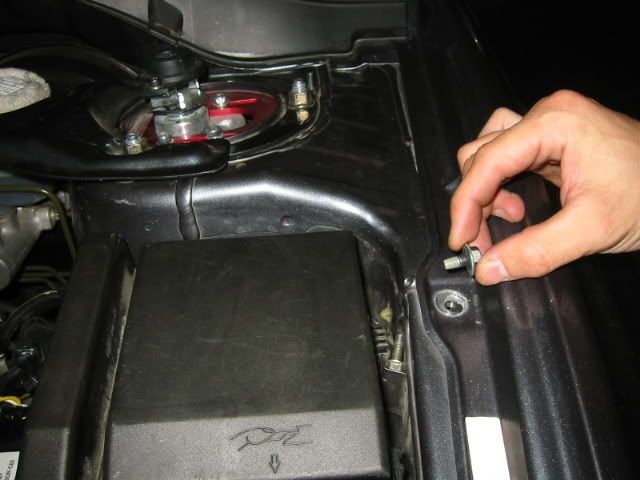
2. Insert screw through the Long bracket (labeled "L") and attach lock washer behind the bracket.
3. Tighten screw back on to Fender - make sure the ball screw end is pointing towards the driver seat.
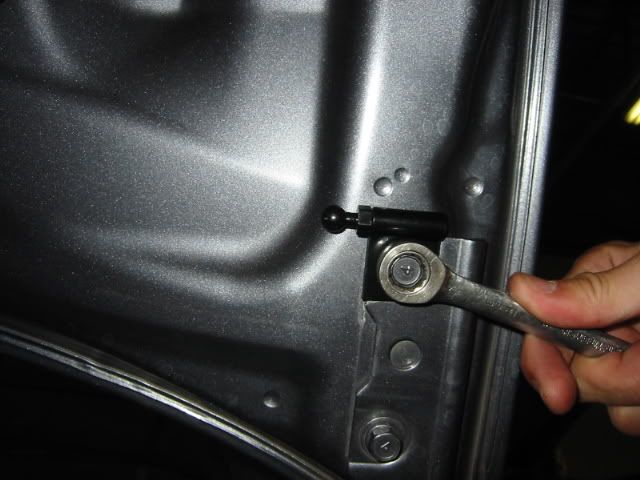
4. Remove the screw on the outer edge of the hood bracket with 12mm socket

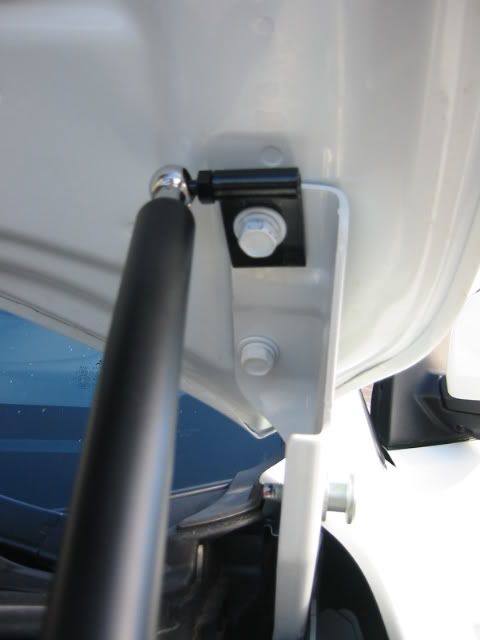
5. Insert screw through the "L"-labeled short bracket and attach lock washer behind the bracket.
6. Tighten screw back on to hood - make sure the ball screw end is pointing upward.
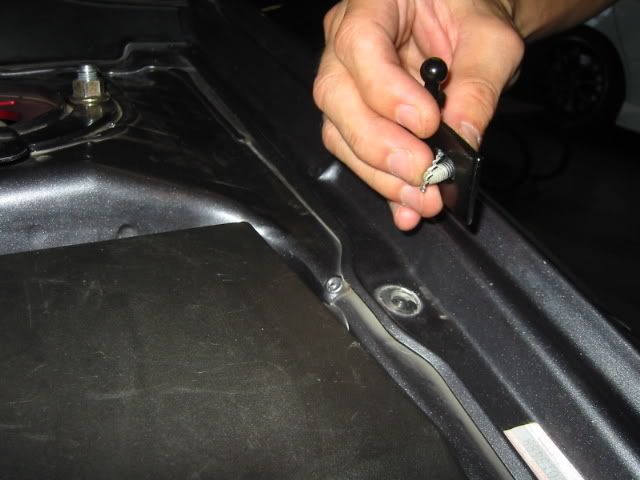
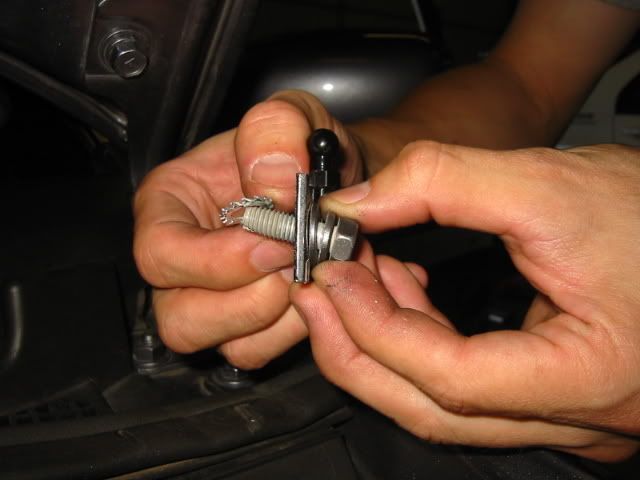
7. Remove "fastening clip" from the skinny end of the damper.
8. Affix Ball Stud to the ball screw on the fender bracket, make sure the fitment is tight.
9. Insert the "fastening clip" back into the ball screw and rotate the clip until it snaps back into the body.
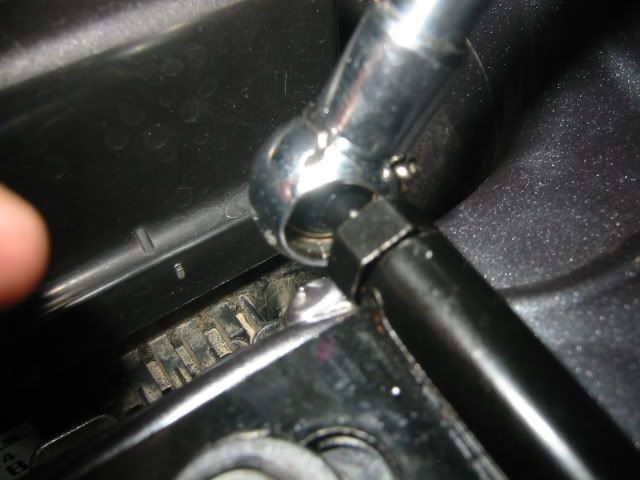
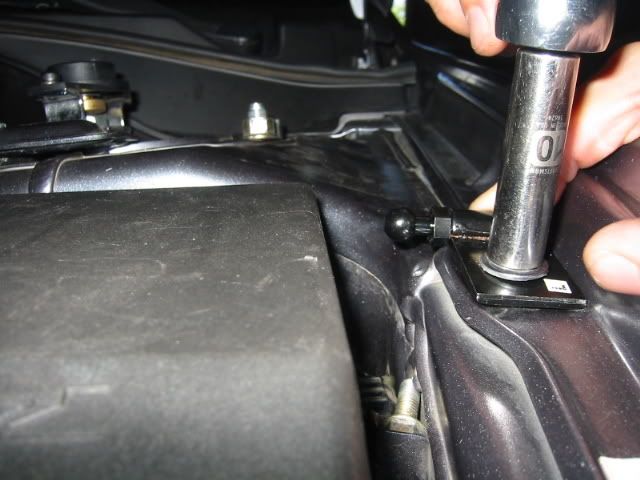
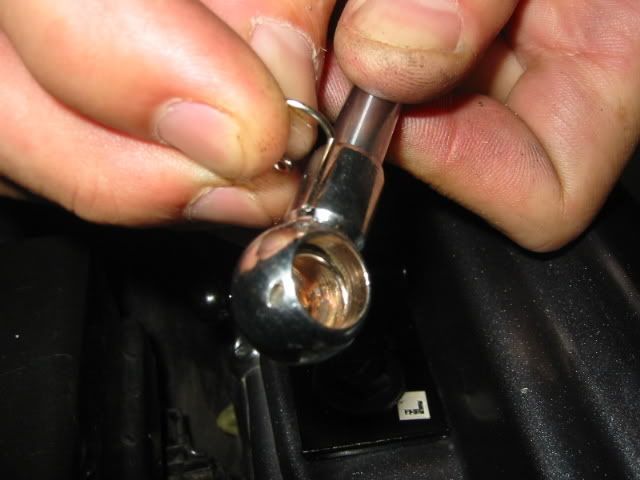
10. Remove the "fastening clip" from the other end. Compress the shock and affix the Ball Stud to the ball screw on the Hood Bracket. Rotate the shock (if needed) so the Ball stud & Ball Screw are in perfect alignment.
11. Insert the "fastening clip" back into the ball screw and rotate the clip until it snaps back into the body.
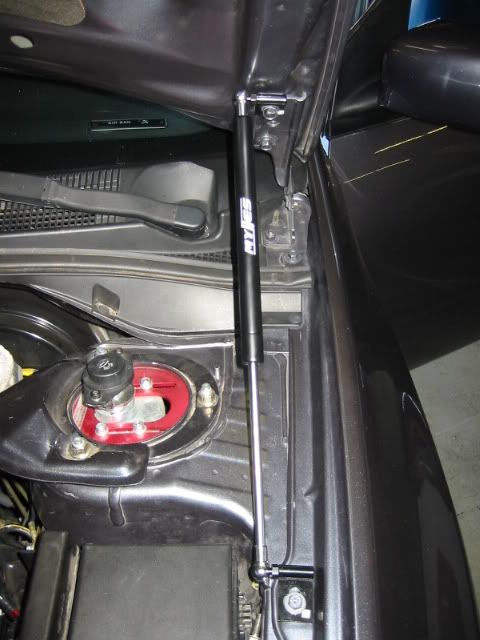
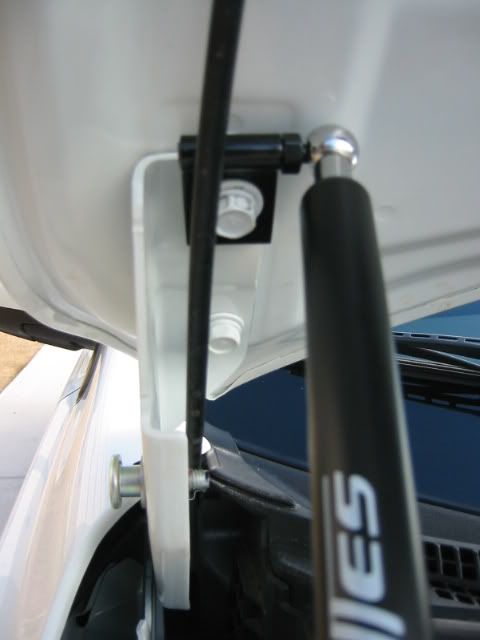
12. This is how it looks when properly installed.
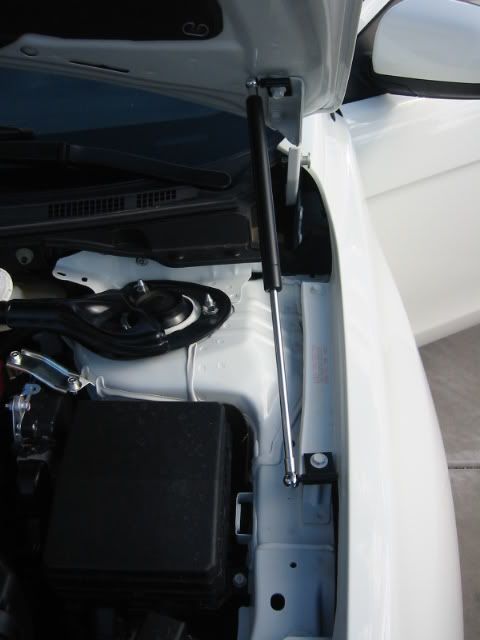
13. Repeat the above steps on the passenger side; when done, this is how it should look
These hood dampers were originally designed for the Evo 7-9, but they also work great with the Evo X since the fender bolts to the hood bolt are the same distance of travel. The only notable change is the orientation of the mounting brackets.
VIDEO Demo Added: http://www.youtube.com/watch?v=b2bvyj0Mam0
It's Carbon Hood safe
!!!Kit Contents:
- Gas Damper w/ Ball Stud & fastening clips (2)
- "Long" Brackets for fender (2)
- "Short" Brackets for hood (2)
- Lock washers (4)
- Washers (4)
Tools needed:
One rachet with a 10mm socket and a 12mm socket.
If you have any question, please feel free to call the shop directly.
Mynes Performance, Inc.
934 E. Southern Ave, Bldg 1
Mesa, AZ 85204
Tel: 480.969.5609
Paypal address: mynesperformance@yahoo.com
To order: Send $60 to the above Paypal address and i will get it shipped out. Customers outside the Conti-US, pls contact me for shipping quotes. If ordering more than one set, first set is $60, $55 for each additional set.
Key Points for the Evo X and 2007+ Lancer:
Driver side:Use some double-sided sticky tape between the bracket and the fender to give it a little traction so the bracket stays in place.
Passenger side:
Use some double-sided sticky tape between the bracket and the fender to give it a little traction so the bracket stays in place.

Driver side:Use some double-sided sticky tape between the bracket and the fender to give it a little traction so the bracket stays in place.
Passenger side:
Use some double-sided sticky tape between the bracket and the fender to give it a little traction so the bracket stays in place.
================================================== ========
General Install Instructions for your reference.:
Installation Instructions:
1. Remove screw from middle of fender on Driver side.
2. Insert screw through the Long bracket (labeled "L") and attach lock washer behind the bracket.
3. Tighten screw back on to Fender - make sure the ball screw end is pointing towards the driver seat.
4. Remove the screw on the outer edge of the hood bracket with 12mm socket
5. Insert screw through the "L"-labeled short bracket and attach lock washer behind the bracket.
6. Tighten screw back on to hood - make sure the ball screw end is pointing upward.
7. Remove "fastening clip" from the skinny end of the damper.
8. Affix Ball Stud to the ball screw on the fender bracket, make sure the fitment is tight.
9. Insert the "fastening clip" back into the ball screw and rotate the clip until it snaps back into the body.
10. Remove the "fastening clip" from the other end. Compress the shock and affix the Ball Stud to the ball screw on the Hood Bracket. Rotate the shock (if needed) so the Ball stud & Ball Screw are in perfect alignment.
11. Insert the "fastening clip" back into the ball screw and rotate the clip until it snaps back into the body.
12. This is how it looks when properly installed.
13. Repeat the above steps on the passenger side; when done, this is how it should look
Last edited by Mike@Mynes; Mar 9, 2009 at 10:27 PM.

 Feb 6, 2009, 01:11 PM
#3
Account Disabled
Thread Starter
iTrader: (64)
Join Date: Feb 2006
Location: Mesa, AZ
Posts: 396
Likes: 0
Received 0 Likes
on
0 Posts

On the Evo X hoods, they work exactly like the Evo 7-9 hoods... perfect....
cheers.
mike
Feb 6, 2009, 01:43 PM
#6
Any type of warranty on these if they fail after x amount of time? Also any pix of it installed in a X? I notice you posted pics of the 7,8, and 9 kits. Are you using still the same kit or a different one and are they rust proof?
Last edited by R0ME0; Feb 6, 2009 at 02:07 PM.

Trending Topics
 Feb 7, 2009, 12:59 PM
#12
Account Disabled
Thread Starter
iTrader: (64)
Join Date: Feb 2006
Location: Mesa, AZ
Posts: 396
Likes: 0
Received 0 Likes
on
0 Posts
one year warranty from date of purchase. the bracket are painted but the hole where the ball-joint screws into is not rust proof... one can simply put some black silicon to seal it up. These are the same hood dampers i sell for the evo 7-9... we have sold tons of these on EvoM without any issues, and we provide excellent customer service and fast shipping.
cheers.
cheers.