
DIY: Altered Gauges!!!
 Jun 30, 2006 | 10:40 PM
#1
Thread Starter
Evolving Member
Joined: May 2006
Posts: 162
Likes: 0
From: IL
DIY: Altered Gauges!!!
This thread will go into great detail describing how I altered my gauges and how you can do this yourself. I did this to my ES gauges but I assume the same can be done for the OZ. A lot of pictures will be in this thread to help you get an idea of what you will need to do. This thread will cover painting the needles to changing the lighting of the gauges. I will be posting this thread in chunks due to fairly large amounts of information and pictures; however, I will have this thread completed by tonight.
Jun 30, 2006 | 10:51 PM
#2
Thread Starter
Evolving Member
Joined: May 2006
Posts: 162
Likes: 0
From: IL
First off is the list of materials you will need to complete the task:
1. Philips Screwdrivers
2. Paint for the needles
3. Glue stick (or some other adhesive)
4. Theatrical Gel: choose color choice that you would like for your gauges to light up as [more than one color can be used; however, this stuff runs about $7 a sheet] (I got it at a lighting store. It is the transparent film that goes over the lights for plays. Same stuff can be placed over clock to change its color.)
* TIP: You may be able to get the stuff for free by asking if they have any left over scraps. I didn't even have to do this the guy just offered it up (saved $14)
5. Pocket Knife or something with a relatively sharp blade
6. "OOPS!" stain remover (can be found at Wal-mart)
7. Optional (but highly recommended): Lightrikz Hyper-White LED Kit
8. Scissors or Exacto Knife
1. Philips Screwdrivers
2. Paint for the needles
3. Glue stick (or some other adhesive)
4. Theatrical Gel: choose color choice that you would like for your gauges to light up as [more than one color can be used; however, this stuff runs about $7 a sheet] (I got it at a lighting store. It is the transparent film that goes over the lights for plays. Same stuff can be placed over clock to change its color.)
*
TIP: You may be able to get the stuff for free by asking if they have any left over scraps. I didn't even have to do this the guy just offered it up (saved $14)5. Pocket Knife or something with a relatively sharp blade
6. "OOPS!" stain remover (can be found at Wal-mart)
7. Optional (but highly recommended): Lightrikz Hyper-White LED Kit
8. Scissors or Exacto Knife
Jun 30, 2006 | 11:03 PM
#3
Thread Starter
Evolving Member
Joined: May 2006
Posts: 162
Likes: 0
From: IL
IMPORTANT: Take a picture of where your needles sit while the car is running (or try to remember). Make note of where your car idles at (if the a/c is on/off this makes a difference). Make note of the location of the needle on the gas gauge while the car is running. See where the oil temp lies whenever the car is warm. This is all important for putting your needles back on after they have been removed. (Note: This is probably not the most professional method but this is what I did. It works for me but make sure you consult a professional if you do not want to risk having your gauges off.
Getting Out the Instrument Cluster:
1. Remove the two screws just above the steering wheel column in front of the gauges.
2. Now you can pull out the part of the dash surrounding the instrument cluster.
3. Remove the three screws holding in the instrument cluster.
4. Now you can wiggle out the instrument cluster (this can be a little frustrating the first time)
5. Then disconnect the two harnesses on the back of the instrument cluster.
6. Gauges have been successfully been removed from the car!
Jun 30, 2006 | 11:30 PM
#4
Thread Starter
Evolving Member
Joined: May 2006
Posts: 162
Likes: 0
From: IL
Painting the Needles (Probably the most difficult part):
1. Remove the instrument cluster cover by pulling up the two tabs on the side and then pushing in the tabs on the bottom and top of the cover. The cover should pop off.
2. Then take out the little black stoppers below the tach and speedo needles (Put them in a safe place you don't want to lose them). Use a flat blade screwdriver or a small philips screwdriver to gently pry off the black covers over the ends of the needles.
3. Gently but with some force pull up on the needles at the base (do not pull on the skinny part otherwise you risk breaking the needle)
4. The needle should finally pop off.
5. Remove the stock paint from the needle by using "OOPS!" stain remover. The needles will be clear once all paint has been removed *Note : Observe the part of the needle that was paint...you will not want to paint the whole thing (Pour some on a rag or paper towel and GENTLY rub off paint...it should come off really easily).
6. Next choose the color of paint you wish to paint your needles (too dark of colors will not illuminate)
7. Colors I have tested:
Brand-Delta Cermcoat....Color: Bright Red Rouge Clair Transparent...Works with stock bulbs without blue gel caps
Picture of Needles lit with this kind of paint and stock bubs (just pay attention to the tach for color)

Brand-FolkArt....Color:2225 Ocean Cruise....Works with HyperWhite LED Kit by Lightrikz
Needles lit with this type of paint and LED Kit(gauge faces are not the same):

Both paints were found at HobbyLobby for around a $1 a piece. *NOTE: The lights used behind the gauges will alter how the needles light up. For example the speedometer in the first picture is painted the same color as the needles in the second picture. The only difference is the stock bulbs are used in the first picture and the HyperWhite LEDs in the second.
8. Use the paint brush and paint the needles in the same place the stock ones were. Turn needle over to check progress. This is the difficult part but take your time and be sure to do a good job. *Remember: You will not be able to exactly replicate factory needle paint job so don't expect perfection.
9. Hold needle up to the light and observe how the light shines through it. You want the light to shine through evenly.
10. Allow the needles to dry completely. In the meantime, you may work on the gauge face.
1. Remove the instrument cluster cover by pulling up the two tabs on the side and then pushing in the tabs on the bottom and top of the cover. The cover should pop off.
2. Then take out the little black stoppers below the tach and speedo needles (Put them in a safe place you don't want to lose them). Use a flat blade screwdriver or a small philips screwdriver to gently pry off the black covers over the ends of the needles.
3. Gently but with some force pull up on the needles at the base (do not pull on the skinny part otherwise you risk breaking the needle)
4. The needle should finally pop off.
5. Remove the stock paint from the needle by using "OOPS!" stain remover. The needles will be clear once all paint has been removed *Note : Observe the part of the needle that was paint...you will not want to paint the whole thing (Pour some on a rag or paper towel and GENTLY rub off paint...it should come off really easily).
6. Next choose the color of paint you wish to paint your needles (too dark of colors will not illuminate)
7. Colors I have tested:
Brand-Delta Cermcoat....Color: Bright Red Rouge Clair Transparent...Works with stock bulbs without blue gel caps
Picture of Needles lit with this kind of paint and stock bubs (just pay attention to the tach for color)
Brand-FolkArt....Color:2225 Ocean Cruise....Works with HyperWhite LED Kit by Lightrikz
Needles lit with this type of paint and LED Kit(gauge faces are not the same):
Both paints were found at HobbyLobby for around a $1 a piece. *NOTE: The lights used behind the gauges will alter how the needles light up. For example the speedometer in the first picture is painted the same color as the needles in the second picture. The only difference is the stock bulbs are used in the first picture and the HyperWhite LEDs in the second.
8. Use the paint brush and paint the needles in the same place the stock ones were. Turn needle over to check progress. This is the difficult part but take your time and be sure to do a good job. *Remember: You will not be able to exactly replicate factory needle paint job so don't expect perfection.
9. Hold needle up to the light and observe how the light shines through it. You want the light to shine through evenly.
10. Allow the needles to dry completely. In the meantime, you may work on the gauge face.
Last edited by mscc04; Jul 1, 2006 at 01:14 AM.
Jul 1, 2006 | 12:18 AM
#5
Thread Starter
Evolving Member
Joined: May 2006
Posts: 162
Likes: 0
From: IL
Altering the Gauge Face:
Two Different Routes can be taken here. It depends on if you would like to use the stock bulbs and just remove the gel caps or use hyperwhite LEDS.
Route #1 (using stock bulbs):
1. Remove the cover on the backside of insturment cluster to more fully expose the bulbs.
2. Remove bulbs by twisting them out.
3. Remove the gel covers (except possibly the odometer bulb...it's up to you)
4. Install bulbs and cover on insturment cluster.
5. While you have the needles removed the gauge face can be popped off by gently applying pressure upward by the bases of needles. You'll know what I am talking about once you try to do it.
Two Options: Follow steps for Route #2 dealing with the alteration of the gauge face (which I did not test with the stock bulbs) or do what I did with the stock bulbs and continue on to step 6.
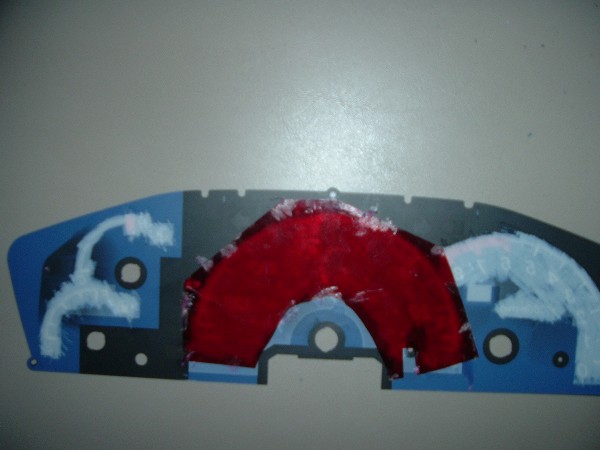
6. Once the gauge face is removed you should turn it over. Cut the theatrical gel to cover places that the light will go through. I then used a glue stick to attach the theatrical gel to the gauge face (I know it seems pretty primative but it worked really well). I would pinch off a little of the glue with my fingers and would apply it in small amounts to attach the theatrical gel. It will probably look kind of sloppy but that really doesn't matter. Just make sure you are not getting glue over the parts that light emits through. You can also use multiple pieces to fill in a spot if you mess up so don't worry. Be sure that the pieces align and don't overlap if this is a spot that light needs to go through. I used two layers of theatrical gel for the stock bulbs to give it a deeper color. Pictures of what the back of my gauge face looks like can be found in Route 2 as reference.
7. Hold up gauges to a light and see how the light comes through the numbers to check to make sure you did not miss a spot.
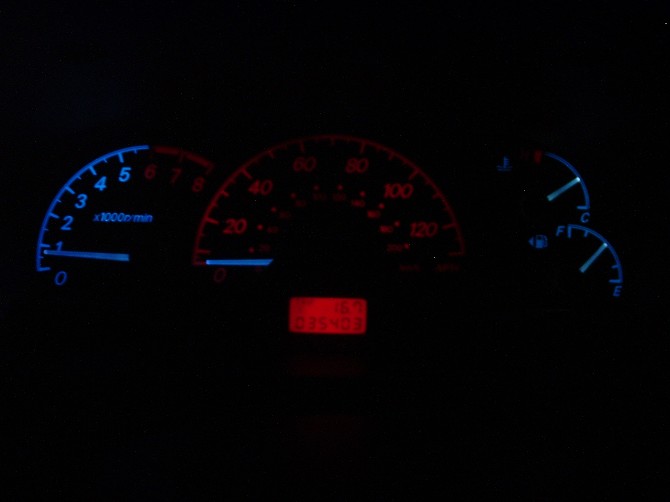
Picture of Gauges with One Layer Theatrical Gel with Needles painted with Brand: Testors...Color: 1352 Fluor. Green...Stock Bulbs (the Needles Light up a Yellow/Green...Odometer bulb still has blue gel cover on it

Picture of Gauges with Two Layers of Theatrical Gel (same blue as used in picture above) with Stock Needles and Bulbs...odometer bulb still has blue gel cover over it

8. Place Gauge face back on instrument cluster like it was before (make sure it is popped back into place)
9. Move on to Replacing the needles
Two Different Routes can be taken here. It depends on if you would like to use the stock bulbs and just remove the gel caps or use hyperwhite LEDS.
Route #1 (using stock bulbs):
1. Remove the cover on the backside of insturment cluster to more fully expose the bulbs.
2. Remove bulbs by twisting them out.
3. Remove the gel covers (except possibly the odometer bulb...it's up to you)
4. Install bulbs and cover on insturment cluster.
5. While you have the needles removed the gauge face can be popped off by gently applying pressure upward by the bases of needles. You'll know what I am talking about once you try to do it.
Two Options: Follow steps for Route #2 dealing with the alteration of the gauge face (which I did not test with the stock bulbs) or do what I did with the stock bulbs and continue on to step 6.
6. Once the gauge face is removed you should turn it over. Cut the theatrical gel to cover places that the light will go through. I then used a glue stick to attach the theatrical gel to the gauge face (I know it seems pretty primative but it worked really well). I would pinch off a little of the glue with my fingers and would apply it in small amounts to attach the theatrical gel. It will probably look kind of sloppy but that really doesn't matter. Just make sure you are not getting glue over the parts that light emits through. You can also use multiple pieces to fill in a spot if you mess up so don't worry. Be sure that the pieces align and don't overlap if this is a spot that light needs to go through. I used two layers of theatrical gel for the stock bulbs to give it a deeper color. Pictures of what the back of my gauge face looks like can be found in Route 2 as reference.
7. Hold up gauges to a light and see how the light comes through the numbers to check to make sure you did not miss a spot.
Picture of Gauges with One Layer Theatrical Gel with Needles painted with Brand: Testors...Color: 1352 Fluor. Green...Stock Bulbs (the Needles Light up a Yellow/Green...Odometer bulb still has blue gel cover on it
Picture of Gauges with Two Layers of Theatrical Gel (same blue as used in picture above) with Stock Needles and Bulbs...odometer bulb still has blue gel cover over it
8. Place Gauge face back on instrument cluster like it was before (make sure it is popped back into place)
9. Move on to Replacing the needles
Last edited by mscc04; Jul 1, 2006 at 12:24 AM.
Jul 1, 2006 | 12:54 AM
#6
Thread Starter
Evolving Member
Joined: May 2006
Posts: 162
Likes: 0
From: IL
Route 2 (With HyperWhite LED Kit from Lightrikz.com):
1. Follow steps 1 and 2 of Route 1 and then replace the stock bulbs with the LEDS. *NOTE: LED will change the color of the odometer to the color of the LED when lit
2. Reinstall cover on the back of instrument cluster.
3. While you have the needles removed the gauge face can be popped off by gently applying pressure upward by the bases of needles. You'll know what I am talking about once you try to do it.
4. Two choices either make this modification to the gauges or don't do it. I'll include pictures to show what the guages look like with and without it done.
5. Here is the modification: Take the pocket knife or sharp object and scrap off the back part of the gauge till it becomes white. Make sure to scrap off every part of the gauge that has light showing through it.
Picture of what the guage face looks like with part of it scraped off
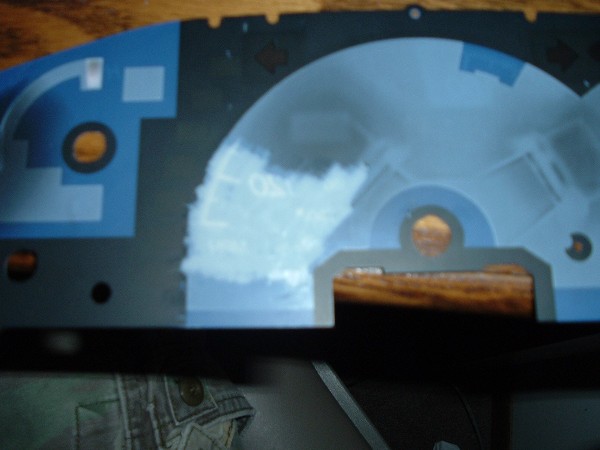
Picture of Difference in the type and amount of light that goes through the gauge face with the back scraped...*Note: that the same amount and type of light is going through the gauge face
6. (Start at this point if you want to skip the modification)
Follow step 6 of Route 1 except only use one layer of theatrical gel
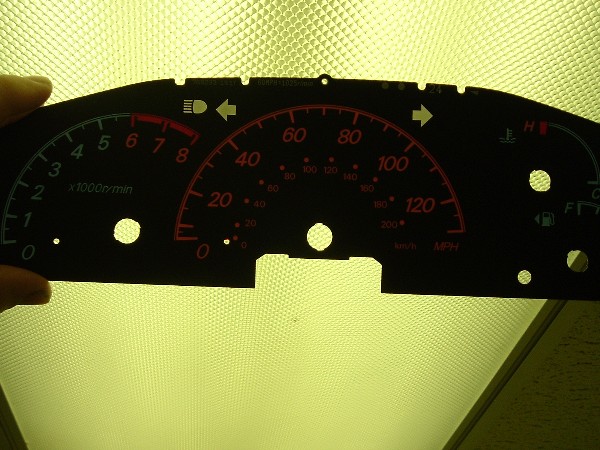
Picture of Modified Gauge with beginning of theatrical gel application
Fully covered gauge (I know it looks bad but the next picture will show that it doesn't matter)

Picture of checking for no missed spots
7. Replace gauge face and be sure that it is snapped in correctly.
8. Time to replace the needles
1. Follow steps 1 and 2 of Route 1 and then replace the stock bulbs with the LEDS. *NOTE: LED will change the color of the odometer to the color of the LED when lit
2. Reinstall cover on the back of instrument cluster.
3. While you have the needles removed the gauge face can be popped off by gently applying pressure upward by the bases of needles. You'll know what I am talking about once you try to do it.
4. Two choices either make this modification to the gauges or don't do it. I'll include pictures to show what the guages look like with and without it done.
5. Here is the modification: Take the pocket knife or sharp object and scrap off the back part of the gauge till it becomes white. Make sure to scrap off every part of the gauge that has light showing through it.
Picture of what the guage face looks like with part of it scraped off
Picture of Difference in the type and amount of light that goes through the gauge face with the back scraped...*Note: that the same amount and type of light is going through the gauge face
6. (Start at this point if you want to skip the modification)
Follow step 6 of Route 1 except only use one layer of theatrical gel
Picture of Modified Gauge with beginning of theatrical gel application
Fully covered gauge (I know it looks bad but the next picture will show that it doesn't matter)
Picture of checking for no missed spots
7. Replace gauge face and be sure that it is snapped in correctly.
8. Time to replace the needles
Last edited by mscc04; Jul 1, 2006 at 09:51 AM.
Jul 1, 2006 | 01:13 AM
#7
Thread Starter
Evolving Member
Joined: May 2006
Posts: 162
Likes: 0
From: IL
Final and Tricky Step is Putting the Needles back on (remember this is how I do it..if you don't want to risk it talk to a pro):
1. Bring Instrument cluster back to car with the gauge cover still off.
2. Plug in the two harness in the back of the gauge and prop it up on the steering wheel column (so it is upright). Be sure to lower the steering wheel all the way down.
3. Start the car
4. Align the needle with the normal rpms normally idle and press it on (do not push it too far down otherwise it will not move b/c it will touch the gauge face)
5. Put the little black cover back over the base of the needle and make sure there is a little bit of clearance between the gauge face and it. Rev the engine a little bit to make sure the needle moves properly. Put the little black stopper back in below the needle once everything is in line.
6. Do the same for the fuel gauge (minus the stopper)
7. For the Speedometer align the needle on the bottom/slightly below the hole for the stopper. Drive the car a little to make the speedometer go up. Slow down and watch for where the needle drops (you'll know what i'm talking about when you see it). If the speedometer drops at zero you are done...if not you need to change the position of the needle and try again. Once you get it put the stopper back on and the black cover.
8. By this time the engine will be warmed up so you can put the needle for the oil back to where it normally sits when the engine is warmed up. Put the black cover back on.
9. I also changed the color of my odometer to red. I did this as the final step by adding one piece of theatrical gel over the odometer and placed the instrument cluster cover back on (which holds the theatrical gel in place over the odometer).
10. Reinstall instrument cluster back into car.
11. Final pictures of my gauges can be found in this thread---->https://www.evolutionm.net/forums/sh...d.php?t=208339
12. Congratulations You are Done
Trending Topics
Jul 3, 2006 | 08:02 PM
#10
Thread Starter
Evolving Member
Joined: May 2006
Posts: 162
Likes: 0
From: IL
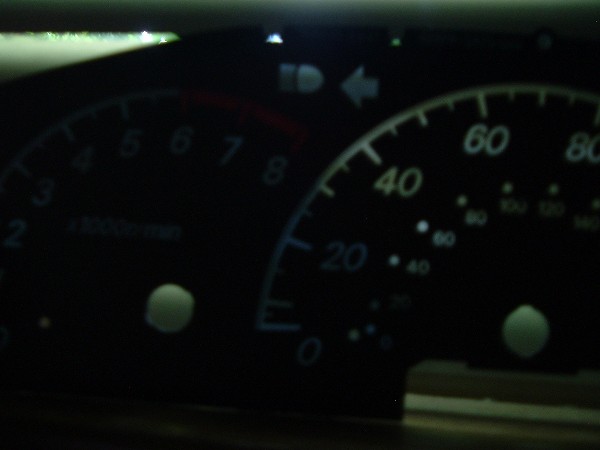
I forgot to add the picture of what the gauges look like if you do not scrape off the back of the gauge face with the hyper white LEDs behind it. It makes a huge difference if you do not do this modification. So here it is.
 Jul 17, 2006 | 08:56 AM
#15
Thread Starter
Evolving Member
Joined: May 2006
Posts: 162
Likes: 0
From: IL
PM Sent...also I think that you would need to go to blackcatcustom.com for an EVO to even attempt to change the color. I believe that the plastic is red for the numbers which is not due to the lighting behind the gauge face like an ES gauge face. Then using an led kit would put the finishing touches on it. Someone in the Ralliart section used the blackcatcustom site to do their gauges, and their is an example of an evo gauge face that was done on the website.