How-to: Upgrade the "Big 3"
#1
How-to: Upgrade the "Big 3"
So I installed an amplifier and a sub woofer into my car a few months back and I have since been experiencing electrical "difficulties". I decided to upgrade the "big 3" according to my research on the internet it should help improve power flow.
I have researched and tried to find any info on wiring diagrams and such for the Lancer engine, the alternator, battery, and negative wires are all unlabeled and confusing. What I am trying to do is help Lancer owners install the "big 3" with ease. (I am not responsible for anything happening to your car ). I have had this install in the rain and through puddles and nothing has fried or "stalled" my car.
I did this install because I was skeptical about how it would improve the performance of my electrical system and my vehicle. I was actually very impressed by the improvements. Less light dimming and less putter while idling and intense power drain. Now I would like to share my experience with everyone else.
**************************************************
How To- Upgrade the Big 3:
(Even though this is "termed" the big 3, there are only 2 wires you really need to replace. Because the alternator is bolted directly onto the car and doesn't require its own grounding wire.) *Please feel free to correct me if I'm wrong *
*
*!* If you intend to make this easy, i suggest lifting your car with ramps or a jack and stands before starting this upgrade .
**Disconnect your negative terminal from the battery with the car off.
**Disconnect your positive terminal from the battery with the car off.
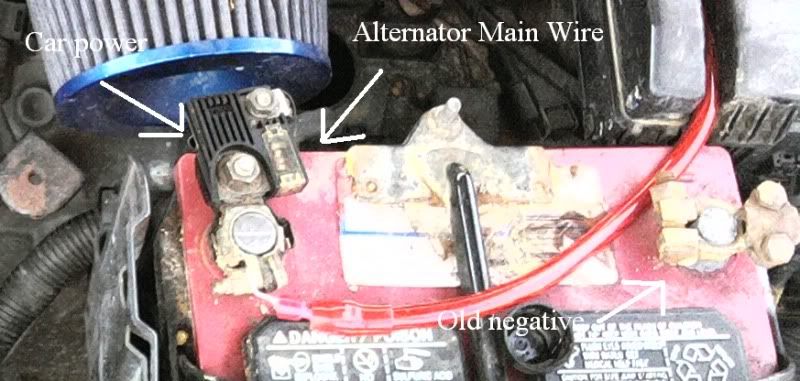
Here is what my battery looked like before.

I personally suggest using ring terminals because the ones that "screwed" into place don't seem to hold well, (personal and others experience). That's why I tried both types of terminals on my battery.

This type of terminal looks nice, but its not very reliable, I used it for the positive battery connection anyways though.

These rings terminals from Xscorpion are very reliable and are universal for both positive and negative battery terminals, I used it for the negative on mine.
Remember that your only replacing the main alternator power wire and ground wire to the battery, make sure you replace all other stock OEM wiring into your new terminals. This usually (well in my case) takes cutting of wires and fitting them to your wiring needs.
Before you begin, make sure you have enough length of 0-2 gauge wiring and appropriate terminals/fuses and such to complete the job.
The hardest part of this install is removing the old alternator power wire and replacing it with a new bigger wire. This is because this alternator has a two "nut" locking system mumbo jumbo that makes it hard to remove the wire. It is easy to distinguish the power wire from the sensors, one is large and connected by a nut and the other branches off into 4 small wires and is connected by a clip (don't touch that).
If you do not notice another nut, it is because there is a plastic protective cover, you need to cut it off. You will need to hold one nut with a pair of pliers while unscrewing the other.
The easiest part of the install is the negative terminal, there are only two wires going into this one, follow them both until you find the one that leads down and bolts to the chassis. That is your battery ground, get out your socket set and remove the old ground wire and replace it with your new thicker wire (0-2 gauge suggested). Then just splice or strip the other wire and reattach it to the battery's negative terminal. (which ever terminal you decide to use, if your getting new ones obviously install the wires into those.)
If you are going to replace the positive terminal, which i suggest you do. You will need to purchase a new fuse to place between the battery and the alternator. The original fuse is integrated into the OEM battery terminal.
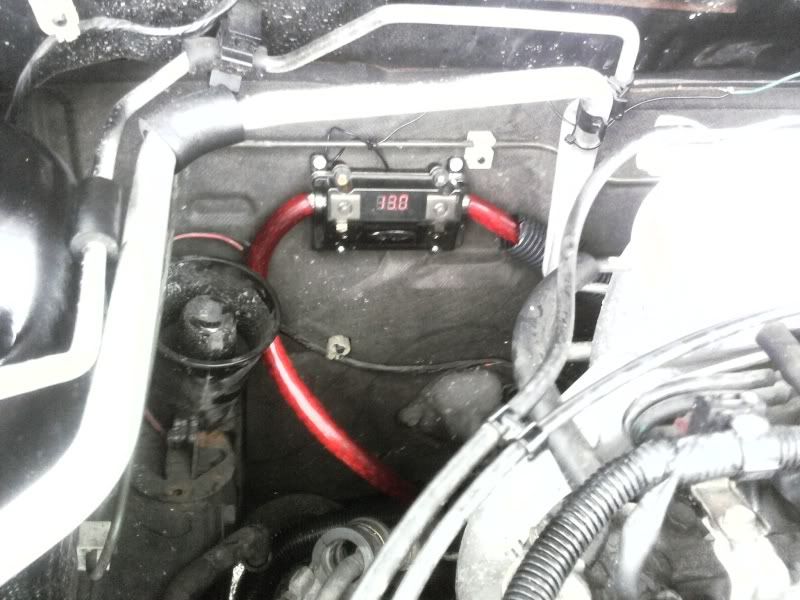
Here is where i placed my new fuse.

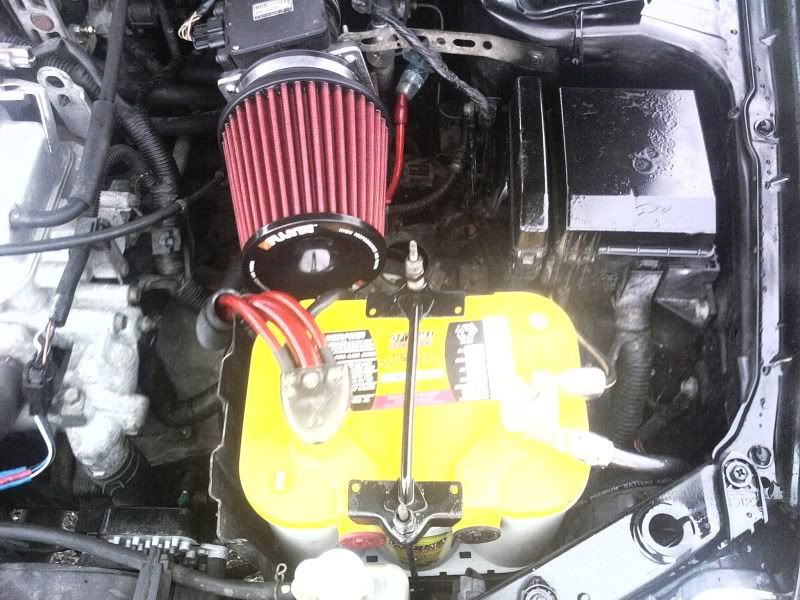
And here is what the new setup looks like completed. (With a new Optima yellow top of course )
)

*IF I LEFT ANYTHING OUT OR YOU HAVE ANY QUESTIONS, FEEL FREE TO PM ME*
I wish i had more pictures of the install, but we did it in the dark, ITS HOT IN FLORIDA DURING THE DAY!
Thanks to everyone at evolutionm for all the support.
I have researched and tried to find any info on wiring diagrams and such for the Lancer engine, the alternator, battery, and negative wires are all unlabeled and confusing. What I am trying to do is help Lancer owners install the "big 3" with ease. (I am not responsible for anything happening to your car ). I have had this install in the rain and through puddles and nothing has fried or "stalled" my car.
I did this install because I was skeptical about how it would improve the performance of my electrical system and my vehicle. I was actually very impressed by the improvements. Less light dimming and less putter while idling and intense power drain. Now I would like to share my experience with everyone else.

**************************************************
How To- Upgrade the Big 3:
(Even though this is "termed" the big 3, there are only 2 wires you really need to replace. Because the alternator is bolted directly onto the car and doesn't require its own grounding wire.) *Please feel free to correct me if I'm wrong
 *
**!* If you intend to make this easy, i suggest lifting your car with ramps or a jack and stands before starting this upgrade .
**Disconnect your negative terminal from the battery with the car off.
**Disconnect your positive terminal from the battery with the car off.
Here is what my battery looked like before.

I personally suggest using ring terminals because the ones that "screwed" into place don't seem to hold well, (personal and others experience). That's why I tried both types of terminals on my battery.

This type of terminal looks nice, but its not very reliable, I used it for the positive battery connection anyways though.

These rings terminals from Xscorpion are very reliable and are universal for both positive and negative battery terminals, I used it for the negative on mine.
Remember that your only replacing the main alternator power wire and ground wire to the battery, make sure you replace all other stock OEM wiring into your new terminals. This usually (well in my case) takes cutting of wires and fitting them to your wiring needs.
Before you begin, make sure you have enough length of 0-2 gauge wiring and appropriate terminals/fuses and such to complete the job.
The hardest part of this install is removing the old alternator power wire and replacing it with a new bigger wire. This is because this alternator has a two "nut" locking system mumbo jumbo that makes it hard to remove the wire. It is easy to distinguish the power wire from the sensors, one is large and connected by a nut and the other branches off into 4 small wires and is connected by a clip (don't touch that).
If you do not notice another nut, it is because there is a plastic protective cover, you need to cut it off. You will need to hold one nut with a pair of pliers while unscrewing the other.
The easiest part of the install is the negative terminal, there are only two wires going into this one, follow them both until you find the one that leads down and bolts to the chassis. That is your battery ground, get out your socket set and remove the old ground wire and replace it with your new thicker wire (0-2 gauge suggested). Then just splice or strip the other wire and reattach it to the battery's negative terminal. (which ever terminal you decide to use, if your getting new ones obviously install the wires into those.)
If you are going to replace the positive terminal, which i suggest you do. You will need to purchase a new fuse to place between the battery and the alternator. The original fuse is integrated into the OEM battery terminal.
Here is where i placed my new fuse.

And here is what the new setup looks like completed. (With a new Optima yellow top of course
 )
)
*IF I LEFT ANYTHING OUT OR YOU HAVE ANY QUESTIONS, FEEL FREE TO PM ME*
I wish i had more pictures of the install, but we did it in the dark, ITS HOT IN FLORIDA DURING THE DAY!
Thanks to everyone at evolutionm for all the support.

Last edited by eusgen; Jun 17, 2010 at 07:01 PM.
#2
Do you know the purpose of the stock fuse between the battery and alternator?
I realize it's in case it over amps but is this really a issue?
Also were did you get your wire and new fuse?
Good write up.
~Micah
I realize it's in case it over amps but is this really a issue?
Also were did you get your wire and new fuse?
Good write up.
~Micah
#3
0 gauge wire isn't cheap, good quality can run about $4 a foot.
Here is a good guide to determine fuse sizes with your electrical load your presenting on your system.
http://www.oznium.com/forum/topic15761
Hope this helps.

#5
 .
.
#6
Sorry to revive an incredibly old thread. I have a 2010 Lancer DE. Alpine 4ch for my front doors (active setup and no speakers in the rear, sounds so much better), and a Hifonics BRZ1700.1D running at 2 ohms for my 12s (i have no trunk, its a DE, it aint fast). I just got my amp back cuz i shorted something out on the circuit board, probably due to voltage drop. I dont want to put it in till i get my new battery (Kinetic 1400) and can do the big 3 under the hood.
I really like the tutorial you did, showing the locations and everything, which is going to make it 10x easier for me since i havent been under the hood of my car since i ran the system years ago (had a different amp then, but still ran 1/0).
A few questions for you. How much wire did you go through to do this (if you can give a rough estimate, i know its been a while now, lol) and how did you get from that old nasty factory positive terminal clunk of **** that mitsubishi gave us, to the nice looking one you have on now? Same for the negative i guess. It would be pretty nice to get rid of that giant thing mitsubishi thought was so important....it makes things a PITA sometimes.
#7
A few questions for you. How much wire did you go through to do this (if you can give a rough estimate, i know its been a while now, lol) and how did you get from that old nasty factory positive terminal clunk of **** that mitsubishi gave us, to the nice looking one you have on now? Same for the negative i guess. It would be pretty nice to get rid of that giant thing mitsubishi thought was so important....it makes things a PITA sometimes.
I don't know any specifics about the 2010 model's terminals but I would assume you can just remove any wires attached to the stock terminal and attach them to another terminal of your liking.
Trending Topics
#8
thanks...for the 2010 theres just a big chunk of plastic and lead with a bunch of ring terminals attached to various spots, but it has the fusing for the wires built into that chunk. Im not sure what those wires do, so im not sure how important the fusing on them really is. But im going to look into it a bit more first. Ive talked to the parts guy at the local mitsu dealership, he seems to be a smart guy and quite a gear head himself, he may have some suggestions if i went over and asked him.
#9
thanks...for the 2010 theres just a big chunk of plastic and lead with a bunch of ring terminals attached to various spots, but it has the fusing for the wires built into that chunk. Im not sure what those wires do, so im not sure how important the fusing on them really is. But im going to look into it a bit more first. Ive talked to the parts guy at the local mitsu dealership, he seems to be a smart guy and quite a gear head himself, he may have some suggestions if i went over and asked him.
Go here.. Its a detailed install by Jok3rEvo8 on his EVO and by me on a 2003 OZ Rally.. check out the pics for ideas i will be updating with my throttle body also
https://www.evolutionm.net/forums/ev...l#post10224220
#10
Go here.. Its a detailed install by Jok3rEvo8 on his EVO and by me on a 2003 OZ Rally.. check out the pics for ideas i will be updating with my throttle body also
https://www.evolutionm.net/forums/ev...l#post10224220
https://www.evolutionm.net/forums/ev...l#post10224220
Thread
Thread Starter
Forum
Replies
Last Post
Jok3rEvo8
Evo How Tos / Installations
29
Mar 16, 2018 10:47 PM
AznDragonV
Evo How To Requests / Questions / Tips
6
Sep 2, 2014 03:00 AM
Bigdon
Evo How Tos / Installations
6
May 8, 2010 02:25 PM
TempeRacerGuy
Evo How Tos / Installations
25
Jan 25, 2008 12:54 PM


