
more 08 Lancer stock wheel painting!
 Jun 5, 2008, 05:46 PM
#1
Newbie
Thread Starter
Join Date: May 2007
Location: New Jersey
Posts: 77
Likes: 0
Received 0 Likes
on
0 Posts
more 08 Lancer stock wheel painting!
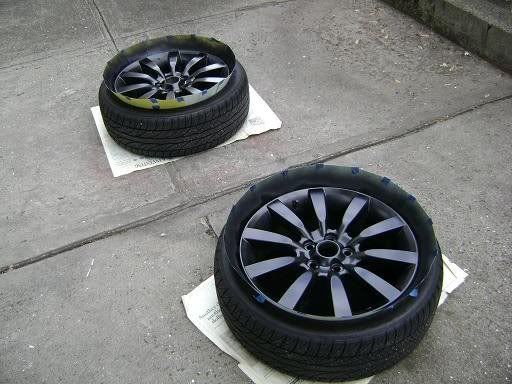
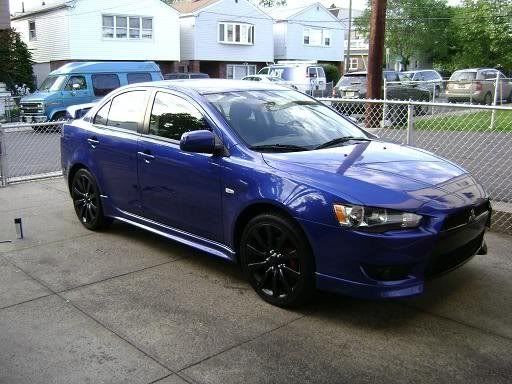
Just did this about a week ago.. looks pretty good.
I used: Duplicolor Black Wheel Paint, Black Primer, Duplicolor Wheel Clearcoat, Duplicolor Caliper Kit


I used: Duplicolor Black Wheel Paint, Black Primer, Duplicolor Wheel Clearcoat, Duplicolor Caliper Kit


 Jun 5, 2008, 07:09 PM
#4
Newbie
Thread Starter
Join Date: May 2007
Location: New Jersey
Posts: 77
Likes: 0
Received 0 Likes
on
0 Posts
For some reason the edges (where the tire meets the wheel) started to flake a little so I had to do some touchup. It's not perfect like I wanted it to be, but I love the color.
Jun 5, 2008, 08:01 PM
#6
Newbie
Thread Starter
Join Date: May 2007
Location: New Jersey
Posts: 77
Likes: 0
Received 0 Likes
on
0 Posts
Thanks. I got it from pepboys.
4 x Duplicolor Wheel Black
2 x Duplicolor Wheel Clear
2 x Primer (Black)
1 x Duplicolor Prep Wipes (looked tempting and pretty cheap)
1 x Sandpaper (i think i got 800 grit)
1 x Nozzle attachment (GET THIS OMG.. I think krylon makes it and it's a red attachment)
1 x Pack of index cards
4 x Duplicolor Wheel Black
2 x Duplicolor Wheel Clear
2 x Primer (Black)
1 x Duplicolor Prep Wipes (looked tempting and pretty cheap)
1 x Sandpaper (i think i got 800 grit)
1 x Nozzle attachment (GET THIS OMG.. I think krylon makes it and it's a red attachment)
1 x Pack of index cards

Trending Topics
 Jun 6, 2008, 08:36 AM
#10
I got one suggestion and it may help in the paint chipping around the edges. The one set of wheels that I ever painted I used tape on the wheels. You got to clean the tires to get the tape to stick, but it helps in getting thicker coat of paint on the edge of the rim. With the cards that you are using, you can only paint from the top. With the tape, you can go at more of an angle to get the edge.
Your wheels look good. I like the color combo you have there.
Your wheels look good. I like the color combo you have there.
Jun 6, 2008, 09:43 PM
#12
Evolved Member
iTrader: (16)
Join Date: Oct 2007
Location: Daytona Beach/Melbourne, Florida
Posts: 1,710
Likes: 0
Received 0 Likes
on
0 Posts
Thanks. I got it from pepboys.
4 x Duplicolor Wheel Black
2 x Duplicolor Wheel Clear
2 x Primer (Black)
1 x Duplicolor Prep Wipes (looked tempting and pretty cheap)
1 x Sandpaper (i think i got 800 grit)
1 x Nozzle attachment (GET THIS OMG.. I think krylon makes it and it's a red attachment)
1 x Pack of index cards
4 x Duplicolor Wheel Black
2 x Duplicolor Wheel Clear
2 x Primer (Black)
1 x Duplicolor Prep Wipes (looked tempting and pretty cheap)
1 x Sandpaper (i think i got 800 grit)
1 x Nozzle attachment (GET THIS OMG.. I think krylon makes it and it's a red attachment)
1 x Pack of index cards
and also, what about the tire inflator? did you just paint right over that or something?
Last edited by yitzac1990; Jun 6, 2008 at 09:46 PM.
Jun 6, 2008, 11:41 PM
#13
Newbie
Join Date: Mar 2008
Location: Toronto
Posts: 57
Likes: 0
Received 0 Likes
on
0 Posts
Also...
Did you have your car on floor jacks while the rims were off and drying?
How long did you wait between coats and before you put your wheels back on?
Thanks
Jun 7, 2008, 10:42 AM
#14
Newbie
Thread Starter
Join Date: May 2007
Location: New Jersey
Posts: 77
Likes: 0
Received 0 Likes
on
0 Posts
I'll try to make a step-by-step in a few days (maybe not lol; but if you have any questions you can PM me or aim at xe120), but here is an overview for now:
- Pick a day that is not too hot or cold (70-80degrees is good) and with little to no wind if your doing this outside. MAKE SURE that there is NO rain on the day of painting and 1-2 days after. Portable radio is nice too.
- Went to local gas station garage here and paid 5 bucks to loosen all the nuts (lol).
- MARK YOUR WHEELS WITH CHAULK OR SOMETHING PLEASE (on the tire so you don't end up washing it off)! lol like right front and right back, etc.
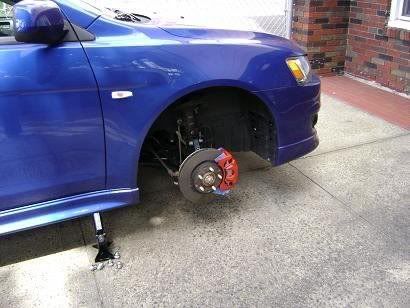
- Jacked 1 side of my car (borrowed a jack from friend so I had 2). Put jackstands or borrow them from someone if you can, just incase
- Removed both wheels > clean > clean! > sand with 800 grit while hosing down the wheel (make sure you sand the edge of the wheel where the tire meets the wheel because I think that is why my wheel edges are chipping) > let it dry for a few min.
- Place tire on newspaper (try not to put it under a tree because a lot of random stuff falls on the wheel while your painting ).
).
- Dry the wheel one last time > use the prep wipes (cut it in half if you want; don't need that much).
- Index card OR tape the edge of the wheels (see pic in first post; make sure you tape the cards together so it doesn't fly off).
Paint time!
Notes:
- OK this will take a LONG time so be patient and it will look good. I did 2 wheels a day so it took me 2 days to finish.
- It is important that you wait between coats and keep your distance while spraying (test spray a newspaper to see a good distance for you). You'll want ZERO overspray because it takes forever to fix.
- Buying the little attachment nozzle will prevent your finger from falling off. Try to get a mask of some sort or you will probably be on the ground by the time you finish.
- I sprayed everything including the inflator (after you're done painting, just loosen the cap and tighten it again so the paint doesn't harden on that.)
- During the painting process, little random stuff will fall from the sky and land on your wheel just to **** you off. I recommend you wait atleast 10minutes after putting on any coat before you try to pull whatever it is off with a tweezer lol.. If its something big like a leaf.. i recommend you cut your tree down or make leaf patterns all over your wheel.
- If you overspray (drip), you will probably have to wait till the paint is dry > sand > clean that section > primer and all the steps again for that area (that's why I recommend black primer lol).
- For all 3 sections, make sure you get a good amount of coat on the edge of the wheels and where the nuts go.
- I painted my calipers during the long...long.. waiting periods and I also ended up taking out my RRM exhaust, cleaning some rust off (sand+rust remover), and then painting it high heat black.
Optional: You can pop the center cap off the wheels from the opposite side. I had some metal cast red paint left over so I taped/sprayed the with that red after the black painting section and before the clear coat section below. The thing about metal cast on that is that the final color will be black with a light red hue (almost like it was a red clearcoat on the ). You can see the difference in direct sunlight, but the whole thing looks black in the shade.
Primer Paint:
1) Spray a light light coat. Wait 10 minutes.
2) Spray a light coat. Wait 10 minutes.
3) Spray a medium-heavy coat.
4) Wait about 30 minutes.
Black Paint:
1) Spray light light coat (super light!). Wait 10 minutes.
2) Spray another light coat making sure you cover most of the area. Wait 10 minutes.
3) Spray a medium coat (cover everything). Wait 10 minutes.
4) Spray a medium-heavy coat (this will be your color; by this time your paint can should be empty or close to it). Wait 10 minutes.
5) Spray another coat if you still have alot of paint in can - medium.
6) Wait about 30 minutes.
Clear Coat Paint:
Notes: Make sure you wait between the black paint and clear coat because if you don't, putting the clear coat on early will "lift" the black paint and it will look like your paint is bubbling.
1) Spray a light light coat. Wait 10 minutes.
2) Spray a light coat. Wait 10 minutes.
3) Spray a medium-heavy coat. Wait 30 minutes.
After about 30 minutes from the final coat you can put your wheels back on. Warning: YOU WILL chip the area where the nuts go on if you try to put it back on right away.
Putting the wheel back on:
- Remember to use the star pattern (shown in car manual) to tighten the wheels after you put it on.
- I think I had tightened my wheels, but not completely > dropped the car > tightened it (torque wrench helps) > moved the car back and fourth a few feet > tightened it again. After a day or 2 driver around your block a few times and make sure your wheels are tightly on.
DEFINETELY do not drive the day you paint your wheels and TRY not to take the car our the next day.
- Pick a day that is not too hot or cold (70-80degrees is good) and with little to no wind if your doing this outside. MAKE SURE that there is NO rain on the day of painting and 1-2 days after. Portable radio is nice too.
- Went to local gas station garage here and paid 5 bucks to loosen all the nuts (lol).
- MARK YOUR WHEELS WITH CHAULK OR SOMETHING PLEASE (on the tire so you don't end up washing it off)! lol like right front and right back, etc.
- Jacked 1 side of my car (borrowed a jack from friend so I had 2). Put jackstands or borrow them from someone if you can, just incase
- Removed both wheels > clean > clean! > sand with 800 grit while hosing down the wheel (make sure you sand the edge of the wheel where the tire meets the wheel because I think that is why my wheel edges are chipping) > let it dry for a few min.
- Place tire on newspaper (try not to put it under a tree because a lot of random stuff falls on the wheel while your painting
).- Dry the wheel one last time > use the prep wipes (cut it in half if you want; don't need that much).
- Index card OR tape the edge of the wheels (see pic in first post; make sure you tape the cards together so it doesn't fly off).
Paint time!
Notes:
- OK this will take a LONG time so be patient and it will look good. I did 2 wheels a day so it took me 2 days to finish.
- It is important that you wait between coats and keep your distance while spraying (test spray a newspaper to see a good distance for you). You'll want ZERO overspray because it takes forever to fix.
- Buying the little attachment nozzle will prevent your finger from falling off. Try to get a mask of some sort or you will probably be on the ground by the time you finish.
- I sprayed everything including the inflator (after you're done painting, just loosen the cap and tighten it again so the paint doesn't harden on that.)
- During the painting process, little random stuff will fall from the sky and land on your wheel just to **** you off. I recommend you wait atleast 10minutes after putting on any coat before you try to pull whatever it is off with a tweezer lol.. If its something big like a leaf.. i recommend you cut your tree down or make leaf patterns all over your wheel.
- If you overspray (drip), you will probably have to wait till the paint is dry > sand > clean that section > primer and all the steps again for that area (that's why I recommend black primer lol).
- For all 3 sections, make sure you get a good amount of coat on the edge of the wheels and where the nuts go.
- I painted my calipers during the long...long.. waiting periods and I also ended up taking out my RRM exhaust, cleaning some rust off (sand+rust remover), and then painting it high heat black.
Optional: You can pop the center cap off the wheels from the opposite side. I had some metal cast red paint left over so I taped/sprayed the
Primer Paint:
1) Spray a light light coat. Wait 10 minutes.
2) Spray a light coat. Wait 10 minutes.
3) Spray a medium-heavy coat.
4) Wait about 30 minutes.
Black Paint:
1) Spray light light coat (super light!). Wait 10 minutes.
2) Spray another light coat making sure you cover most of the area. Wait 10 minutes.
3) Spray a medium coat (cover everything). Wait 10 minutes.
4) Spray a medium-heavy coat (this will be your color; by this time your paint can should be empty or close to it). Wait 10 minutes.
5) Spray another coat if you still have alot of paint in can - medium.
6) Wait about 30 minutes.
Clear Coat Paint:
Notes: Make sure you wait between the black paint and clear coat because if you don't, putting the clear coat on early will "lift" the black paint and it will look like your paint is bubbling.
1) Spray a light light coat. Wait 10 minutes.
2) Spray a light coat. Wait 10 minutes.
3) Spray a medium-heavy coat. Wait 30 minutes.
After about 30 minutes from the final coat you can put your wheels back on. Warning: YOU WILL chip the area where the nuts go on if you try to put it back on right away.
Putting the wheel back on:
- Remember to use the star pattern (shown in car manual) to tighten the wheels after you put it on.
- I think I had tightened my wheels, but not completely > dropped the car > tightened it (torque wrench helps) > moved the car back and fourth a few feet > tightened it again. After a day or 2 driver around your block a few times and make sure your wheels are tightly on.
DEFINETELY do not drive the day you paint your wheels and TRY not to take the car our the next day.
Last edited by rav; Jun 7, 2008 at 10:46 AM.