
Building a Diffuser
 Oct 16, 2009, 02:54 PM
#1
Evolved Member
Thread Starter
iTrader: (62)
Join Date: Feb 2004
Location: Redmond - Lake Tapps ,WA
Posts: 3,336
Likes: 0
Received 6 Likes
on
6 Posts
Building a Diffuser
So along with my GT wing project I'm starting a rear diffuser this weekend - along with seat brackets for the EVO X. My wife is out of town and I am trying to complete the diffuser project by Sunday evening. So stay tuned for pics as things get rolling...
Spent some quality time under the back of the car last night planning out the rear diffuser. After doing some research I realized that the diffuser is just one part of the puzzle in terms of how they create downforce. The area in front of the diffuser is also very important. The diffuser simple creates an area where the air slows down, increases pressure and then exits out the back of the car into the main wake. The downforce is actually created at the entrance to the diffuser and the area directly in front of it. The ideal situation is a totally flat bottom throughout the length of the car feeding into the diffuser. This will maximize downforce created as a result of using a diffuser. Although my car has a large flat bottom area it is not flat all the way to the rear. Mine stops at the front edge of the gas tanks, and the area around the rear diff is completely stock - which is not the ideal type of surface to be feeding directly in the diffuser.
So my first step in building the rear diffuser is getting a nice flat surface to feed into it. The exhaust makes things really difficult. If I had nothing but time I would rework the exhaust to exit out the side of the car so I would be free to do as I wished around the diff area - and I could finish the full flat bottom. But I don't have that much free time. So I'm going to build a flat panel that follows the exhaust and mounts to the rear diff and continues out a little behind the rear subframe. That's where I'll start the diffuser, and it will at least create a smooth flat surfaces fedding directly into the goodness.
Another topic is the angle of the diffuser. Some reading points to angles between 7-14 degrees as being commonly used. The reason for the range mostly based on the size of the diffuser compared to the length of the car, and the "flatness" of the bottom in front of the diffuser. Street type cars with standard bottoms tend to use 7 degrees, as the flow isn't smooth enough for higher angles. Open Wheel and Prototype race cars will use up to 14 degrees, maybe even tapering up to 20 degrees right at the bumper exit. But this requires perfectly smooth bottoms fedding the diffusers.


 Oct 19, 2009, 12:54 AM
#6
Evolved Member
Thread Starter
iTrader: (62)
Join Date: Feb 2004
Location: Redmond - Lake Tapps ,WA
Posts: 3,336
Likes: 0
Received 6 Likes
on
6 Posts
Didn't finish the diffuser, but I made good progress and got all the hard/time consuming stuff completed. For the Evolution Dynamic guys - three nights up until 1AM, got to get up at 5AM to get ready for work... in four hours.
Started off by measuring the angle between the rear sub-frame and the spare tire bulge. This is the max angle the diffuser could be at before it hit the body, assuming the leading edge mount is the subframe. This also requires cutting about 2.5" out of the bumpers lower edge. This scenario leads to a diffuse angle of 9-10 degrees.

Here are my mounting brackets for the pre-diffuser "diff plate". Grabs the diff mount up front and the rear sub-frame.
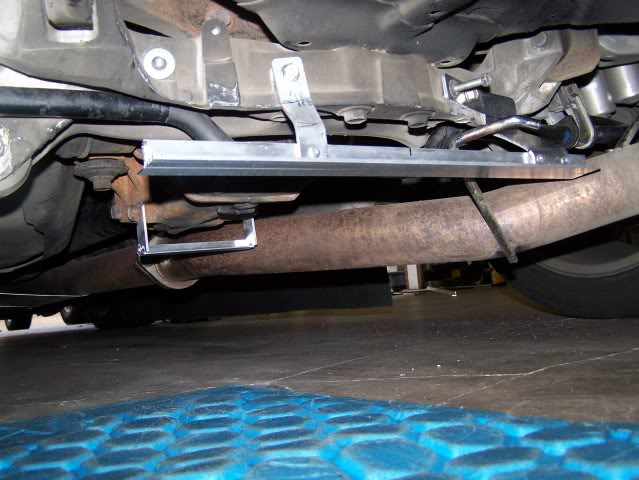
Then I spanned the brackets with a formed plate.

Plate all riveted and welded together.

With the diff-plate installed I went back and remeasured my potential angles. The diff-plate creates a mounting point 2.5" lower than the subframe, and the diff-plate is angled at 7 degrees. If I were to cutout the bumper and bring the trailing edge of the diffuser up to the spare tire well I could get 14 degrees. But I felt that was too much considering the length of the diffuser and the surfaces feeding it. I wanted to run 9-10 degrees. This ended up being flush with the bottom of the bumper - which meant I didn't have to cut my bumper up.

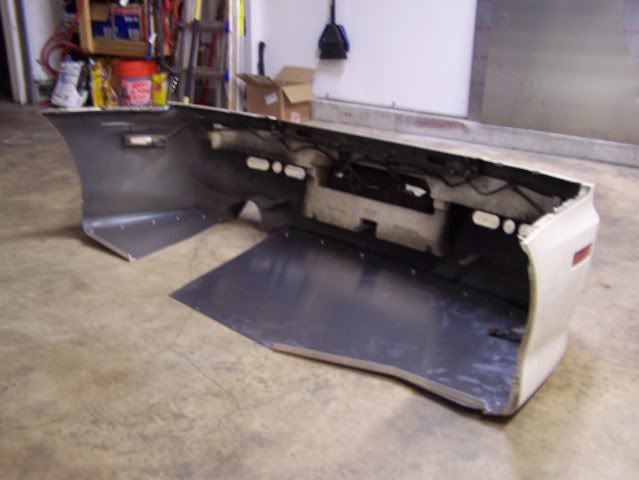
Laying out the template with construction paper.

Cutting out the panels.

Panel set in-place on the car. Now I need to mount the panel to the bumper and reinforce it, as well as building the verticals.

Started off by measuring the angle between the rear sub-frame and the spare tire bulge. This is the max angle the diffuser could be at before it hit the body, assuming the leading edge mount is the subframe. This also requires cutting about 2.5" out of the bumpers lower edge. This scenario leads to a diffuse angle of 9-10 degrees.
Here are my mounting brackets for the pre-diffuser "diff plate". Grabs the diff mount up front and the rear sub-frame.
Then I spanned the brackets with a formed plate.
Plate all riveted and welded together.
With the diff-plate installed I went back and remeasured my potential angles. The diff-plate creates a mounting point 2.5" lower than the subframe, and the diff-plate is angled at 7 degrees. If I were to cutout the bumper and bring the trailing edge of the diffuser up to the spare tire well I could get 14 degrees. But I felt that was too much considering the length of the diffuser and the surfaces feeding it. I wanted to run 9-10 degrees. This ended up being flush with the bottom of the bumper - which meant I didn't have to cut my bumper up.
Laying out the template with construction paper.
Cutting out the panels.
Panel set in-place on the car. Now I need to mount the panel to the bumper and reinforce it, as well as building the verticals.
Trending Topics
 Oct 19, 2009, 05:28 PM
#11
I wonder about the edges having movement with heavy airflow (mainly up front). I know fastening it well may get rid of almost all of it, but what about cutting it out a little bigger (say 1/4 inch all around) so you can fold that 1/4 inch over and form a lip which will make the edge stiffer?
Oct 19, 2009, 10:09 PM
#12
Evolved Member
Thread Starter
iTrader: (62)
Join Date: Feb 2004
Location: Redmond - Lake Tapps ,WA
Posts: 3,336
Likes: 0
Received 6 Likes
on
6 Posts
I got the panels riveted to the bumper this evening, along with tapping mounting holes on the diff-plate. I'm not going to try and completely block things off at the leading edge, at least at this point. I did put some wickers across the leading edges to make the panels more rigid and help stop some air from sneaking up there. I should be able to finish the verticals in the next few days.
The final part will be very rigid given the material thickness.
The final part will be very rigid given the material thickness.
Oct 20, 2009, 09:20 AM
#14
Evolved Member
Thread Starter
iTrader: (62)
Join Date: Feb 2004
Location: Redmond - Lake Tapps ,WA
Posts: 3,336
Likes: 0
Received 6 Likes
on
6 Posts
None of the other diffusers on the market really try and keep the air out. The APR has a lip about the same size as my wickers, and the old Vishnu part was similar as well. BUT, I got thinking in the shower this morning that it would be easy to just add some vertical plates to the wickers that were a little taller, maybe just another inch or so.
Oct 20, 2009, 10:42 AM
#15
Former Sponsor
iTrader: (56)
Join Date: Sep 2004
Location: DFW, TX
Posts: 2,701
Likes: 0
Received 0 Likes
on
0 Posts
 awsome! its always easiest to get stuff done when everyone else is sleeping
great job though! i wouldn't worry about the parachute effect of the rear bumper if you seal your rear diffuser up to your undertray.