
3D Printing & Custom Fabrication

 Mar 11, 2015, 11:20 PM
#32
Evolved Member
Thread Starter
Custom Z-axis Re-enforcement Plates
I wanted to re-enforce/stablize the Z-axis' bearing-rod support plates, so I drafted up some prototypes >
Here the virtual prototype is being "sliced"/prepped for printing.

Sending to printer.


Finished print.


It goes here >

Installed >


Here the virtual prototype is being "sliced"/prepped for printing.
Sending to printer.
Finished print.
It goes here >
Installed >
Last edited by mRVRsport; Mar 11, 2015 at 11:33 PM.
Mar 13, 2015, 01:57 PM
#33
Evolved Member
Thread Starter
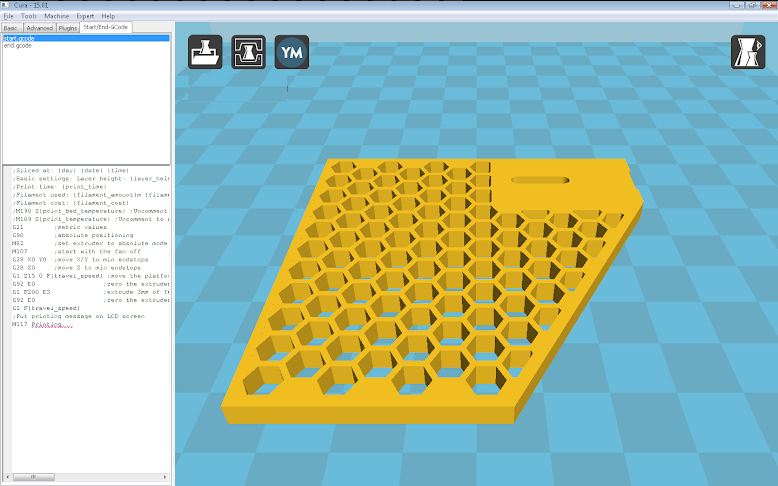
We get little bees flying around here come spring/summer, I love honey(combs).
But, sometimes.. we get them little wasps too.

(texas small, that is...)
You should see their nests.
Well any how, I needed something to hold my FMJ SIGs, so they inspired me to design this >


Making of:


I'm still getting some Z-axis offset/shimmying..
(from what you can see on the side walls of the holder.)
Guess I'll have to do some tweaking on my Z-axis re-enforcement plates later tonight.
But, sometimes.. we get them little wasps too.
(texas small, that is...)
You should see their nests.
Well any how, I needed something to hold my FMJ SIGs, so they inspired me to design this >
Making of:
I'm still getting some Z-axis offset/shimmying..
(from what you can see on the side walls of the holder.)
Guess I'll have to do some tweaking on my Z-axis re-enforcement plates later tonight.
Last edited by mRVRsport; Mar 13, 2015 at 01:59 PM.
Mar 13, 2015, 09:43 PM
#34
Evolved Member
Thread Starter
Just finished redesigning the z-axis plates.
(Old on left, New on right.)

Close-up view.
Basically filled in some of the holes to stiffen up the plate. Added a bit more area toward the back and trimmed off all the 90� corners.

Here it is installed.


I decided to add a metal spacer to stiffen it up even more.

(Old on left, New on right.)
Close-up view.
Basically filled in some of the holes to stiffen up the plate. Added a bit more area toward the back and trimmed off all the 90� corners.
Here it is installed.
I decided to add a metal spacer to stiffen it up even more.
Mar 17, 2015, 09:36 AM
#36
Evolved Member
Thread Starter
Thanks.
Not to shabby..
Got the size exactly right on the first print too.
(considering it was mainly a test run.)
Just wait til I figure out how to best skeletal-ize "things".
That's when the real fun will start!
Need to make some custom killflash/ARDs for my old Leapers scope & binocs next.
.
Not to shabby..
Got the size exactly right on the first print too.
(considering it was mainly a test run.)
Just wait til I figure out how to best skeletal-ize "things".
That's when the real fun will start!
Need to make some custom killflash/ARDs for my old Leapers scope & binocs next.
.
Mar 20, 2015, 01:06 PM
#37
Evolved Member
Thread Starter
Tactical Mount
Roll your own MIL-STD-1913 rails to any length, just type quantity # & hit print. 
3D design -

Slicing (in-fill at 22%) -
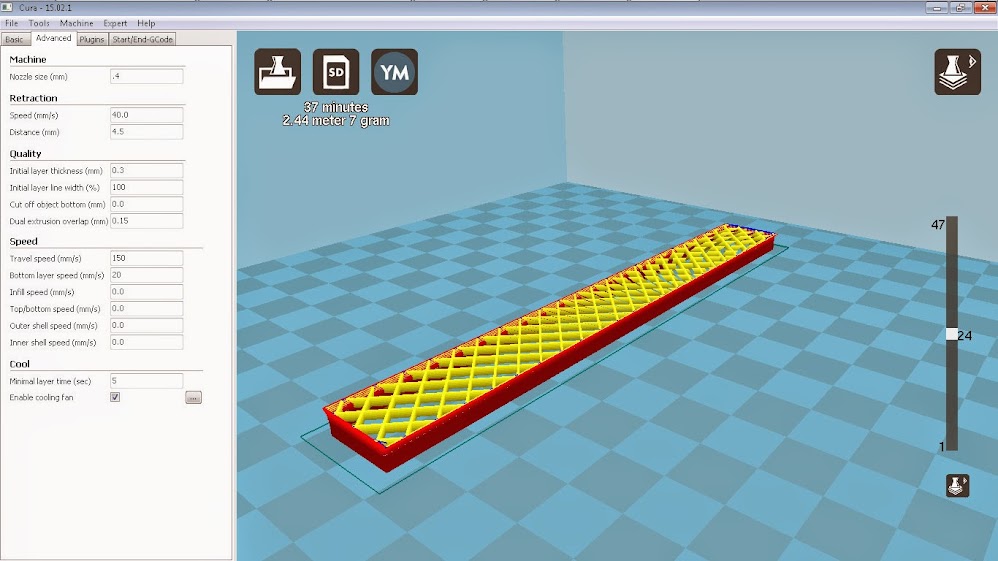
Sliced -

Ready to print -

3D design -
Slicing (in-fill at 22%) -
Sliced -
Ready to print -


 Aug 28, 2015, 09:35 PM
#40
Evolved Member
Thread Starter
a bit of my 3D nerdiness came out the other night...

Printed 3 sizes

As it was nearing finish. (took nearly 2hrs 52minutes to complete - the big one alone.)

Printed 3 sizes
As it was nearing finish. (took nearly 2hrs 52minutes to complete - the big one alone.)
Last edited by mRVRsport; Aug 28, 2015 at 09:39 PM.
Aug 28, 2015, 09:51 PM
#41
Evolved Member
Thread Starter
GoT : Winter is Coming
and for those of you who are fans of the TV show - Game of Thrones ...
You know what you're looking at >


The printing of:


.
You know what you're looking at >
The printing of:
.
Last edited by mRVRsport; Aug 28, 2015 at 09:54 PM.
Aug 31, 2015, 05:47 AM
#43
Evolved Member
do you have to design every aspect of that or do you just up load a picture to the 3d printer? I have no idea how that stuff works but it is so awesome! I would loose myself in that machine printing up everything from the 80's!!!!
Aug 31, 2015, 07:20 AM
#44
Evolved Member
to mRVRsport: Sir, you have a nice system and more importantly a great talent showcased here.
Have you thought of designing custom pieces for the OS/ASX/RVR?
The first option that comes to my mind is an Audi RS type front grill (without the crossbar). I am sure many people would be interested in putting up one like that. I understand there might be a size limitation for that piece. Another idea: many people here want to retain the voice command feature of the stock radio units (basic or RF). Additionally, the MMCS or any aftermarket touch screen modules are poorly visible in bright sunlight especially when the shade of the sunroof is open (due to the tilt angle of the screen). An integrated house with proper shading for a screen on top of the dashboard might also be an interest for some for a monitor for back up camera or a navi unit. The higher mount of a monitor would also be safer. How about these oversized wheel arch plastic inserts that would give a more rugged look? I think there was a thread about this earlier. Besides challenging your creativity you may turn this hobby of yours to some low volume profit.
Aug 31, 2015, 07:46 AM
#45
Evolved Member
Thread Starter
Isn't it!?
I want to print up some dragons next!
Do you heard the chanting...
Drogon, Drogon, Drogon!
**I wish it was that easy as to just upload any photo/image you may have to the "machine" and out pops the 3D stuff after you hit "print that"**
In reality, it's a 4 step process -
1. Design whatever it is you want - precisely in (any of your favorite) 3D CAD program or similar App, ex: Solidworks, 3D Studio Max, Maya or Blender, TinkerCAD, Sketchup.
, then save that as a native 3D file, either .DXF, .3DS, .SKP etc
(BTW, those last three I named are open-source and are available for Free, you just download it, install, use.)
2. Take that 3D model file you just designed and import it into a slicer program to prep for 3D printing. ex: Slic3r, KISSlicer, or Cura
It basically 'chops' the 3D model into layers/slices (and allows you to adjust how strong you want to made the printed 'item') for the 3D printer to understand.
You save all that data as a .STL file - basically it's stores all the technical 3D calibrations.
3. Once you are satisfied with your .STL file, then you must generate a .GCODE file (which basically is a pure machine language) that the 3D printer understands. You usually generate this file within the same slicer program and it's a fairly simple and straight forward step.
4. Lastly, send/transfer that .gcode file to your 3D printer and hit print.
>>> Now go make yourself some fresh pot of coffee & sit back and watch the magic of seeing something materialize right before your eyes!
That's basically all it takes.
BTW, I did not create that entire Winderfell castle. That honor goes to another super GoT fan.
He was gracious enough to share his .STL file online.
You're Not kidding.
I'm totally geeking out.
Making and printing my own custom gauntlets, Wolverine claws, Batarangs, plus all those Robotech, Transformers, and Gaiking action figures...
I want to print up some dragons next!
Do you heard the chanting...
Drogon, Drogon, Drogon!
**I wish it was that easy as to just upload any photo/image you may have to the "machine" and out pops the 3D stuff after you hit "print that"**
In reality, it's a 4 step process -
1. Design whatever it is you want - precisely in (any of your favorite) 3D CAD program or similar App, ex: Solidworks, 3D Studio Max, Maya or Blender, TinkerCAD, Sketchup.
, then save that as a native 3D file, either .DXF, .3DS, .SKP etc
(BTW, those last three I named are open-source and are available for Free, you just download it, install, use.)
2. Take that 3D model file you just designed and import it into a slicer program to prep for 3D printing. ex: Slic3r, KISSlicer, or Cura
It basically 'chops' the 3D model into layers/slices (and allows you to adjust how strong you want to made the printed 'item') for the 3D printer to understand.
You save all that data as a .STL file - basically it's stores all the technical 3D calibrations.
3. Once you are satisfied with your .STL file, then you must generate a .GCODE file (which basically is a pure machine language) that the 3D printer understands. You usually generate this file within the same slicer program and it's a fairly simple and straight forward step.
4. Lastly, send/transfer that .gcode file to your 3D printer and hit print.
>>> Now go make yourself some fresh pot of coffee & sit back and watch the magic of seeing something materialize right before your eyes!
That's basically all it takes.
BTW, I did not create that entire Winderfell castle. That honor goes to another super GoT fan.
He was gracious enough to share his .STL file online.
I'm totally geeking out.
Making and printing my own custom gauntlets, Wolverine claws, Batarangs, plus all those Robotech, Transformers, and Gaiking action figures...
Last edited by mRVRsport; Aug 31, 2015 at 08:03 AM.