
3D Printing & Custom Fabrication
 Feb 22, 2015, 01:41 AM
#1
Evolved Member
Thread Starter
Took me a couple of weeks to build this machine, but that's okay..
Still got a few things to do to it > Mainly calibration and some special tweaks...
(and to tidy up the electronics and wires, of course!)
https://www.evolutionm.net/forums/ou...stom-made.html
However, those things can wait.
Let's fire up this bad boy and print something! Pronto!!


Still got a few things to do to it > Mainly calibration and some special tweaks...
(and to tidy up the electronics and wires, of course!)
https://www.evolutionm.net/forums/ou...stom-made.html
However, those things can wait.
Let's fire up this bad boy and print something! Pronto!!
Last edited by mRVRsport; Mar 13, 2015 at 02:03 PM.
 Feb 23, 2015, 12:39 PM
#3
Newbie

Join Date: Oct 2013
Location: Ohio
Posts: 66
Likes: 0
Received 0 Likes
on
0 Posts
That's awesome RVR. You build the whole thing yourself from scratch or was it a kit that you can buy and assemble?
Are you a programmer? What type of software does this use? What type of servos etc.? We need more details.
Are you a programmer? What type of software does this use? What type of servos etc.? We need more details.
Feb 24, 2015, 04:07 PM
#4
Evolved Member
Thread Starter
Thank you.
The print result turned out okay.
But, that's just a basic 2D imagine bumped out to look 3D-ish. Wait til you see some of there other items I have planned.
1. Yes, build from scratch.
I sourced all the metal parts and electronics online.
The only thing that was a "kit" was the acrylic frame. (I didn't have a CNC laser cutter to be able to cut that precisely.)
If anyone's interested in the technical stuff, I'll eventually post all the specs in my other thread "[Off Topic] Custom Made..."
2. Yes, I'm a programmer.
Self-taught. Mostly in backend web development - database, e-commerce, etc. (I studied drafting/architecture back in the day.. decided to go into ME in college to build rockets/spaceships... but, the physics & chemistry classes were Way too over my head.)
But hey some of that stuff I'd learned is put to use now, at least.
If you're interested in building your own 3D printer -
I used:
- NEMA 17 type stepper motors (you'll need 5 of them)
- controller is based off of Arduino Mega with RAMPS
- power supply should be at least 250Watts. (I'm using an Antec 500Watt from a PC that I modified for this printer.)
- Software:
1. for the actual 3D designing, I use Blender and Sketchup (I also use Adobe Illustrator for the initial drafts.)
2. A "slicer" program called Slic3r to prep your design so the machine can understand & print it.
3. Pronterface/Printrun to control/interface with the printer via USB.
Basically it's a Makerbot Replicator "Clone", so if you search it you can get an idea of what it's capable of.
The print result turned out okay.
But, that's just a basic 2D imagine bumped out to look 3D-ish. Wait til you see some of there other items I have planned.
I sourced all the metal parts and electronics online.
The only thing that was a "kit" was the acrylic frame. (I didn't have a CNC laser cutter to be able to cut that precisely.)
If anyone's interested in the technical stuff, I'll eventually post all the specs in my other thread "[Off Topic] Custom Made..."
2. Yes, I'm a programmer.
Self-taught. Mostly in backend web development - database, e-commerce, etc. (I studied drafting/architecture back in the day.. decided to go into ME in college to build rockets/spaceships... but, the physics & chemistry classes were Way too over my head.)
But hey some of that stuff I'd learned is put to use now, at least.
If you're interested in building your own 3D printer -
I used:
- NEMA 17 type stepper motors (you'll need 5 of them)
- controller is based off of Arduino Mega with RAMPS
- power supply should be at least 250Watts. (I'm using an Antec 500Watt from a PC that I modified for this printer.)
- Software:
1. for the actual 3D designing, I use Blender and Sketchup (I also use Adobe Illustrator for the initial drafts.)
2. A "slicer" program called Slic3r to prep your design so the machine can understand & print it.
3. Pronterface/Printrun to control/interface with the printer via USB.
Basically it's a Makerbot Replicator "Clone", so if you search it you can get an idea of what it's capable of.
Feb 24, 2015, 06:02 PM
#5
Evolved Member
Thread Starter
Filament Guide
Here's a little something a bit more useful.
To help keep my filaments from getting tangled up..

Making of:


To help keep my filaments from getting tangled up..
Making of:
Last edited by mRVRsport; Feb 24, 2015 at 06:42 PM.
Feb 24, 2015, 06:40 PM
#6
Evolved Member
Thread Starter
3 of Hearts
Something for the Mrs.

Making of:


1st Major mishap... Axis shear!
Take a look, during one of the slices the printer some how shifted on the X-Y plane.
You can see a portion of the print is completely off alignment.

Obviously you can't really tell when looking at it from the front... My wife said it's kind of cool to be able to "peek inside".
Guess I can call this mistake a "feature"
Making of:
1st Major mishap... Axis shear!
Take a look, during one of the slices the printer some how shifted on the X-Y plane.
You can see a portion of the print is completely off alignment.
Obviously you can't really tell when looking at it from the front... My wife said it's kind of cool to be able to "peek inside".
Guess I can call this mistake a "feature"
Last edited by mRVRsport; Feb 24, 2015 at 06:43 PM.
Feb 25, 2015, 06:23 AM
#7
Evolved Member
Thread Starter
Complex part(s)
Testing out the capability of preprinting hinges into a 'complete' part as it's being made.
No post-assembling necessary!
1st test -

Making of:


Want to guess what this is...
No post-assembling necessary!
1st test -
Making of:
Want to guess what this is...
Trending Topics
Feb 26, 2015, 06:00 AM
#10
Evolved Member
http://arstechnica.com/tech-policy/2...er-600-rounds/
and they are even printing the magazines! that's awesome I might have to get me one of these printers! My wife is going to kill me lol...
and they are even printing the magazines! that's awesome I might have to get me one of these printers! My wife is going to kill me lol...
Feb 26, 2015, 06:54 AM
#11

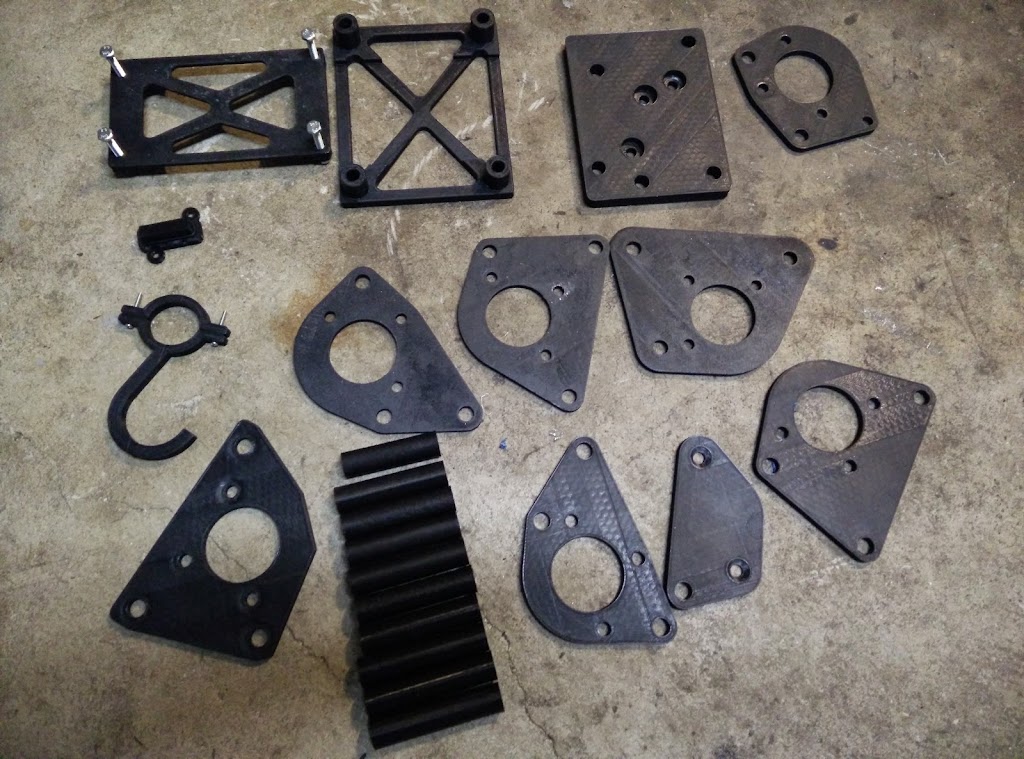
Here's my collection of 3d printed parts.
- ls3/ls7 MAF hole blocker plate
- rollbar hangar for steering wheel/helmet
- 2-piece e38 (lsx) ecu mount
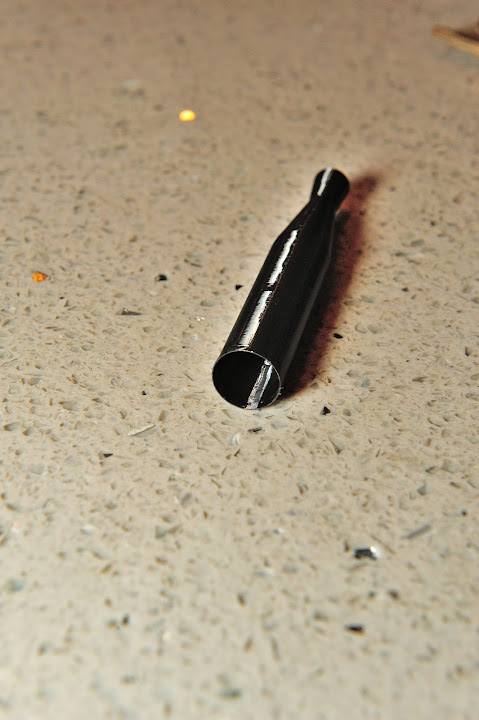
- way too many FD power steering brackets and spacers for mounting oem stock pump on ls1 head
- AC compressor seal installer tool
Some other things I've wanted to print:
- replacement plastic piece for lancer fuel door spring clip. I gave up after seeing it cost $2 for a new one.
- fire extinguisher mount.

- ls3/ls7 MAF hole blocker plate
- rollbar hangar for steering wheel/helmet
- 2-piece e38 (lsx) ecu mount
- way too many FD power steering brackets and spacers for mounting oem stock pump on ls1 head
- AC compressor seal installer tool
Some other things I've wanted to print:
- replacement plastic piece for lancer fuel door spring clip. I gave up after seeing it cost $2 for a new one.
- fire extinguisher mount.
Last edited by orion4096; Feb 26, 2015 at 07:07 AM.
Feb 26, 2015, 03:42 PM
#12
Evolved Member
Thread Starter

check this out...just sayin! and that makerbot is pretty futuristic looking
http://www.businessinsider.com/i-3d-...-great-2013-12
http://www.businessinsider.com/i-3d-...-great-2013-12
http://arstechnica.com/tech-policy/2...er-600-rounds/
and they are even printing the magazines! that's awesome I might have to get me one of these printers! My wife is going to kill me lol...
and they are even printing the magazines! that's awesome I might have to get me one of these printers! My wife is going to kill me lol...

Word of advise -
Please do your homework first BEFORE you throwdown a couple of thousend$...
Makerbot makes "great" 3D printers with nifty features, But even at $6,499 they can't print with ABS plastics, let alone their $2,899 model.
One main consideration > You need a heated bed and extruders that can handle the process (ie: reach certain temperatures) to make those "particular" parts you are so fond of.
******************
Knowing what you said about your wife before, I doubt she'd do that.
In fact, I bet you anything she'll probably back you up on the idea. I'm sure she has tons of things she would like custom made, just for herself. ie: fashion related..

Here's my collection of 3d printed parts.
- ls3/ls7 MAF hole blocker plate
- rollbar hangar for steering wheel/helmet
- 2-piece e38 (lsx) ecu mount
- way too many FD power steering brackets and spacers for mounting oem stock pump on ls1 head
- AC compressor seal installer tool
Some other things I've wanted to print:
- replacement plastic piece for lancer fuel door spring clip. I gave up after seeing it cost $2 for a new one.
- fire extinguisher mount.
Love this "show & tell" results presentation.
I'm glad I'm not the only one here that's trying their hands with this new technology.
Those parts look really really good.
What tolerances are you getting?
Last edited by mRVRsport; Feb 26, 2015 at 03:56 PM.
Feb 26, 2015, 07:07 PM
#13
The frustrating part on the seal installer was it had to be fairly precise, but prints end up 1% or so smaller than the CAD. I scaled everything up by 1%, but it was still a little too tight on the compressor shaft. I tend to oversize bolt holes to avoid printing too many copies of the same thing and making the house smell like PLA.I have a flash forge creator from Amazon which is mostly a clone of the old makerbot replicatorx that still had an open design (dual extruders, heated bed, not-so-big print area, ABS + PLA). Haven't had a clog yet and PLA seems to stick pretty good to blue tape without a raft. As I'm sure you've discovered, there's some black magic in getting a good print involving a combination of temps, blue tape, rafts, speeds of various stages of the print, position on the build platform, slicing software, etc.
One thing I haven't experimented much with is supports. I end up designing my pieces so they don't have any overhangs with more than 45 degree angles in Z. I did try makerware supports one time, but it was really hard to remove them. A friend at work gave me a program he designed that adds a more minimal set of supports to a STL, but I haven't tried it yet.
Feb 26, 2015, 10:16 PM
#14
Evolved Member
Thread Starter
Honestly, I haven't checked the dimensions of most of my prints. The seal installer wall thickness is supposed to be .011" but I never did measure it. Unfortunately, I stepped on it the day after installing the seal and never printed another one. The frustrating part on the seal installer was it had to be fairly precise, but prints end up 1% or so smaller than the CAD. I scaled everything up by 1%, but it was still a little too tight on the compressor shaft. I tend to oversize bolt holes to avoid printing too many copies of the same thing and making the house smell like PLA.
I have a flash forge creator from Amazon which is mostly a clone of the old makerbot replicatorx that still had an open design (dual extruders, heated bed, not-so-big print area, ABS + PLA). Haven't had a clog yet and PLA seems to stick pretty good to blue tape without a raft. As I'm sure you've discovered, there's some black magic in getting a good print involving a combination of temps, blue tape, rafts, speeds of various stages of the print, position on the build platform, slicing software, etc.
One thing I haven't experimented much with is supports. I end up designing my pieces so they don't have any overhangs with more than 45 degree angles in Z. I did try makerware supports one time, but it was really hard to remove them. A friend at work gave me a program he designed that adds a more minimal set of supports to a STL, but I haven't tried it yet.
The frustrating part on the seal installer was it had to be fairly precise, but prints end up 1% or so smaller than the CAD. I scaled everything up by 1%, but it was still a little too tight on the compressor shaft. I tend to oversize bolt holes to avoid printing too many copies of the same thing and making the house smell like PLA.I have a flash forge creator from Amazon which is mostly a clone of the old makerbot replicatorx that still had an open design (dual extruders, heated bed, not-so-big print area, ABS + PLA). Haven't had a clog yet and PLA seems to stick pretty good to blue tape without a raft. As I'm sure you've discovered, there's some black magic in getting a good print involving a combination of temps, blue tape, rafts, speeds of various stages of the print, position on the build platform, slicing software, etc.
One thing I haven't experimented much with is supports. I end up designing my pieces so they don't have any overhangs with more than 45 degree angles in Z. I did try makerware supports one time, but it was really hard to remove them. A friend at work gave me a program he designed that adds a more minimal set of supports to a STL, but I haven't tried it yet.
It's definitely a "trial & error" type of thing right now. SO Many adjustments and variables to try and/or keep a mind on to get a good print.
I'm slowly getting a hang of the basics. I can imagine though once you have it dialed in a bit more I can iterate parts a lot better. But even now I can tell there is a big difference in compromise > print speed vs print quality. I have to crank it way down (for now) to get my prints to retain details...
Perhaps I'm just printing too small of items?
*************
I'm testing quite a few things with supports, they are a drag but necessary evil. It's just tough trying to figure out what's supports and what's actual printed part, at times.
I've ripped apart a component already by accident - since I had set the shell thickness so thin that it's hard to tell what's what. (On top of that everything is the same color.)

Last edited by mRVRsport; Feb 26, 2015 at 10:19 PM.
Feb 27, 2015, 06:38 AM
#15
Evolved Member
ha dem shoes lol! yeah she would probably learn how to use it while I was a work and be making designer jewelry and kid toys lol... yeah I don't have the time, knowledge, or skills to build one, nor the cash to shell out on new one.. just dreaming a bit.
I do see this as the future though, and the lines will get blurred as soon as people start copying trademarked items for sale...
I do see this as the future though, and the lines will get blurred as soon as people start copying trademarked items for sale...