
R/TErnie's Evo 9 2.2L 4G64 EFR7670

 Apr 1, 2012, 10:13 AM
#154
Great build thread man. Cool to see more FSAE guys as well. I was on the UofA Formula Car team. We where another under funded program. 20 or so members 4-6 actual guys working on the car. little to no out side help. The most talented of our members went on to work at http://phoenixracecars.com/ as there lead designer and engineer. The only thing I wished I had on in college was spend more time hands one with the FSAE car.
Keep up the good work.
Keep up the good work.
 Apr 1, 2012, 11:06 PM
#157
yeah we have 92. I'll run E85 pretty much as often as possible. Probably get some 98 to help mix when I have a low ethanol content and want it near 85. Since washington is soo cold running e98 will only work for about 2-3 months out of the year.
I will do a pump gas tune. It won't be spectacular so don't expect me to push the envelope on 92.
I will do a pump gas tune. It won't be spectacular so don't expect me to push the envelope on 92.
Apr 2, 2012, 06:23 AM
#158
Evolved Member
iTrader: (20)

Join Date: Jul 2010
Location: Clovis, California
Posts: 527
Likes: 0
Received 0 Likes
on
0 Posts
yeah we have 92. I'll run E85 pretty much as often as possible. Probably get some 98 to help mix when I have a low ethanol content and want it near 85. Since washington is soo cold running e98 will only work for about 2-3 months out of the year.
I will do a pump gas tune. It won't be spectacular so don't expect me to push the envelope on 92.
I will do a pump gas tune. It won't be spectacular so don't expect me to push the envelope on 92.
 by December 2012 would be fine for me
  Apr 2, 2012, 02:17 PM
#159
I'll have some numbers on 92 for sure.
OIL PAN PROGRESS & COMPLETION
Here we are setting up the pan with toe clamps on the Cinci-port


Oil Pan installed. WITH RTV.


MIVEC LINE
MAP's Mivec adapter. Looks like they took an ARP nut and welded it to a metric fitting. Meh...it works.

This is what the MIVEC Banjo bolt (on the right) looks like. This needs to go into the block, it has a check valve in it. Might possibly be a restrictor too, I'm not sure.

ENGING BLOCK BSP PLUG RESULTS
n2oiroc and my initial assumptions were right. It's a 3/8" BSP plug. You CAN use the one you remove from your oil filter housing.

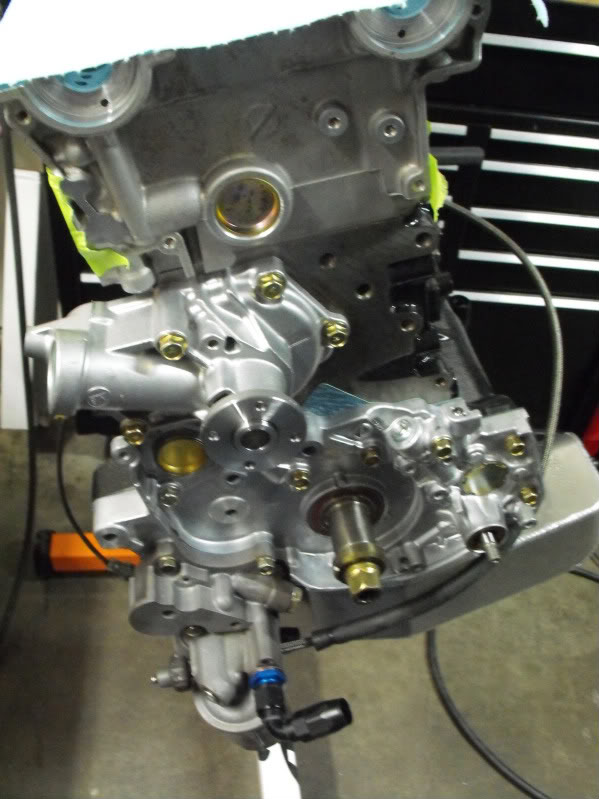
ENGINE BUILD PROGRESS
Just some pics of the engine Friday.


CYLINDER HEAD WORK
Cylinder head partially assembled.

Notice the deburred casting flash?


Notice the ported drain backs?


KIGGLY HLA INSTALL
Super simple Install. No gasket & no RTV. Better than a restrictor...this regulators the oil pressure supple to the Hydraulic lash adjusters. Keeps the oil where you need it and not pooled in the cylinder head.


Spark plugs (Evo 9 1 step colder)

Copper Anti-Seize.

Reason for the plugs and anti-seize... test fit shows that there is a sliver of aluminum dangling from the spark plug hole. I have couple picturs of the pre & post operation...as well as the trick tool I used A really dull carpenters knife.


Deburring the combustion chamber.


INSTALLING HEAD
This is something I noticed before putting the head...which I remembered from removing the head. That some of the washers for the head studs have to sit UNDER the spring. Which means if you want them to go on easy, put them on before the stud/head is installed. Here are three such examples.


My easy trick to installing the washers perfectly in their holes...

Cosworth 87mm Headgasket.


Head On. MAP H11 Head studs. Torqued to 95 lb-ft. 1/2" 12pt socket. Lots of moly lube. Torque sequence below.


FP Oil feed line plug. It's a shorter length so it doesn't block oil flow through the galley that is behind it.

WATER PUMP MODS
So the 4G64 block and the Evo water pump don't play well together. So I fixedi t by building up aluminum on the flange and then surfacing it afterwards.
1st hole that needs to be fixed


The Dy-NASTY 200dx.

Twin argon tanks. One for backpurge.

Ready for Carnage.

Lots of filler rod.


Oops. Missed a spot.


There I fixed it.

A little pre-mature installation of the coolant tube...

I WAS WRONG
An apology. I was telling people that this fitting would fit on the front of the block and could be used as a crank case ventilation port. I was wrong. THIS DOES NOT FIT... nor does the size smaller.

COOLANT LINES TO TURBO
Remember me saying, premature installation before? funny right? Well... here's why. My turbo has -6 fittings on it...and this has regular hose barbs. Let's fix that.

What I think I'll do...


Done and done. A hit of black spray paint to prevent corrosion and some arp moly lube on the threads. I used my old -6AN breather lines for mock up.


MORE ENGINE PROGRESS
Bolting more things up and torqing them via my PDF manual. If you notice there is a hole with no bolt in it... that is for the balance shaft pulley that I'm not using. I put a bolt in that hole later...don't worry


BLEEDING LIFTERS WITH DIESEL
Thanks to my Pregnant wife for fighting her gag reflex to snap these non-awe-inspiring photos me bleeding the lifters. You can see I used some steel filler rod and a Mobil1 jug cut in half for my special tools.


EVEN MORE ENGINE PROGRESS
Lash adjusters and rocker arms installed with copious amounts of Redline Assembly lube.

Got to hook up the MIVEC oil feed line.


Cam caps and hardware all cleaned (that diesel came in handy)

ESS-TRIZZLES! Thanks Curt Brown for the hookup.

Cam caps and hardware all super lubed with ARP moly lube (yes I wiped some off)

here I turned the engine 60 degrees past TDC to give me some valve clearance... bolted the cams in. I forgot to put the RTV on the end caps and had to remove the end caps to put some in there. OH well. Not a bad mistake to make.

My cam seal install tube. Schedule 10 1.5" diameter pipe. Worked like a charm with my rubber mallet.

Some random shots as I was leaving the garage Sunday night.


What's up next

I also had lunch with a buddy of mine this weekend. It was nice to talk to him and catch up. I also started looking at my Vi-PEC PnP wiring pinout and identifying what I/O's I want to keep, remove, or replace. Thanks to Mike C. for the emails relating to this exact issue.
To be clear I have the Evo IX PnP Vi-PEC box, not the v44... so I do have considerably more I/Os than the 44, but certainly less than the 88. I've already outgrown the number of inputs for the PnP box, so I'll be looking to wire in the v88 before too long. I'll share my excel screen shot of my pinout analysis when I complete it.
Also realized that I need to finish my fuel system hardline. It would be far easier to do with the engine out of the car, than in the car. So I need to get on that.
OIL PAN PROGRESS & COMPLETION
Here we are setting up the pan with toe clamps on the Cinci-port
Oil Pan installed. WITH RTV.
MIVEC LINE
MAP's Mivec adapter. Looks like they took an ARP nut and welded it to a metric fitting. Meh...it works.
This is what the MIVEC Banjo bolt (on the right) looks like. This needs to go into the block, it has a check valve in it. Might possibly be a restrictor too, I'm not sure.
ENGING BLOCK BSP PLUG RESULTS
n2oiroc and my initial assumptions were right. It's a 3/8" BSP plug. You CAN use the one you remove from your oil filter housing.
ENGINE BUILD PROGRESS
Just some pics of the engine Friday.
CYLINDER HEAD WORK
Cylinder head partially assembled.
Notice the deburred casting flash?
Notice the ported drain backs?
KIGGLY HLA INSTALL
Super simple Install. No gasket & no RTV. Better than a restrictor...this regulators the oil pressure supple to the Hydraulic lash adjusters. Keeps the oil where you need it and not pooled in the cylinder head.
Spark plugs (Evo 9 1 step colder)
Copper Anti-Seize.
Reason for the plugs and anti-seize... test fit shows that there is a sliver of aluminum dangling from the spark plug hole. I have couple picturs of the pre & post operation...as well as the trick tool I used
A really dull carpenters knife.Deburring the combustion chamber.
INSTALLING HEAD
This is something I noticed before putting the head...which I remembered from removing the head. That some of the washers for the head studs have to sit UNDER the spring. Which means if you want them to go on easy, put them on before the stud/head is installed. Here are three such examples.
My easy trick to installing the washers perfectly in their holes...
Cosworth 87mm Headgasket.
Head On. MAP H11 Head studs. Torqued to 95 lb-ft. 1/2" 12pt socket. Lots of moly lube. Torque sequence below.
FP Oil feed line plug. It's a shorter length so it doesn't block oil flow through the galley that is behind it.
WATER PUMP MODS
So the 4G64 block and the Evo water pump don't play well together. So I fixedi t by building up aluminum on the flange and then surfacing it afterwards.
1st hole that needs to be fixed
The Dy-NASTY 200dx.
Twin argon tanks. One for backpurge.
Ready for Carnage.
Lots of filler rod.
Oops. Missed a spot.
There I fixed it.
A little pre-mature installation of the coolant tube...
I WAS WRONG
An apology. I was telling people that this fitting would fit on the front of the block and could be used as a crank case ventilation port. I was wrong. THIS DOES NOT FIT... nor does the size smaller.
COOLANT LINES TO TURBO
Remember me saying, premature installation before? funny right? Well... here's why. My turbo has -6 fittings on it...and this has regular hose barbs. Let's fix that.
What I think I'll do...
Done and done. A hit of black spray paint to prevent corrosion and some arp moly lube on the threads. I used my old -6AN breather lines for mock up.
MORE ENGINE PROGRESS
Bolting more things up and torqing them via my PDF manual. If you notice there is a hole with no bolt in it... that is for the balance shaft pulley that I'm not using. I put a bolt in that hole later...don't worry
BLEEDING LIFTERS WITH DIESEL
Thanks to my Pregnant wife for fighting her gag reflex to snap these non-awe-inspiring photos me bleeding the lifters. You can see I used some steel filler rod and a Mobil1 jug cut in half for my special tools.
EVEN MORE ENGINE PROGRESS
Lash adjusters and rocker arms installed with copious amounts of Redline Assembly lube.
Got to hook up the MIVEC oil feed line.
Cam caps and hardware all cleaned (that diesel came in handy)
ESS-TRIZZLES! Thanks Curt Brown for the hookup.
Cam caps and hardware all super lubed with ARP moly lube (yes I wiped some off)
here I turned the engine 60 degrees past TDC to give me some valve clearance... bolted the cams in. I forgot to put the RTV on the end caps and had to remove the end caps to put some in there. OH well. Not a bad mistake to make.
My cam seal install tube. Schedule 10 1.5" diameter pipe. Worked like a charm with my rubber mallet.
Some random shots as I was leaving the garage Sunday night.
What's up next
I also had lunch with a buddy of mine this weekend. It was nice to talk to him and catch up. I also started looking at my Vi-PEC PnP wiring pinout and identifying what I/O's I want to keep, remove, or replace. Thanks to Mike C. for the emails relating to this exact issue.
To be clear I have the Evo IX PnP Vi-PEC box, not the v44... so I do have considerably more I/Os than the 44, but certainly less than the 88. I've already outgrown the number of inputs for the PnP box, so I'll be looking to wire in the v88 before too long. I'll share my excel screen shot of my pinout analysis when I complete it.
Also realized that I need to finish my fuel system hardline. It would be far easier to do with the engine out of the car, than in the car. So I need to get on that.
Last edited by R/TErnie; Apr 2, 2012 at 02:19 PM.
Apr 2, 2012, 02:38 PM
#160
Looks incredible, man.
Question...I picked up the 12mmx1.5 banjo bolt with a 12mm to -6an banjo fitting.
Does your above post imply that the bolt hole is not 12mm or that the Holley fitting doesn't work? Hopefully the latter, as I had to special order that 12mm to -6an fitting.
Looks great!
Question...I picked up the 12mmx1.5 banjo bolt with a 12mm to -6an banjo fitting.
Does your above post imply that the bolt hole is not 12mm or that the Holley fitting doesn't work? Hopefully the latter, as I had to special order that 12mm to -6an fitting.
Looks great!
The following users liked this post:
ixbreaker (May 29, 2016)
Apr 2, 2012, 04:10 PM
#162
Thank you mang.
I picked up all of my fittings and will be modifying my head for the 1/2" NPT to -10AN fittings, as well as running the -6AN banjo fitting from the crankcase breather.
What are your thoughts on the MAP Water Pump adapter?
Keep on keepin' on.
I picked up all of my fittings and will be modifying my head for the 1/2" NPT to -10AN fittings, as well as running the -6AN banjo fitting from the crankcase breather.
What are your thoughts on the MAP Water Pump adapter?
Keep on keepin' on.
 Apr 2, 2012, 05:23 PM
#165
Such a nice build thread man! Nothing is being overlooked here!
Thats a little disappointing on Map's mivec adapter, especially for the price lol. I just drilled and tapped my 8 block for mivec.
I check this thread everyday and enjoy reading up on it!
Thats a little disappointing on Map's mivec adapter, especially for the price lol. I just drilled and tapped my 8 block for mivec.
I check this thread everyday and enjoy reading up on it!