
My True DIY 03 Evo 8 Build, Lots of detail with Many pictures.

 Dec 11, 2012, 03:04 PM
#32
Newbie
Thread Starter
Hey jeffbeagley
I actually bought it from Luxury Imports in Leavenworth Kansas, In cash. I don't recommend this dealership by any means. From what I understand they bought it at an action locally.(KC area) Given the relatively close proximity it is possible the owner lived in Springfield.
Feb 28, 2013, 08:50 AM
#34
Newbie
Thread Starter
 Mar 22, 2013, 04:45 PM
#37
Newbie
Thread Starter
Hey Evolutionm.
Hey peeps like I said to blue I have not yet finished the wiring yet or decided a turbo but I did do some motor mount work.
I purchased Torque solutions Evo 8 both sides and the front trans mount I also purchased their shift cable bushings. I ordered them on Wednesday and received them by Saturday AM I was very pleased I am in Missouri so not bad for shipping time. I will discuss quality later as it will require pictures to do so. (stay tuned)
I decided to re-use my factory mounts instead of buying new ones for many reasons. I pressed out the factory mount bushing inserts with the shop press, and began to prep them for powder coat.
On the cam side mount there is a tab for the p/s hose to be mounted. I will be relocating the p/s hose and reservoir later, so I cut off the tab carefully and filled the hole that was left after with JB Weld metal filler. I then sandblasted all the mounts after I removed their bushings
I sandblasted them with 220 Silica free black diamond sand I though this sand would be abrasive enough to roughen up the surface of the front trans and driver side mounts to hold the powder. It did just fine but in regards to the Passenger side mount the black Diamond sand broke down the Jb weld more then I wanted
Now During the powder coating process I wanted to lay the powder on thick so It will fill in the casting of the cam side mount so that it would be smooth like the others. unfortunately it didn't as well as I wanted. I will let you guys tell me what you think.
Now here are some pictures of the powder coated mounts and after I will discuss the quality of the mounts that I have experienced thus far as I said I would eailer.
Sandblasted


After Powder Coating


Ok as I said before I would talk about 1 issue I have with the torque solutions mounts thus far. The 2 side mounts (cam & driver side) mounts are all the same 1 molded urethane 75a on the drivers front portion of the mount the urethane needs to be notched for fitment identified in figure the below as POINT 2. Point 1 is what happens when you use the the mounts in the other locations you get the same notch exposed when using them on the other mounts. Not visually appealing in my opinion but it keeps the manufacture from making more then 1 cast thus allow manufacturing cost low.

My Buddy and I are looking to get back into powder coating so if you would like something coated (small items) such as these mounts we can do so at low cost And I can safely remove the factory bushings for you properly and safely by pressing them out (rather then cutting or torching)and i repress them back in after coating. PM me for more information.
Opinions, Comments, Ideas All welcome
Thanks,
Steven

Last edited by s240ka24t; Aug 16, 2014 at 06:49 AM.
Mar 28, 2013, 05:07 PM
#38
Newbie
Thread Starter
Hey evolutionm,
I notice alot of people have been checking in, but not many people are commenting. Anyone have any ideas comments or things that they would like to see done in the general area as pre engine installation?
I will be doing some brake line work master cylinder (booster Delete) as my next step, as well as p/s tank and line reroute and relocation.
Steven,
Mar 28, 2013, 10:26 PM
#39
Looking good man. Id like to see your tucked harness. Did you delete the abs? Did you just call P-R-S and told them what your doing? would you care to message me the part numbers on the connectors and pins? i been debating about doing my harness. Id wanna do it right if i tear it out of my car.
Mar 30, 2013, 12:03 PM
#40
Newbie
Thread Starter
Looking good man. Id like to see your tucked harness. Did you delete the abs? Did you just call P-R-S and told them what your doing? would you care to message me the part numbers on the connectors and pins? i been debating about doing my harness. Id wanna do it right if i tear it out of my car.
I haven't gotten to that point to start pinning into the bulkhead connector as the engine is still out. Once the engine goes back in I will do a FULL Mil-spec post. As for the Connector Information (part #'s) I sent you a PM. Stay tuned Thanks for the compliments it helps me stay motivated.
Steven,
Apr 8, 2013, 10:43 AM
#41
Newbie
Thread Starter
Welcome back followers,
I know everyone is eager to see how the wiring came out but I'm just not to that point yet. I am still finishing up the chassis for the engine to go in.
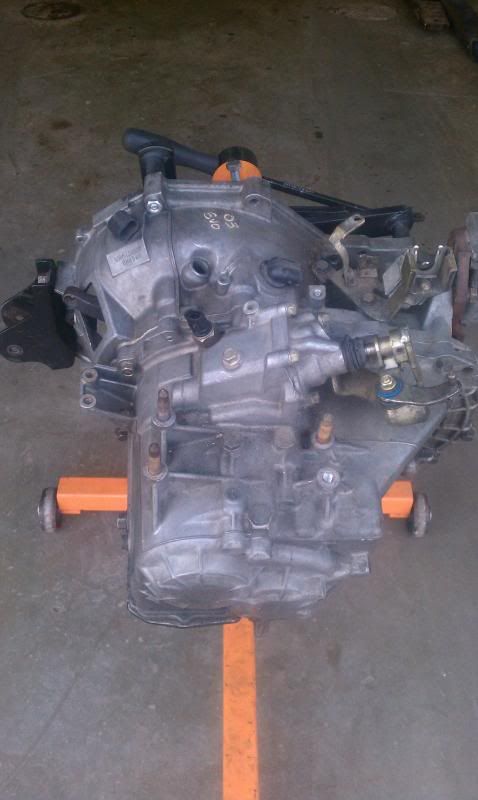
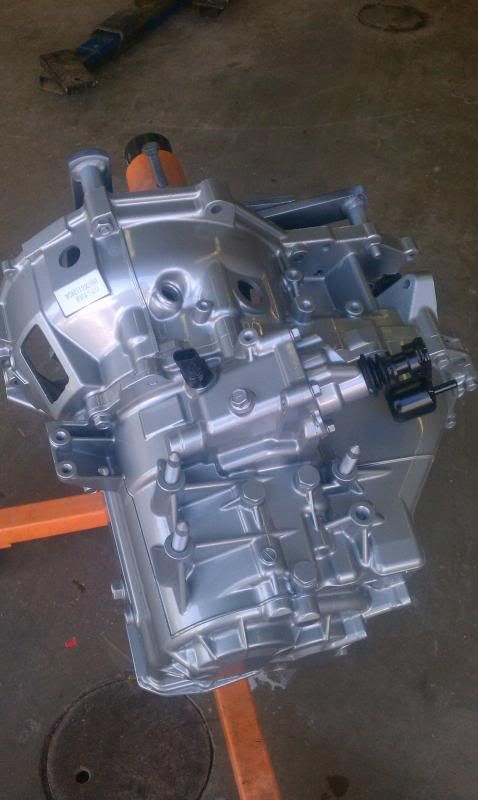
I just recently finished up the transmission clean up.after removing all removable hardware, I started by Pressure washing it with some purple power, I expected it not to go to well, but actually it wasn't bad. But there was still some debris in the nooks and crannies of the trans case. So I got some foaming aerosol engine degreaser from the auto parts store and a solvent resent hard brissle brush I began to clean vigorously, and rinsed it down with distilled water.(less Iron) I let it dry and began to prep the surface for base coat paint with a self acid etching self leveling epoxy Primer in a aerosol can. evidently not many aerosol cans have acid but I found one that did. Great product I might add*. Then laid down a couple coats of Duplicolor High heat aluminum and then with Clear. Pictures below.
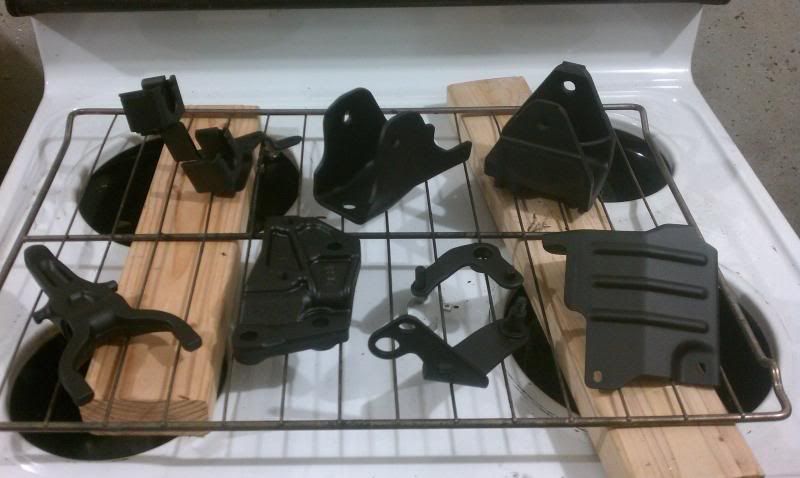
I then took all the removable items such as mounts brackets ect. And powder coated them in a Matte Black. The sifter did not remove from the transmission with full tear down so i Used again the acid primer and VHT epoxy primer in black color. On that
~*I will get the acid epoxy primer product information up shortly.~
Here are some pictures


Powder coating

Finished Product


Thanks,
Steven
I know everyone is eager to see how the wiring came out but I'm just not to that point yet. I am still finishing up the chassis for the engine to go in.
I just recently finished up the transmission clean up.after removing all removable hardware, I started by Pressure washing it with some purple power, I expected it not to go to well, but actually it wasn't bad. But there was still some debris in the nooks and crannies of the trans case. So I got some foaming aerosol engine degreaser from the auto parts store and a solvent resent hard brissle brush I began to clean vigorously, and rinsed it down with distilled water.(less Iron) I let it dry and began to prep the surface for base coat paint with a self acid etching self leveling epoxy Primer in a aerosol can. evidently not many aerosol cans have acid but I found one that did. Great product I might add*. Then laid down a couple coats of Duplicolor High heat aluminum and then with Clear. Pictures below.
I then took all the removable items such as mounts brackets ect. And powder coated them in a Matte Black. The sifter did not remove from the transmission with full tear down so i Used again the acid primer and VHT epoxy primer in black color. On that
~*I will get the acid epoxy primer product information up shortly.~
Here are some pictures


Powder coating


Finished Product


Thanks,
Steven
Last edited by s240ka24t; Aug 16, 2014 at 07:00 AM.


 Apr 8, 2013, 08:14 PM
#45
Newbie
Thread Starter
Hello Followers
Thanks for your compliments, it helps me stay motivated. I updated the photos I was having trouble with photobucket. Keep following many things to arise this spring.
~Steven
Thanks for your compliments, it helps me stay motivated. I updated the photos I was having trouble with photobucket. Keep following many things to arise this spring.
~Steven