
Mark this thread as Unsold
Buschur's Quick-Release Harness Bar Final Production Run
 May 13, 2012, 10:02 AM
#241
Oh and no need to put the little washer back on. There is a install guide on the high boost forums or something like that. Can't remember the name of the site but I'm sure someone can correct me. Not on this forum to often so I never saw your question.
Buschur will you guys offer another set of push pins for sale?
Buschur will you guys offer another set of push pins for sale?
 May 13, 2012, 02:14 PM
#242
how did you guys get the bolt out of the seatbelt asssembly? After all the plastic is off? I'm assuming I'm to replace the bolt in the seatbelt with one of the bolts that came with the kit - 4 long ones with a smooth part and 2 with a nut partially on it.. right?

one of you who bought and installed this, help me out i started this group buy
Just to check - did you guys put a washer before putting the retainer ring back? or add one of the thicker ones that was provided with the kit? not sure what the design is to be

one of you who bought and installed this, help me out i started this group buy
Just to check - did you guys put a washer before putting the retainer ring back? or add one of the thicker ones that was provided with the kit? not sure what the design is to be
FYI - here's where I am:
everything taken apart:

OEM spinning thing back into the assembly:

Back onto the seatbelt thing:

and Buschur-supplied bolt in:

After this, I've tried pretty much every combination of washers etc including purchasing different ones, but nothing retains the function of the seatbelt assembly being able to spin, since the retaining washer cannot reach the end of the bolt (smooth area is thicker). Also still having a problem getting the quick release bolt through - i cant be doing that wrong... is it maybe that the paint is too thick?
Last edited by kyoo; May 13, 2012 at 02:47 PM.
May 13, 2012, 02:55 PM
#243
Kyoo you will have to use a file to open it up some. They thought I was crazy when I said they didn't fit as they said they made the holes in house and checked them but clearly they weren't checked. So just take your time to file it a little so that the push pins will fit and not be too loss are else it will take away from the whole idea of a tight fit.
Oh and no need to put the little washer back on. There is a install guide on the high boost forums or something like that. Can't remember the name of the site but I'm sure someone can correct me. Not on this forum to often so I never saw your question.
Buschur will you guys offer another set of push pins for sale?
Buschur will you guys offer another set of push pins for sale?
May 13, 2012, 03:08 PM
#244
I don't think it was built to be able to keep that part spinning that is why nothing you do is giving that functionality back. You have to get a file that goes on the end of a drill that looks like a upside down cone. But don't use the drill just hold the bit and spin it back and forth with you hand. Then do the underside. Take your time so that you don't sand off your finish. Then try to push the pin in after to see if you need more sanding. You don't want to make it much bigger than you need...
May 14, 2012, 08:34 AM
#245
I don't think it was built to be able to keep that part spinning that is why nothing you do is giving that functionality back. You have to get a file that goes on the end of a drill that looks like a upside down cone. But don't use the drill just hold the bit and spin it back and forth with you hand. Then do the underside. Take your time so that you don't sand off your finish. Then try to push the pin in after to see if you need more sanding. You don't want to make it much bigger than you need...
My pins are fitted in now but very hard to come out, but I think after several in and out they will fit better.
May 14, 2012, 08:40 AM
#246
how did you guys get the bolt out of the seatbelt asssembly? After all the plastic is off? I'm assuming I'm to replace the bolt in the seatbelt with one of the bolts that came with the kit - 4 long ones with a smooth part and 2 with a nut partially on it.. right?
one of you who bought and installed this, help me out i started this group buy
Just to check - did you guys put a washer before putting the retainer ring back? or add one of the thicker ones that was provided with the kit? not sure what the design is to be
one of you who bought and installed this, help me out i started this group buy
Just to check - did you guys put a washer before putting the retainer ring back? or add one of the thicker ones that was provided with the kit? not sure what the design is to be
There is a washer hold the bolt in place you will have to find a thing to pull that washer out or destroy it to let the original bolt out.
I have all the issues you guys described, but I finally get it done literally takes me a whole afternoon to figure it all out
May 14, 2012, 03:39 PM
#248
and just to confirm, from what people said this setup will not allow the seatbelt assembly portion to rotate as stock, correct?
May 14, 2012, 05:42 PM
#250
I hate to do this but since the install is essentially the same here is a link to Sparco's instructions:
http://www.sparcousa.com/resourceFiles/48.pdf
You just need a little file to knock the powder coating out of the holes, shipping it back is silly.
Yes, the seat belt still rotates.
http://www.sparcousa.com/resourceFiles/48.pdf
You just need a little file to knock the powder coating out of the holes, shipping it back is silly.
Yes, the seat belt still rotates.
May 14, 2012, 09:04 PM
#251
I hate to do this but since the install is essentially the same here is a link to Sparco's instructions:
http://www.sparcousa.com/resourceFiles/48.pdf
You just need a little file to knock the powder coating out of the holes, shipping it back is silly.
Yes, the seat belt still rotates.
http://www.sparcousa.com/resourceFiles/48.pdf
You just need a little file to knock the powder coating out of the holes, shipping it back is silly.
Yes, the seat belt still rotates.
forgive my stupidity; how does the belt still rotate? i've tried every combination of washer retainer washer etc but it will just not rotate. basically i can't put the retainer washer on right after i put the bolt on because of that thick smoother area, so i put on another nut and then the retainer washer, then the harness bar holder but it will not spin. any other combination won't spin.
the "problem" that i have with mine is that the smooth part of the supplied bolt (step 3 for the sparco case) is too long for the retainer washer to reach all the way to the end to that intermediate nut hat.. i guess i will just take it to a shop, i'm clearly incapable of this fairly basic task (no sarcasm) just not sure the way things are suppsoed to go
Last edited by kyoo; May 14, 2012 at 09:07 PM.
May 20, 2012, 07:24 PM
#252
I hate to do this but since the install is essentially the same here is a link to Sparco's instructions:
http://www.sparcousa.com/resourceFiles/48.pdf
You just need a little file to knock the powder coating out of the holes, shipping it back is silly.
Yes, the seat belt still rotates.
http://www.sparcousa.com/resourceFiles/48.pdf
You just need a little file to knock the powder coating out of the holes, shipping it back is silly.
Yes, the seat belt still rotates.
Since I'm most likely about to order a Schroth harness this week, do you mind if I send you the two flanges to be dremeled down for fitment? I'd rather not be liable for that sort of thing since I don't really have any ability or experience with that.. and I know if I mess it up I'm SOL
Is it also possible to provide a definitive order for the seatbelt assembly, nuts, and bolts you provided so that the seatbelt assembly will keep rotating with it installed? most people are saying they were not able to keep the seatbelt assembly rotating.. I'm sure there's something we're not understanding, and the sparco install instructions do not really apply for our particular combination of nuts and bolts.. for a general guide it's fine and I can put it together but I lose the rotation of the seat belt assembly.
:edit: here is the definitive order since it was on the other site:


still having a couple issues though
Last edited by kyoo; May 20, 2012 at 08:59 PM.
May 20, 2012, 07:36 PM
#253
Evolved Member
iTrader: (20)

Join Date: Mar 2009
Location: Big city, Bright lights
Posts: 2,389
Likes: 0
Received 11 Likes
on
10 Posts
David,
Since I'm most likely about to order a Schroth harness this week, do you mind if I send you the two flanges to be dremeled down for fitment? I'd rather not be liable for that sort of thing since I don't really have any ability or experience with that.. and I know if I mess it up I'm SOL
Is it also possible to provide a definitive order for the seatbelt assembly, nuts, and bolts you provided so that the seatbelt assembly will keep rotating with it installed? most people are saying they were not able to keep the seatbelt assembly rotating.. I'm sure there's something we're not understanding, and the sparco install instructions do not really apply for our particular combination of nuts and bolts.. for a general guide it's fine and I can put it together but I lose the rotation of the seat belt assembly.
i really think your over thinking this all. the sparco pictures make it pretty obvious imho (ill let you know for sure after i do it tomorrow lol).
im not 100% certain on the hardware selection thats included, but you can see from the sparco doc where the thick spacer goes, and im planning on use the rest of the stock bolts.
also, heres the page off highboost since its back.
http://highboostforum.com/forum/show...575#post182575
Last edited by killerpenguin21; May 20, 2012 at 07:44 PM.
May 20, 2012, 07:47 PM
#254
^^^^ Great!! Thanks for that link - gonna run down the car now - I've been reusing the stock inner nut that fit inside the seatbelt assembly
tell me after you do it - the problem is the smooth portion on the provided bolt si too thick and doesnt let you slip the retaining washer all the way down, and any other combination locks it up so that once you tighten it down enough the seatbelt assembly will not rotate. i'd love to be wrong on this so post pictures once you get it done.
it's obvious what should to be done from the sparco guide - what's not obvious is the particular setup with our nuts and bolts, and that's exactly what the issue is.. i didn't spend 10 minutes trying this and that, i spent two hours trying every single order possible and even buying new/different washers.. as for the filing.. i guess i could go out and buy something to file the holes down... but it's not something I should have to or am comfortable with doing, and David even said Nick is supposed to check each one of them. What kind of file are we talking about here? I'm assuming it's not a nail file - something like this http://www.amazon.com/TEKTON-66631-8...7568416&sr=8-1 ?
i fixed my brackets tonight, took literally 4 minutes to fix both. you just need to knock off the powder coat in the holes till you see bare metal. i literally ran a round rat tail file over it with little to no pressure.
i really think your over thinking this all. the sparco pictures make it pretty obvious imho (ill let you know for sure after i do it tomorrow lol).
im not 100% certain on the hardware selection thats included, but you can see from the sparco doc where the thick spacer goes, and im planning on use the rest of the stock bolts.
it's obvious what should to be done from the sparco guide - what's not obvious is the particular setup with our nuts and bolts, and that's exactly what the issue is.. i didn't spend 10 minutes trying this and that, i spent two hours trying every single order possible and even buying new/different washers.. as for the filing.. i guess i could go out and buy something to file the holes down... but it's not something I should have to or am comfortable with doing, and David even said Nick is supposed to check each one of them. What kind of file are we talking about here? I'm assuming it's not a nail file - something like this http://www.amazon.com/TEKTON-66631-8...7568416&sr=8-1 ?
Last edited by kyoo; May 20, 2012 at 07:50 PM.
May 20, 2012, 08:08 PM
#255
i fixed my brackets tonight, took literally 4 minutes to fix both. you just need to knock off the powder coat in the holes till you see bare metal. i literally ran a round rat tail file over it with little to no pressure.
i really think your over thinking this all. the sparco pictures make it pretty obvious imho (ill let you know for sure after i do it tomorrow lol).
im not 100% certain on the hardware selection thats included, but you can see from the sparco doc where the thick spacer goes, and im planning on use the rest of the stock bolts.
also, heres the page off highboost since its back.
http://highboostforum.com/forum/show...575#post182575
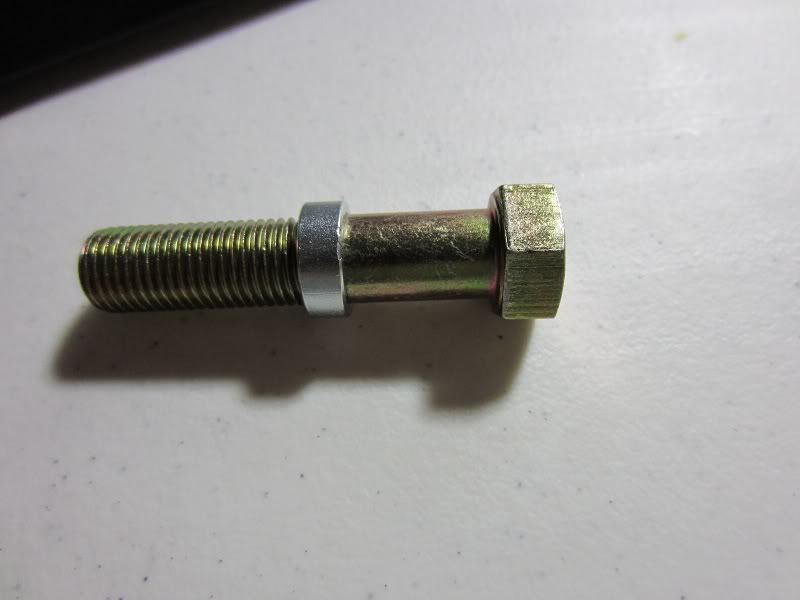
and fyi the large supplied washer will go all the way to the end of the supplied bolt
edit, this will slip all the way down.
Last edited by kyoo; Sep 6, 2012 at 08:57 AM.