
Aquamist HFS-6 installed and running. :)
 May 9, 2009 | 06:49 AM
#17

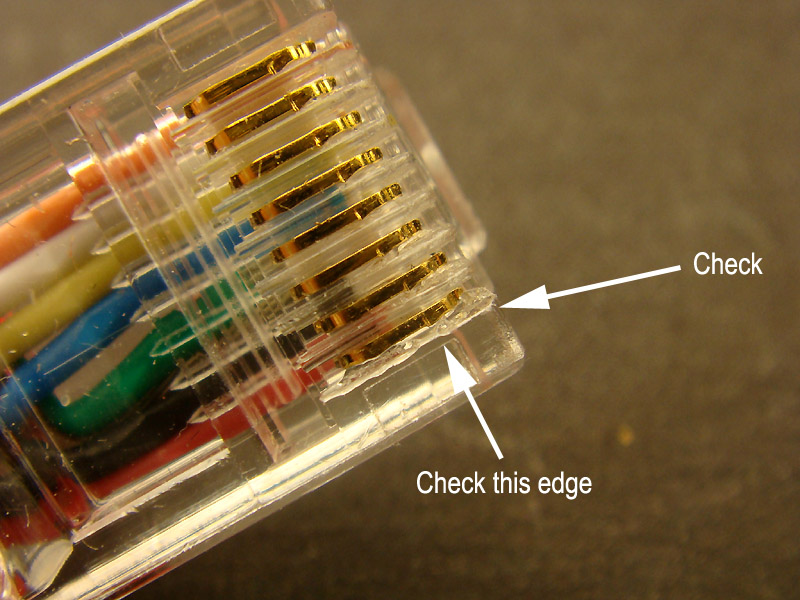
I did check that. Pins look perfectly fine, and there are no debris what so ever.
Kit has been working for 2 days that way, but i am somewhat sure that it will stop again once i move it wires. I will have the fiddle around again to make it work.
Oh and i'm currently not using any failsafe. Didn't make up my mind yet. I'm gonna be using either alt-map, or a 3-port solenoid in parallel with my mbc.
The flared edges may cause contact mis-alignment and hence bad connection.
I managed to take some close-up pictures, with arrows. Ignore the cable colours - not from a HFS-6.
Last edited by Richard L; May 9, 2009 at 06:56 AM.
May 25, 2009 | 04:05 AM
#18
Jamal from HBspeed has posted his install of the HFS6 system on our forum, I "copy and paste" it here as a reference although it is not an EVO but useful to know how he tackle the install and skillfully fabricated the tank bracket....
I'm almost done with my first HFS-6 install, which is going in an 08 STi.
Here's the car:

Here's the fancy new HFS-6 control board, which goes in the glove box:


I suppose I will wrap that wiring up a bit. Moving rearward to the hatch we have this mess going on:

If I could tig weld this would be done already. Here's the tank and partially completed mounting frame:

Yeah, it's 4 gallons. Or 15l for you metric system using people.
Moving all that water/meth is the new 160psi pump featuring compression fittings:


The line and wiring harness to the rear are tucked under the passenger floor along with the fuel lines. There are even convenient extra tabs to mount the line:

From there the wiring harness travels into the glove box and the pump power wire and tubing go through the main harness grommet into the engine bay with the flow control unit harness. The flow control unit is mounted to the firewall. A 90 degree fitting for the inlet would make this work a lot better.


Here's the engine bay and ATP 3076 turbo:


Okay well that's all for now. Once the bracketry is welded up I can get the hatch finished and the car will be tuned tomorrow.
Well, the car is finished and here are the pictures I took today. I'll start with the pump.
Mounting bracket and pump location:


And yes, I tapped some M5x0.9 holes so I could just bolt it right down.
Then I got a little crazy with the split loom and spiral wrap to protect the meth line and clean up the wiring:


Jon welded up the rest of my bracketry so all I had to do was paint it, bolt it in place, strap down the tank, and make the floor fit around it:


After testing for leaks, we filled the tank with a 50/50 mix and it went on the dyno:

Previously the car made 361 whp on 91 octane with 21 pounds of boost. Now with 21 psi it makes 390whp. Going farther on the stock map sensor means there is no boost cut, so we left it there for now. Later on I'm sure we'll put in a new MAP sensor and see what it will really do. This is a stock engine, though, so we're reluctant to push too far. Stupid stock pistons.
Impressions:
I like the HFS-6. A lot.
Wiring up the HFS-5 board never bothered me, and in fact I liked doing it because each installation was custom and all the wires were exactly the right length. With the HFS-6, I have to say the RJ connectors for everything is very nice. Having most of the harnesses pre-set in length worried me a bit, but I ended up with very little extra wiring to deal with. Most of the extra on the trunk harness, and it's just zip-tied together and tucked under the tank. Aside from the tank fabrication, the installation was quick and easy. The fact that I've installed plenty of aquamist kits helped, but I am really impressed to have had no issues whatsoever with the installation of ths brand new product. This one came out of the group buy and must be one of the first to be installed and tuned. I've previously had some issues with the HFS-5, like getting the boost cut to work without throwing a CEL, systems that reset when the lights were turned on, and had a trip-adj pot reversed. All I have to say is this is a really, really great kit. Thanks Richard.
Also, I suppose I could post this up on some Subaru forums.
I'm almost done with my first HFS-6 install, which is going in an 08 STi.
Here's the car:

Here's the fancy new HFS-6 control board, which goes in the glove box:


I suppose I will wrap that wiring up a bit. Moving rearward to the hatch we have this mess going on:

If I could tig weld this would be done already. Here's the tank and partially completed mounting frame:

Yeah, it's 4 gallons. Or 15l for you metric system using people.
Moving all that water/meth is the new 160psi pump featuring compression fittings:


The line and wiring harness to the rear are tucked under the passenger floor along with the fuel lines. There are even convenient extra tabs to mount the line:

From there the wiring harness travels into the glove box and the pump power wire and tubing go through the main harness grommet into the engine bay with the flow control unit harness. The flow control unit is mounted to the firewall. A 90 degree fitting for the inlet would make this work a lot better.


Here's the engine bay and ATP 3076 turbo:


Okay well that's all for now. Once the bracketry is welded up I can get the hatch finished and the car will be tuned tomorrow.
Well, the car is finished and here are the pictures I took today. I'll start with the pump.
Mounting bracket and pump location:


And yes, I tapped some M5x0.9 holes so I could just bolt it right down.
Then I got a little crazy with the split loom and spiral wrap to protect the meth line and clean up the wiring:


Jon welded up the rest of my bracketry so all I had to do was paint it, bolt it in place, strap down the tank, and make the floor fit around it:


After testing for leaks, we filled the tank with a 50/50 mix and it went on the dyno:
Previously the car made 361 whp on 91 octane with 21 pounds of boost. Now with 21 psi it makes 390whp. Going farther on the stock map sensor means there is no boost cut, so we left it there for now. Later on I'm sure we'll put in a new MAP sensor and see what it will really do. This is a stock engine, though, so we're reluctant to push too far. Stupid stock pistons.
Impressions:
I like the HFS-6. A lot.
Wiring up the HFS-5 board never bothered me, and in fact I liked doing it because each installation was custom and all the wires were exactly the right length. With the HFS-6, I have to say the RJ connectors for everything is very nice. Having most of the harnesses pre-set in length worried me a bit, but I ended up with very little extra wiring to deal with. Most of the extra on the trunk harness, and it's just zip-tied together and tucked under the tank. Aside from the tank fabrication, the installation was quick and easy. The fact that I've installed plenty of aquamist kits helped, but I am really impressed to have had no issues whatsoever with the installation of ths brand new product. This one came out of the group buy and must be one of the first to be installed and tuned. I've previously had some issues with the HFS-5, like getting the boost cut to work without throwing a CEL, systems that reset when the lights were turned on, and had a trip-adj pot reversed. All I have to say is this is a really, really great kit. Thanks Richard.
Also, I suppose I could post this up on some Subaru forums.
May 30, 2009 | 05:24 PM
#19
grats with the install. by the way im trying to get around to getting mine installed and tuned. i went to just have the gauge setup with my sterring colom mount so i can have it ready since im moving my boost gauge their aa well but it wont fit. did you have a similer problem cause i thought it was supposed to be 52mm not larger.
May 30, 2009 | 06:40 PM
#20

Thread Starter
Evolving Member
iTrader: (2)
Joined: Sep 2007
Posts: 214
Likes: 0
From: Florida / Lebanon
@Zodiac, didn't have any problems with the gauge... I used an stri 52mm pod iirc, installed it on my steering column, towards the left.
will have pics and vids of the whole setup up soon..
will have pics and vids of the whole setup up soon..

 Jul 29, 2009 | 09:52 AM
#23
Thanks for sharing the install pics Richard.
Question if you got a minute. For an evo on a stock IX turbo w/ stock injectors, what nozzle(s) do you recommend? Also, where is the best place to tap the UICP for them? thanks. Cant wait 'till this weekend to install the HFS-6.
Question if you got a minute. For an evo on a stock IX turbo w/ stock injectors, what nozzle(s) do you recommend? Also, where is the best place to tap the UICP for them? thanks. Cant wait 'till this weekend to install the HFS-6.
Jul 30, 2009 | 09:12 AM
#24
Thanks for sharing the install pics Richard.
Question if you got a minute. For an evo on a stock IX turbo w/ stock injectors, what nozzle(s) do you recommend? Also, where is the best place to tap the UICP for them? thanks. Cant wait 'till this weekend to install the HFS-6.
Question if you got a minute. For an evo on a stock IX turbo w/ stock injectors, what nozzle(s) do you recommend? Also, where is the best place to tap the UICP for them? thanks. Cant wait 'till this weekend to install the HFS-6.

 May 7, 2011 | 01:16 AM
#27
What is the serial number of your system, it is on the label on top of the FCM unit. This problem has been addressed and eradicated from prodcution years ago.
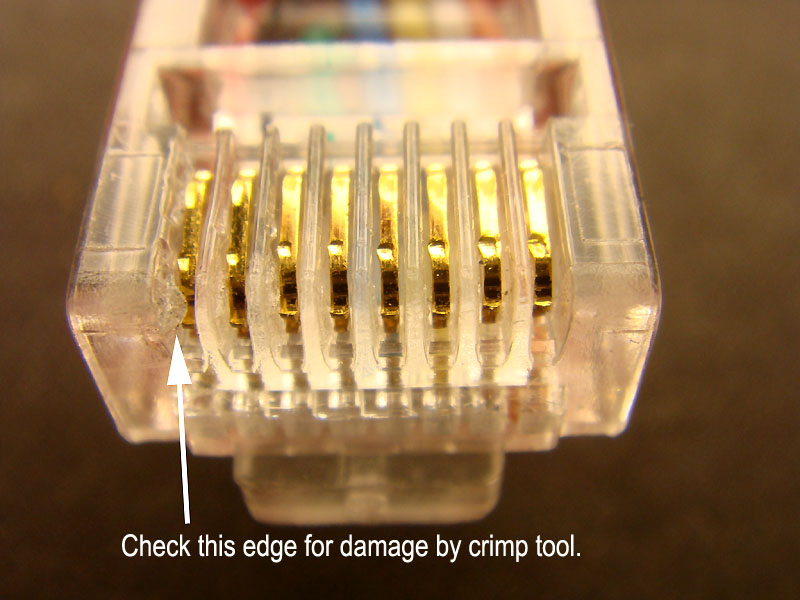
Send me a close-up picture of the connector. the overhang can be scrape off with a small knife.
Send me a close-up picture of the connector. the overhang can be scrape off with a small knife.
Last edited by Richard L; May 7, 2011 at 01:19 AM.
May 7, 2011 | 07:46 AM
#28
The cable end doesn't appear to have any damage. but once the car gets into boost mid pull the red plug light turns off, then i have the water level light on the gauge unit turn yellow and i have to disconnect/ fiddle around with the red plug to get the system opperational again.